We often encounter customers with business continuity goals which require XenDesktop user VMs to be available to users in the event of a full site failure. A passive DR failover configuration is often not desirable because customers want to be able to leverage their hardware investment in a secondary data center. This leads to requests to architect a XenDesktop environment with active/active data center capability leveraging Global Server Load Balancing (GSLB) for XenDesktop. Using Citrix NetScaler, it’s quite easy to run through the wizard driven interface and create a GSLB active/active XenDesktop environment that will send users to one data center or another based upon proximity, fastest response time, availability, etc… However, there are two big catches… How do we handle the user data and how do we find disconnected sessions across multiple data centers?
Well, the user data is easy as there’s data replication for that, right? Sure there is, but it’s not instantaneous – replication could take hours, not seconds. And what about file lock issues? What’s going to happen when the user’s profile or documents are out of date? What’s going to happen when they log in during the morning and get a desktop from one data center, log out at lunchtime, and then log in and get a desktop from another data center in the afternoon? For an in-depth review of the many considerations around active/active XenDesktop deployments, see XenDesktop, GSLB & DR – Everything you think you know is probably wrong! written by my colleague Martin Zugec.
My colleague Dan Allen and I have recently had to design active/active XenDesktop deployments for several customers. In this blog I will walk you through how we approached the design and successfully implemented the active/active solution.
So how do we deliver desktops to users in an active/active GSLB deployment? We ultimately create two separate active/passive deployments and assign the users to a preferred active data center, dividing users equally by Active Directory groups. In this configuration, users that are “homed” or assigned to Data Center 1 will always receive a desktop in Data Center 1 unless it is unavailable. Likewise, users that are “homed” to Data Center 2 will always receive a desktop in Data Center 2 unless it is unavailable. If neither data center is available… well we’re probably experiencing the zombie apocalypse and we all have bigger problems than desktop availability. 😉
This article will provide the high-level design and explain the key configurations to enable active/active GSLB for XenDesktop pooled desktops using Citrix NetScaler in a “homed user” configuration. Also, stay tuned for Part 2 of this series which will provide more in-depth details and sample templates to help you quickly get a baseline configuration up and running. Finally, this article assumes the reader is already familiar with XenDesktop, NetScaler, NetScaler Gateway, and NetScaler GSLB concepts. If a refresher is required, I recommend reading through these references before proceeding:
NetScaler Global Server Load Balancing Primer
Creating Groups for LDAP Group Extraction
Deployment Guide ICA Proxy for XenApp – Access Gateway Enterprise Edition
Getting Started with XenDesktop 7
Before I jump into the specifics of this configuration, I have to give credit to my friend and colleague, Dan Allen for his thought leadership and guidance along the way. Additionally, my core focus is as a Senior Architect for virtualization, not networking. I’m sure there are many super smart NetScaler gurus out there that can suggest several alternative approaches involving Content Switching, AAA vservers, custom monitors, etc. This article is covering one approach that uses the basic building blocks of server load balancing and GSLB which can be implemented by Citrix virtualization admins with a medium to advanced skill level. It also assumes that all users are accessing pooled desktops. With that, let’s get started…
Approach
The approach outlined in this article can be used with or without ICA proxy through the NetScaler Gateway. For the purposes of this document, the configuration will assume ICA proxy is desired; however, if this was an internal deployment without ICA Proxy, nothing would fundamentally change with the design as NetScaler Gateway would still be used as the entry point. If ICA Proxy is not desired, then simply configure the Web Interfaces sites as Direct for the access method but still keep the authentication at Access Gateway. Additionally, because we are going to direct users to a “preferred” or “home” data center based on group membership, NetScaler needs to know who the user is and what groups they are a member of. Therefore, authentication must be performed at the NetScaler and group extraction will be used to determine the user group memberships. Explicit authentication of users to Active Directory (single domain) is also assumed; however, multiple domains and Smart Card authentication will also work as well. Finally, this approach will not work with Web Interface Services sites (PNAgent functionality). For implementing highly available access to applications delivered via StoreFront, there are new StoreFront specific features that can be leveraged, but that is a conversation for another day!
Building Blocks
The following configuration items will be used:
- There are two separate data centers with separate and independent XenDesktop Sites in each data center; DC1, DC2.
- Users are assigned to an active directory group “homing” them to DC1 or DC2.
- There is an HA pair of NetScaler Enterprise or Platinum in each data center with GSLB where the NetScaler is configured as authoritative for a GSLB sub domain.
- Three NetScaler Gateway GSLB vservers are configured as follows on the HA pairs in each data center:
- desktop.company.com: This is the NetScaler Gateway vserver providing the URL/FQDN that users enter into their browser in order to locate their desktop. This URL is configured for active/active GSLB across both DC1 and DC2. Load balancing will be based upon health monitoring and fastest response time.
- dc1-desktop.company.com: This is a vserver that specifically refers to a NetScaler Gateway instance hosted in DC1. This vserver will be used to route ICA Proxy traffic to the DC1 NetScalers regardless of user location. This vserver will be configured in an active/passive GSLB configuration across both data centers where traffic will only be routed to DC2 in the event that DC1 is inaccessible.
- dc2-desktop.company.com: This is a vserver that specifically refers to a NetScaler Gateway instance hosted in DC2. This vserver will be used to route ICA Proxy traffic to the DC2 NetScalers regardless of user location. This vserver will be configured in an active/passive GSLB configuration across both data centers where traffic will only be routed to DC1 in the event that DC2 is inaccessible.
- An additional vserver will be created on each HA pair of NetScalers at each data center so that the originating NetScaler can be located for Web Interface callback authentication. Since each call back authentication must go back to the original NetScaler, GSLB will not be used on these vservers.
- dc1-callback.company.com (HA pair in DC1)
- dc2-callback.company.com (HA pair in DC2)
- At least one pair of Web Interface / StoreFront servers at each data center
- Multiple NetScaler load balancing vservers will be created to provide access to the Web Interface servers.
- All Web Interface sites are created with authentication “At Access Gateway”.
- At least one XenDesktop site per data center (Note: If using Web Interface, this configuration can be used in conjunction with Dan Allen’s XenDesktop – High Availability & Load Balancing Add On for Web Interface! Using this add-on allows for multiple XenDesktop sites to be created and intelligently load balanced within each data center.)
- XenDesktop sites, Web Interface sites, Provisioning Services, etc. are all only site or data center specific. In other words, Web Interface in Data Center 1 only directs users to desktops in Data Center 1; Provisioning Services Farm in Data Center 1 will only serve desktops in Data Center 1, etc…
Architecture
The following diagram illustrates the high-level architecture and main components (right-click and save image for a high-res version):

Important Note: NetScalers participating in a GSLB configuration do not share/replicate user authentication information. However, multiple NetScaler Gateway vservers on a single NetScaler appliance will have access to user authentication information. As the user access flow traverses the architecture illustrated above, it is important that any and all processes needing to verify user authentication be directed back to the same NetScaler appliance / HA pair that authenticated the user. This includes desktop enumeration and desktop launch processes. This is the reason for multiple NetScaler Gateway vservers and multiple Web Interface sites that differ only by which Callback vserver they use.
Let’s break down this diagram and discuss how the pieces fit together. We will use several examples.
Scenario 1: A DC1 user is traveling and is closer to DC2.
- A DC1 user opens a browser and enters https://desktop.company.com.
- NetScaler provides active/active GSLB for the NetScaler Gateway configured at that address and sends the user to the vserver at DC2 as it has the fastest response time.
- The user enters their username and password and initiates a logon to the NetScaler gateway at DC2
- The NetScaler Gateway vserver authenticates the user via LDAP and performs group extraction. A NetScaler session policy/profile is bound to the DC1 group. The session profile is configured to perform SSON to the vserver for Web Interface at DC1. The full path to the Web Interface site in DC1 specifies a site configured to use the callback vserver in DC2. For example, https://dc1-web.company.com/citrix/dc2.
- The Web Interface site in DC1 communicates with only the configured XenDesktop site(s) in DC1 and the list of desktops in DC1 is retrieved.
- The user selects from one or more available desktops to begin the launch process.
- Web Interface creates and delivers to Citrix Receiver on the user’s endpoint a launch.ica file. If this is internal without ICA Proxy, the user connects directly to the IP address of their desktop in DC1. If ICA Proxy is desired, the DC1 Web Interface site is configured to use dc1-desktop.company.com as the gateway server for ICA Proxy.
- As long as the NS Gateway at dc1-desktop.company.com is available, the user’s connection is now routed entirely through DC1 even though the initial connection was made to DC2 from a GSLB perspective.
Scenario 2: DC1 user is close to DC1, but DC1 is down.
- A user opens a browser and enters https://desktop.company.com.
- NetScaler provides active/active GSLB for the NetScaler Gateway configured at that address and sends the user to the vserver at DC2 as it is the only one up.
- The user enters their username and password and initiates a logon to the NetScaler gateway at DC2
- The NetScaler Gateway vserver authenticates the user via LDAP and performs group extraction. A NetScaler session policy/profile is bound to the DC1 group. The session profile is configured to perform SSON to the vserver for Web Interface at DC1, but DC1 is down.
- The NetScaler detects that DC1 is down and instead of trying to communicate with a Web Interface server in DC1, it uses a Web Interface site in DC2 as the backup vserver. The backup Web Interface site in DC2 is configured to use the NetScaler in DC2 as the callback for authentication. The Web Interface server in DC2 communicates with XenDesktop sites in DC2 and only desktops from DC2 are presented to the user.
- The user selects from one or more available desktops to begin the launch process.
- Web Interface creates and delivers to Citrix Receiver on the user’s endpoint a launch.ica file. If this is internal without ICA Proxy, the user connects directly to the IP address of their desktop in DC2. If ICA Proxy is desired, the DC2 Web Interface site is configured to use dc2-desktop.company.com as the gateway server for ICA proxy.
- Even though the user is a DC1 user, he is now connecting to a desktop in DC2 through NetScaler Gateway at DC2. Failover was seamless for the end user.
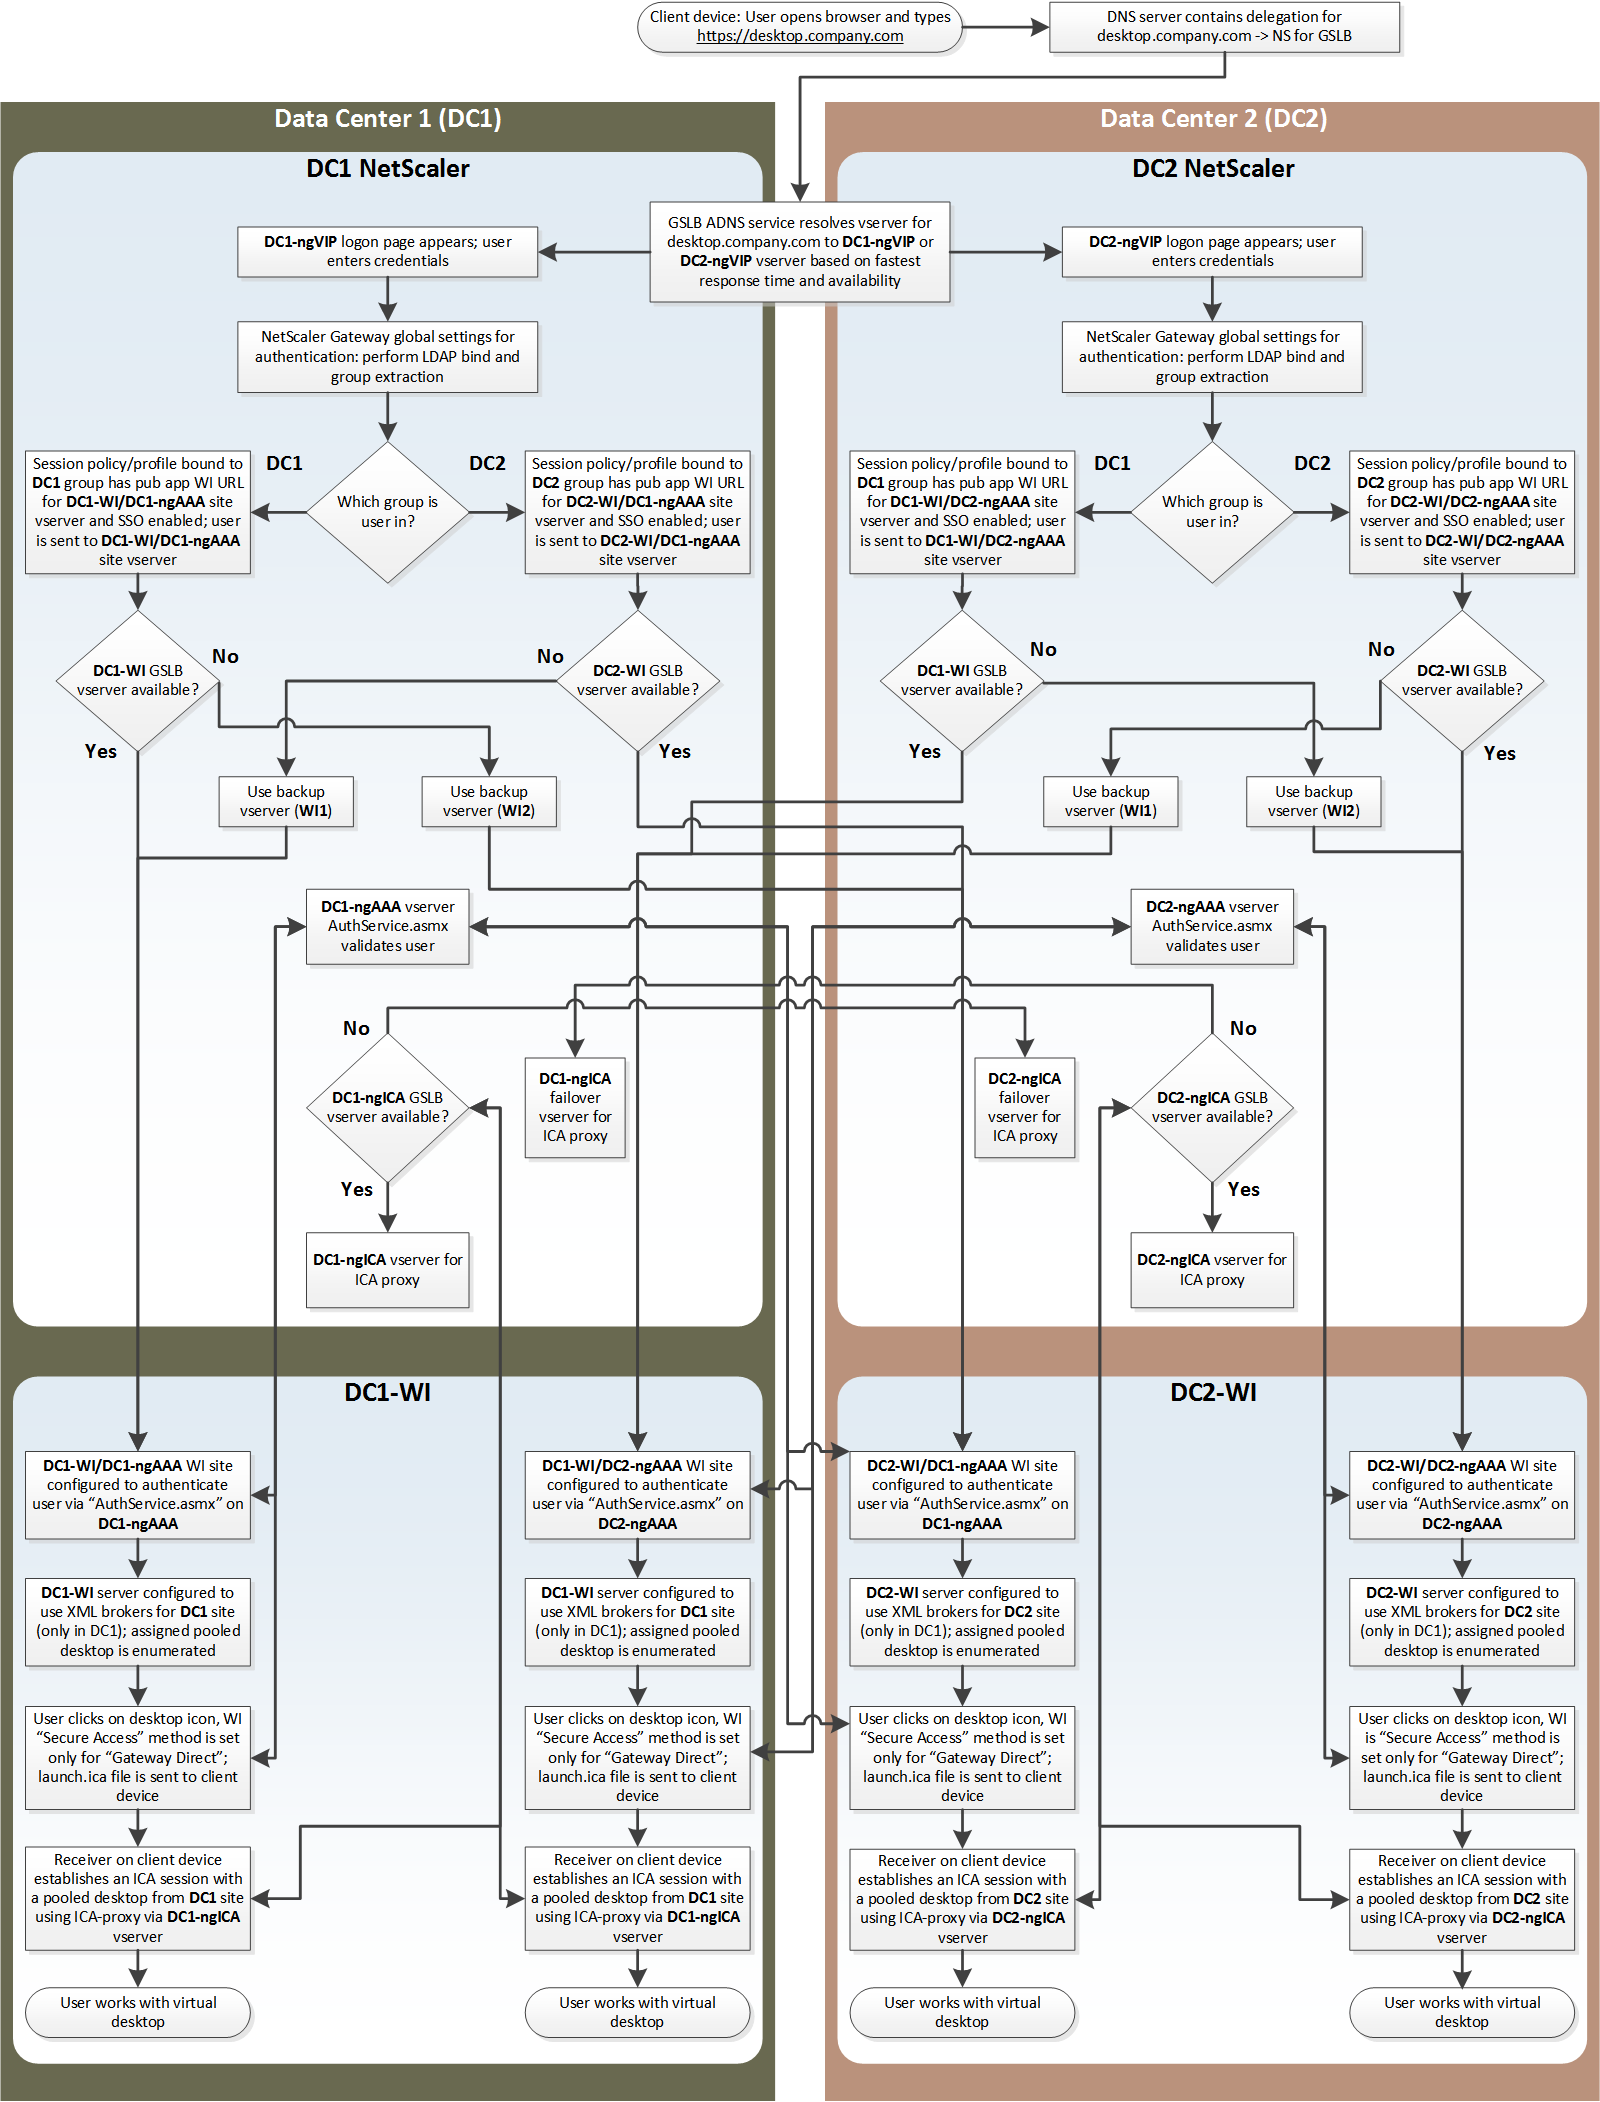
Process Flow Diagram
There are several additional scenarios that could be encountered. In all of the scenarios the high-level workflow is as follows:
- A user will first authenticate to the closest NetScaler Gateway that is available via GSLB.
- Based upon AD group membership, the closest NetScaler will attempt to locate desktops in the data center assigned to the user.
- If the load balancing rules and health monitors determine that no desktops are accessible from the assigned data center, then NetScaler will locate a desktop for the user out of the alternate datacenter.
The following diagram illustrates the step-by-step process described above (right-click and save image for a high-res version):
Note: Short names are used to keep the diagram manageable; therefore:
dc#-desktop.company.com = DC#-ngICA
dc#-callback.company.com = DC#-ngAAA
Summary
Active/Active GSLB for XenDesktop can be implemented by homing users to a preferred data center using LDAP group extraction. Having users first authenticate at NetScaler gives us the power to direct users to the appropriate data center and make intelligent decisions on how to find an alternate data center when outages occur. Creating a successful active/active desktop solution requires using pooled desktops and keeping the Web Interface and XenDesktop stacks isolated to one data center only. In other words, do not aggregate XenDesktop sites from multiple data centers into a Web Interface site. Finally, combining this with Dan Allen’sXenDesktop – High Availability & Load Balancing Add On for Web Interface!results in a very resilient solution that provides desktop fault tolerance at every level.
The primary goal with this approach is to simply ensure that a user will always be able to launch a pooled desktop. This solution can be combined with persistent desktops as well. However, what we typically recommend for persistent desktops is that users always have a pooled desktop to fallback upon. Persistent desktops are notoriously unreliable and you should always have a fallback mechanism. For example, you could assign a user a persistent desktop in DC1, but also allow them to access pooled desktops as a fallback. If their persistent desktop in DC1 is unavailable, they can launch a pooled desktop (or XenApp hosted desktop) from DC1 as a fallback. If all of DC1 is unavailable, then they will automatically be presented with a pooled Desktop from DC2.
This solution does not address the user data and application challenges associated with the back-end data that Martin discussed in his blog that was referenced at the beginning of this article. However, it does ensure that a user will always be able to logon to a desktop via XenDesktop.
Stay tuned for Part 2 in this series where we dive into greater technical detail with the NetScaler and Web Interface configurations and show you exactly how to implement the design detailed in this post!