This is a step-by-step guide to setting up a machine on which to install the Linux VDA, and aimed at helping existing Windows admins with no Linux experience get up and running quickly.
If you’re reading this, then I assume you’ve set up a XenApp or XenDesktop environment before, you know your way around XenCenter and you’re familiar with Windows domains and AD, but you’ve never worked with Linux before today.
This guide will cover the setup process for Red Hat Enterprise Linux 6 (RHEL) and CentOS 6, starting from the templates provided in XenServer 6.5 SP1.
Officially we only support the Linux VDA on Red Hat and SuSE Enterprise Linux, but CentOS is nearly identical to RHEL, and as the free alternative it is the simplest choice for setting up a test environment.
Getting Started
All the steps in this guide are performed at the terminal, either via the VM console in XenCenter or over SSH if you prefer. Copying and pasting the commands from this guide directly into the terminal will help to reduce the chance of errors.
It will help to have the following information about your environment at hand before getting started. Some of the commands listed in this guide require you to substitute the appropriate values for your own environment:
| <hostname> | The desired hostname for your machine. |
| <rhn-user> | The username of your Red Hat subscription account. |
| <controller> | The FQDN of your Windows domain controller. |
| <user> | The name of a user account on your Windows domain. |
| <admin> | The name of a domain admin account on your Windows domain. |
| <DOMAIN> | The NetBIOS name of your Windows domain, capitalised. |
| <REALM> | The Kerberos realm name of your Windows domain, capitalised. |
| <MACHINE> | The hostname of your machine, capitalised. |
You can download the Red Hat 6 installation media by logging into the Red Hat Customer Portal, here: https://access.redhat.com/downloads
There are three flavors of Red Hat: Desktop, Server and Workstation. Only Workstation and Server are suitable, and for the purposes of this guide, I am using and recommend Workstation.
You can download the CentOS 6 install media directly, here: http://wiki.centos.org/Download
At the time of writing, the current point release for RHEL and CentOS 6 was 6.6, so that’s what I’ve used for this guide. (UPDATE: Since then I’ve also confirmed these steps work on version 6.7)
Create your VM in XenCenter using either the Red Hat Enterprise Linux 6 (64-bit) or the CentOS 6 (64-bit) templates. Configure your VM as appropriate, for this guide I used default options throughout. When the VM boots up it will start will an installation wizard, again for this guide I used the default options.
Once the installation is complete, log in as the root user:

Intro to Vi
Throughout this guide we will be using the vi text editor to modify configuration files. If you’ve never used vi then it can behave a little counter-intuitively at first, so for the sake of those completely new to this we’ll briefly cover basic functionality, i.e. opening, editing, and saving a file. Note that all key presses in vi are case sensitive.
To open an existing file for editing, or to create a new one, type:
vi <file name>
Vi has several different modes: one is normal mode, where typed keys are interpreted as vi operations; the other is the insert mode, where typed keys are inserted into the document. When vi first starts it is running in normal mode, and this is what trips up most new users.
Before you start typing in vi, press the i key to enter insert mode. When you are done typing, press the Esc key to return to normal mode.
To save your changes, while in normal mode, type a colon to enter command mode:
:w<Enter>
Where <Enter> refers pressing the Enter key on your keyboard. To quit vi, type:
:q<Enter>
Commands can be combined. For example, to save and quit at the same time type:
:wq<Enter>
Sometimes vi will require a ! as confirmation before performing an action that might discard data. For example, to quit vi without saving your changes type:
:q!<Enter>
That covers everything you will need to complete the tasks in the rest of the guide. Vi has a whole host of advanced features to offer, and there many tutorials available to provide in-depth guidance of this text editor.
Configuring the Network
Before we can do anything else, we need to get networking set up. To begin, we’ll configure the network interface using the command:
vi /etc/sysconfig/network-scripts/ifcfg-eth0
Change the ONBOOT variable to yes so that networking starts automatically in future, and set BOOTPROTO to either static or dhcp.
If you are using a statically allocated IP address then you’ll need to add the variables IPADDR, NETMASK, GATEWAY, DNS1, and DOMAIN and give them values appropriate for your own environment:

If you’re using straight DHCP then the configuration is a lot simpler:

If, like me, you have an environment where you want to get an address from DHCP, but need to specify your own DNS server, you can add the PEERDNS variable and set it to no, then specify the DNS1 and DOMAIN variables as we did for the static configuration:

Save and exit once the changes are complete.
If you manually specified a DNS server above, regardless of whether or not you are using DHCP, then you will need to edit a second file:
vi /etc/resolv.conf
This file may be completely empty when you first open it. Later on this file will be automatically generated, but for the moment you will need to manually specify your DNS and domain name like this:
![]()
Save and exit once the changes are complete.
Now we need to set our hostname. This involves a couple of different steps, the first is to change what our hostname will be set to on boot:
vi /etc/sysconfig/network
Change the HOSTNAME field to something more appropriate:
![]()
NOTE: Linux AD integration doesn’t reliably support NetBIOS names greater than 15 characters. To ensure you don’t run into issues later on, choose a hostname containing 15 characters or less.
Save and exit.
The second step is to modify the hosts file so that our hostname and FQDN are reported correctly for the loopback address:
vi /etc/hosts
Modify the lines containing loopback addresses so that they list the FQDN, hostname and ‘localhost’, resulting in a file that looks something like this:
![]()
Save and exit.
The final steps are to set the current hostname and then restart the network service:
hostname <hostname>
service network restart
Once the service restarts you should have network connectivity.

Verifying the Network Configuration
Before moving on we’ll quickly verify the changes using the following commands:
hostname
hostname -f
ifconfig
These commands should report the new hostname, FQDN and IP address of the machine, respectively:

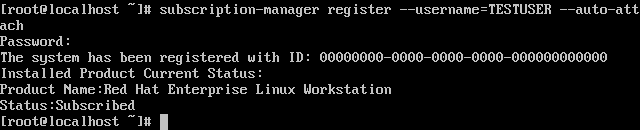
Subscribing the Machine
If you are using RHEL you will need to register your system in order to receive access to the software repositories and system updates. CentOS users can skip this step.
Use the following command to register the machine with Red Hat:
subscription-manager register –username=<rhn-user> –auto-attach
Updating the Machine
This step is optional but recommended. The following command will install all available software updates:
yum update

Installing Packages
The following command will install the tools we will need as we progress through this guide:
yum install lokkit ntp cifs-utils samba-winbind krb5-workstation authconfig pam_krb5 oddjob-mkhomedir
We’ll also install and configure the major prerequisite packages for the Linux VDA:
yum install java-1.7.0-openjdk postgresql postgresql-server postgresql-jdbc
service postgresql initdb
service postgresql start
chkconfig postgresql on
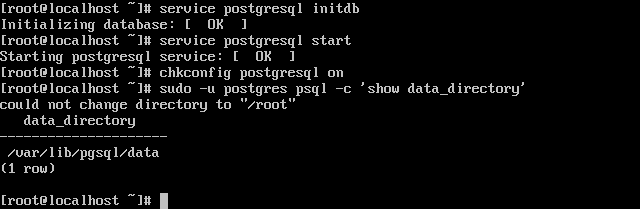
We can confirm that PostgreSQL initialised successfully by querying the data directory:
sudo -u postgres psql -c ‘show data_directory’
You should see something like this:
Finally, we need to install a desktop environment. The CentOS and RHEL 6 templates in XenServer 6.5 are designed as lightweight servers and do not come with one by default:
yum groupinstall “Desktop” “Desktop Platform” “Fonts” “General Purpose Desktop” “X Window System” “Internet Browser”
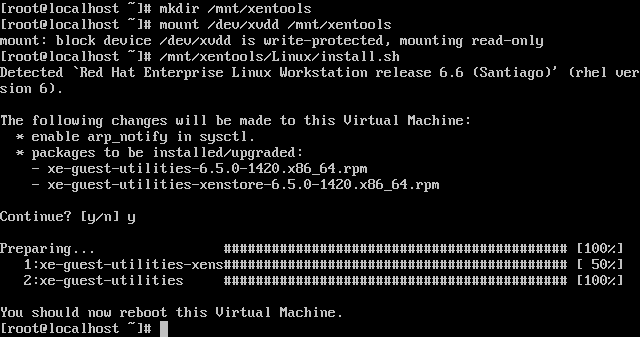
Installing XenTools
In XenCenter, click on VM -> Install XenServer Tools. Once the XenTools ISO has been mounted, type the following commands:
mkdir /mnt/xentools
mount /dev/xvdd /mnt/xentools
/mnt/xentools/Linux/install.sh
Restart the VM
Reboot the VM using the following command:
reboot

When the machine comes back up, you may be presented with a configuration utility:
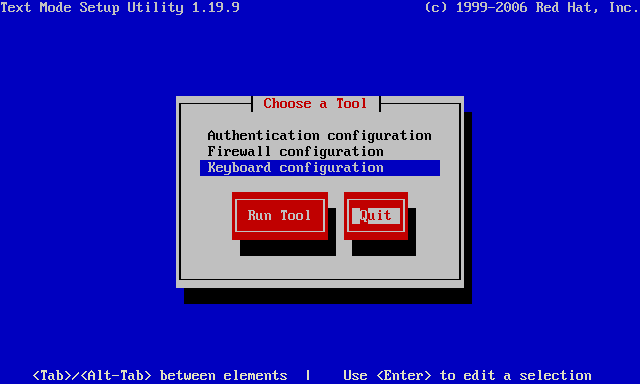
If so, select quit.
Log in again as the root user to continue.
Starting the Firewall
This step is optional but recommended. Start the firewall using the following command:
lokkit –enabled
Configuring NTP
Open the NTP configuration file using the following command:
vi /etc/ntp.conf
By default NTP will be configured to point to the Red Hat pool servers. Look for the lines that start with server, remove the default entries and add your own instead (this will typically be your domain controller):
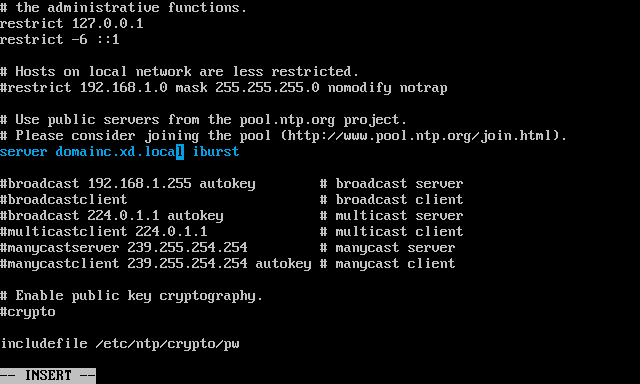
Save and exit.
Restart the NTP service and make sure it is set to start on boot with the following commands:
service ntpd restart
chkconfig ntpd on
Joining the Domain
The following is a single command. It will take care of the majority of the configuration steps needed to authenticate domain users via Winbind:
authconfig –disablecache –enablewinbind –enablewinbindauth –smbsecurity=ads –smbworkgroup=<DOMAIN> –smbrealm=<REALM> –winbindtemplatehomedir=/home/%D/%U –winbindtemplateshell=/bin/bash –enablekrb5 –krb5realm=<REALM> –krb5kdc=<controller> –krb5adminserver=<controller> –enablekrb5kdcdns –enablekrb5realmdns –enablelocauthorize –enablemkhomedir –enablepamaccess –updateall

By default, Winbind will not create the system keytab file, which Kerberos tools will need to authenticate the machine account. We’ll fix this in the samba configuration file:
vi /etc/samba/smb.conf
Add the following two lines in the [global] section of the file, making sure to stay outside of the section that authconfig generated for us:
kerberos method = secrets and keytab
winbind refresh tickets = true
This will force Winbind to create a system keytab file and to automatically renew tickets.

Save and exit.
We also need to configure PAM to enable Kerberos ticket caching and creation of home directories for Winbind:
vi /etc/security/pam_winbind.conf
Add or modify the three lines below, making sure to uncomment them (remove any leading semicolons) in the process:
krb5_auth = yes
krb5_ccache_type = FILE
mkhomedir = yes
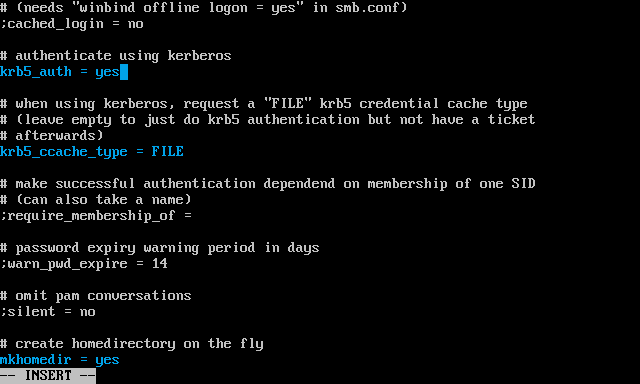
Save and exit.
Now we’re, ready to actually join the domain:
net ads join -w <DOMAIN> -S <controller> -U <admin>

Finally, start Winbind and make sure it is set to start on boot:
service winbind start
chkconfig winbind on
Verifying Domain Authentication
The following steps are optional but HIGHLY recommended. The most common issues encountered from this point onwards are all related to domain authentication, so it is helpful to verify that the previous steps were successful before moving on.
It’s worth noting that domain authentication for users and the machine itself work via different mechanisms, making it possible for one to succeed even while the other is failing (e.g. domain users may be able to log on to a machine that failed to successfully join the domain itself.)
Verify that the domain join was successful:
net ads testjoin
![]()
Verify that the keytab file has been created and contains valid keys:
klist -ke

Verify that the machine can authenticate with the domain controller and that a TGT ticket is being cached:
kinit -k <MACHINE>\$@<REALM>
klist

Verify that domain users can authenticate with the domain:
wbinfo –krb5auth=<domain>\\<user>

Finally, verify that PAM is configured correctly, and that domain users can log in via Winbind. The easiest way to do this is to type:
exit
Then attempt to log in as a domain user:
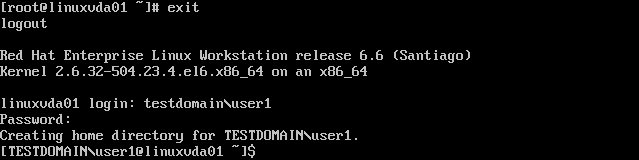
Afterwards, type exit again and log back in as the root user.
Configure Delivery Controllers
Each of your Delivery Controllers will require a change to their Broker service configuration before they will be capable of brokering sessions to Linux VDAs.
In the citrix-linuxvda-scripts-1.0.0.zip package you will find a PowerShell script named Update-BrokerServiceConfig.ps1, which you will need to run on each and EVERY Delivery Controller in the farm:

These changes will not prevent the brokering of Windows VDAs configured to use the same Delivery Controllers. A single Controller farm can manage and broker sessions to both Windows and Linux VDAs seamlessly.
See the section about updating Delivery Controllers to broker Linux desktops in the Linux Virtual Desktop installation manual for more information.
Creating Machine Catalogues and Delivery Groups
Now the machine is on the domain you can create your machine catalogues and delivery groups. The process is the same as it is for Windows VDAs, but with some restrictions.
When creating machine catalogues for Linux VDA machines:
- Select ‘Server OS’ or ‘Windows Server OS’ for your operating system.
- Do not set your machines as power managed.
- Select ‘Another service or technology’ for your deployment method.
- Do not mix Windows and Linux machines in the same catalogue.
When creating delivery groups for Linux VDA machines:
- Select ‘Desktops’ for your delivery type.
- Do not allow unauthenticated/anonymous logons.
- Do not mix Windows and Linux machines/catalogues in the same delivery group.
See the section on adding Linux machines to Machine Catalogues and Delivery Groups in the Linux Virtual Desktop installation manual for more information.
Installing the Linux VDA
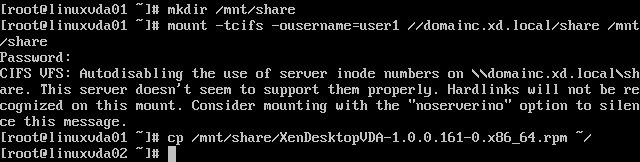
Now all the pieces are in place we can install the Linux VDA. In order to do that we need to get the RPM package onto the machine. In my case I did this via a Windows share using the following commands:
mkdir /mnt/share
mount -tcifs -ousername=<user> //<server>/<share> /mnt/share
cp /mnt/share/XenDesktopVDA-1.0.0.161-0.x86_64.rpm ~/
Once you have a copy of the RPM, install it using the following command:
yum install XenDesktopVDA-1.0.0.161-0.x86_64.rpm
This will also pull in the last few package dependencies.
The final step is to configure the VDA with the following command:
ctxsetup.sh
The script will ask a series of questions about your environment. If you have followed this guide verbatim then the default answers to most questions will suffice. The only custom information you will need to provide is the FQDN of your DDC:

Once the script is complete the HDX and VDA services will have been configured and started. You can confirm the services are running with the following commands:
service ctxhdx status
service ctxvda status

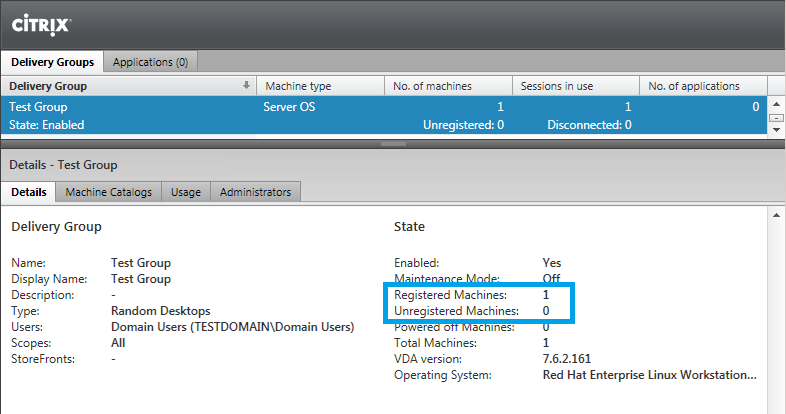
If everything is configured correctly, registration will occur within 10 to 20 seconds. Refresh Citrix Studio and it should confirm that the registration was successful:
All that remains is to login to StoreFront and launch your Red Hat 6 (or CentOS 6) Shared Hosted Desktop:

That’s it! Thanks for reading; I hope this has helped people get started.