As I’ve had a lot of conversations and questions around ADFSv3 and NetScaler, this post will cover–in greater detail–the steps to configure NetScaler with ADFS v3 in the following scenarios:
- NetScaler as SAML Service Provider (SAML-SP) for ADFSv3
- NetScaler as ADFS Proxy (or WAP) replacement
NetScaler as SAML-SP for ADFSv3
There is an excellent KB article on NetScaler integration with ADFS v2.0 at CTX133919. Please use this existing CTX133919 article of as baseline for configuration.
When configuring NetScaler for ADFSv3 there are a couple of side notes to keep in mind. First of all, I’ve used following versions in this configuration: NetScaler 10.5 build 57.7 and Windows Server 2012 R2.
Prerequisites to keep in mind before configuration,
- Acquire Certificates for:
- ADFS – SSL Communications
- (This will be automatically generated) ADFS – Encryption
- (This will be automatically generated) ADFS – Signing
- NetScaler – SAML Assertion Signing
- NetScaler – SSL Communications
- Configure DNS:
- A-record for Federation Service
- A-record for NetScaler Load Balancing virtual server
- Make sure you have folowing IP addresses:
- 1x Public IP for ADFS
- 1x Public IP for NetScaler LB virtual server
- 1x Private IP for NetScaler AAA virtual server
Just in case you’ve never configured ADFS before, this guide from Jay Simcox is a good starting point.
Watch out, before you start configuring ADFS:
When configuring ADFS on the Windows Server with “Configure the federation service on this server”, make sure the Federation Service Name is NOT set to the server name of the Windows server (if you do; you’ll get an SPN error). But you do need to create a DNS record pointing the Federation Service Name to your adfs server. In my setup the Windows server name is fs.citrix.local; whilst the ADFS service (and matching certificate for SSL Communications) is on adfs.citrix.local.
Configure the relying party trust (as mentioned in CTX133919) with all its steps;
- Data Source: Enter data about relying party manually,
- Display Name: Choose a logical display name, in my case: sp-adfs.rocks.local,
- Profile: AD FS Profile,

- Configure Certificate: Do not choose an encryption certificate,
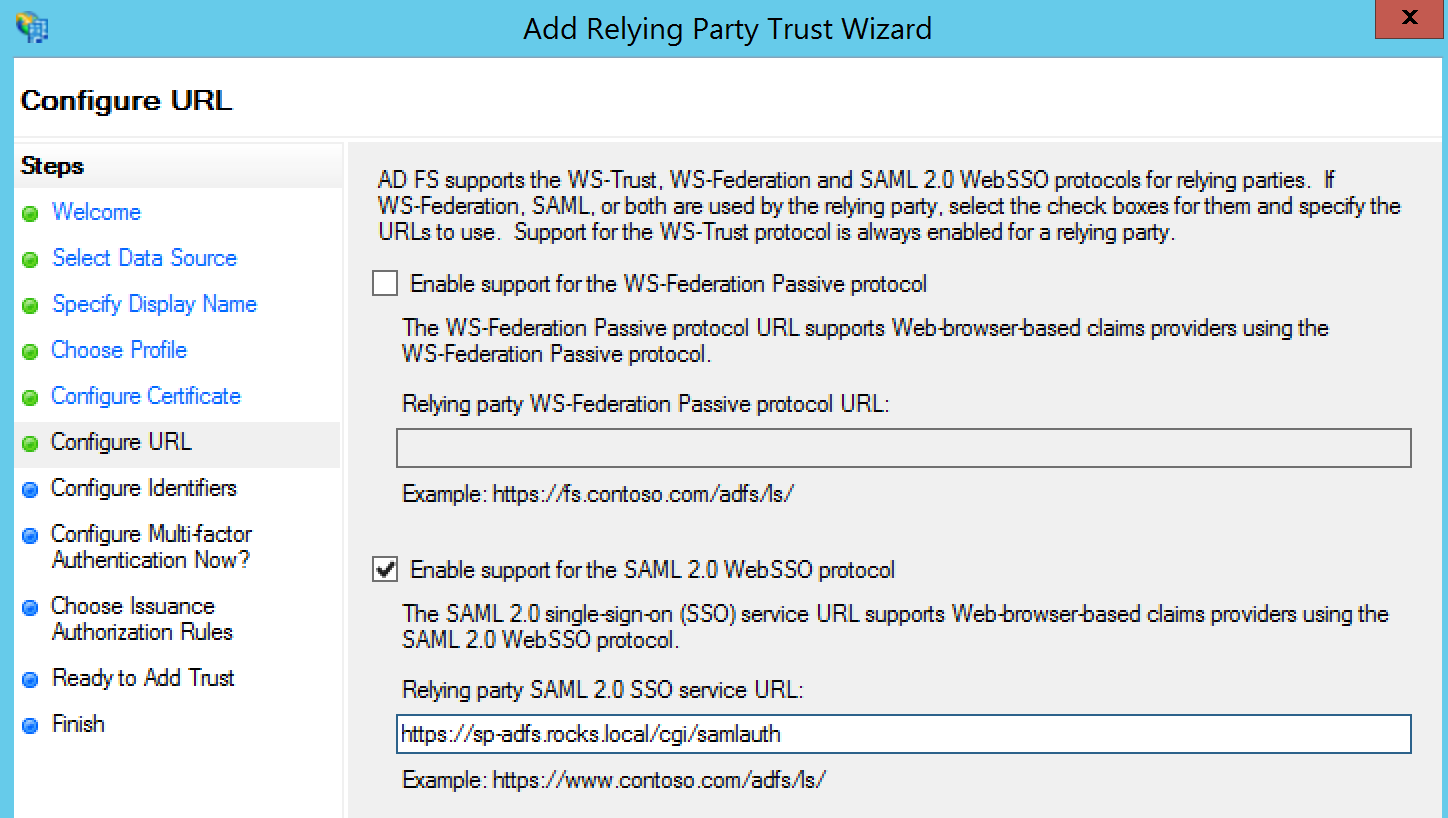
- URL: Disable WS-Federation Passive Protocol, Enable Support for SAML 2.0 WebSSO Protocol
- Identifiers: Add the relying party identifier, in my case: sp-adfs.rocks.local (this can actually also be a full URL or an FQDN),
- Multi-factor Authentication: Do not configure multi-factor at this time,
- Issuance Authorization Rules: Permit all users to access this relying party
- Open the Claims Rule window.
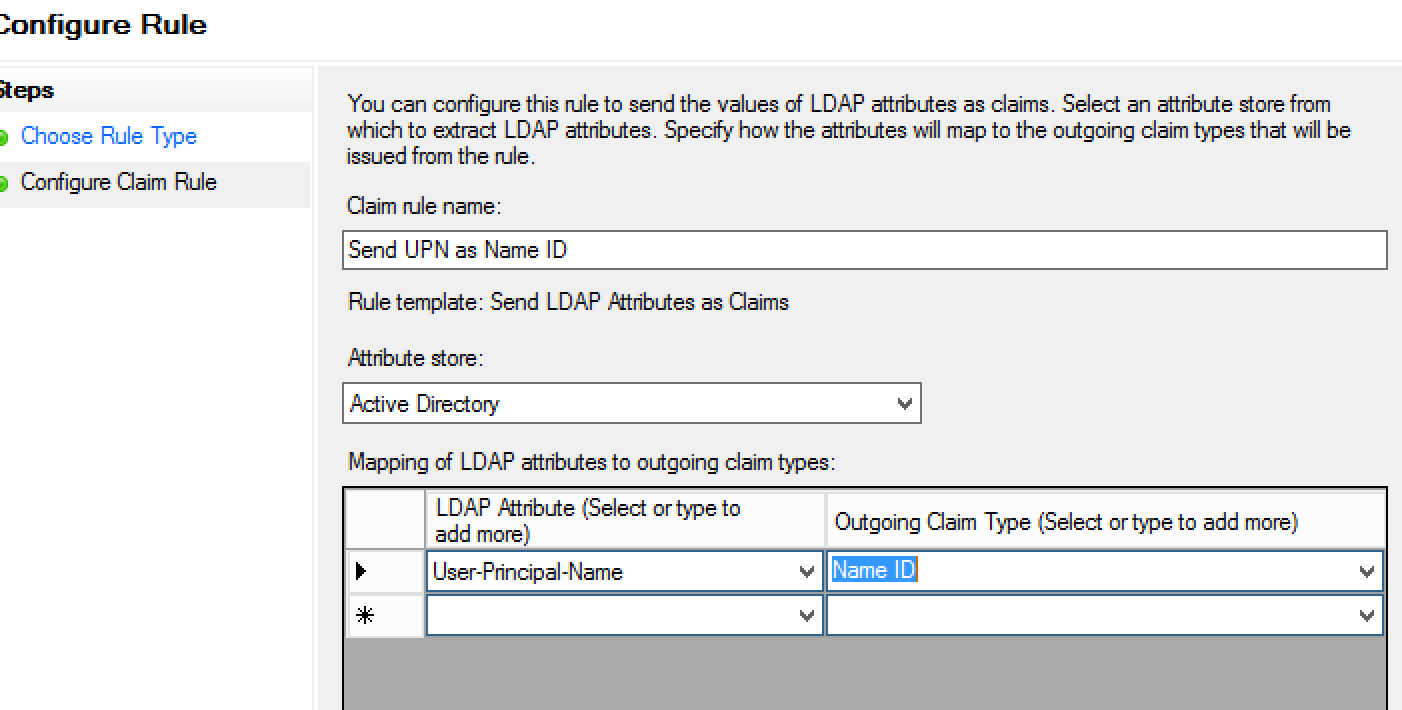
- Issuance Transform claims rule: Add a rule with option to send LDAP Attributes as claims.
- Give the claims rule a logical name, e.g. “Send UPN as Name ID” and use the Attribute store of Active Directory.
- Map LDAP Attribute “User-Principle-Name” to “Name ID” as Outgoing Claim.
-
- Close the claims rules and finish the wizard.
- Go to the relying parties and select properties of newly created “sp-adfs.rocks.local”
- Select the signature tab, and upload the correct NetScaler SAML-SP signing certificate.

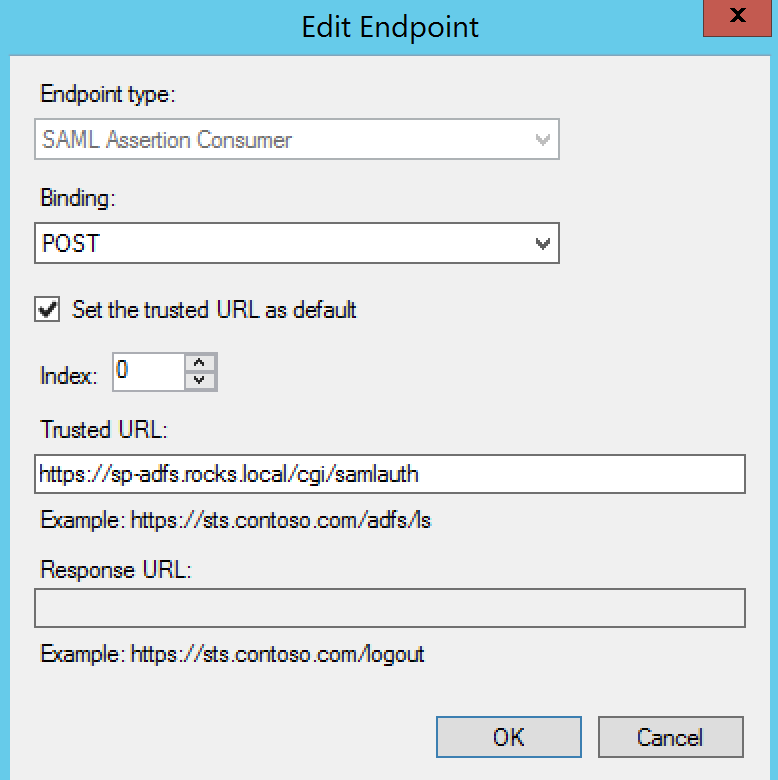
- Select the Endpoints Tab and configure the SAML Assertion Consumer Endpoint to the following URL: https://FQDN/cgi/samlauth with POST binding and Default “yes”. (In my case: https://sp-adfs.citrix.local/cgi/samlauth).
Please note, that as specified in CTX133919, for ADFSv3 there is no need to change the Advanced tab to “SHA-1”, it can be left at the default SHA-256.
If you’re using an internal Certificate Authority, or if you are not exposing your internal CA’s CRL’s, then you need to explicitly disable the Certificate Revocation List checking of your Relying Party. Launch up a PowerShell console (Administrative Privileges are required; don’t forget “Run as Administrator”) and issue the following command:
PS C:\Windows\system32> Set-AdfsRelyingPartyTrust -TargetName “sp-adfs.rocks.local” -SigningCertificateRevocationCheck”None” -EncryptionCertificateRevocationCheck “None”
Additionally, make sure that the Federation Service is not encrypting claims:
PS C:\Windows\system32> Set-AdfsRelyingPartyTrust -TargetName “sp-adfs.rocks.local” -EncryptClaims $false
Note that this is explicitly different from ADFSv2, and SAML will fail with a “Malformed Assertion” error if your certificate revocation checking is enabled.
![]()
Configuration on NetScaler is then as following:
- Create a AAA virtual server, and notice the Authentication Domain is set to “rocks.local”, because my SAML-SP is pointing to sp-adfs.rocks.local:
add authentication vserver vs_samlsp-adfs SSL 172.16.17.113 443 -AuthenticationDomain rocks.local
- Also add authentication to your LB (or CS) virtual server, which you want to be fronted and authenticated by ADFS. This LB/CS virtual server should match the FQDN of sp-adfs.rocks.local in my case. Also note the Authntication FQDN is set accordingly:
add lb vserver vs_https_sp-adfs SSL 172.16.17.112 443 -AuthenticationHost sp-adfs.rocks.local -Authentication ON -authnVsName vs_samlsp-adfs
- Don’t forget SSL on the LB/CS vserver.
bind ssl vserver vs_https_sp-adfs -certkeyName sp-adfs-rocks-local
- Finally create a corresponding samlAction and samlPolicy. Link them together and bind the policy to the AAA virtual server.
add authentication samlAction srv_samlsp-adfs -samlIdPCertName adfs-citrix-local-ADFS-Signing -samlSigningCertName sp-adfs-rocks-local -samlRedirectUrl “https://adfs.citrix.local/adfs/ls/wia” -samlUserField NameID -samlIssuerName sp-adfs.rocks.local -signatureAlg RSA-SHA256 -digestMethod SHA256 -requestedAuthnContext minimum -authnCtxClassRef PasswordProtectedTransport -attributeConsumingServiceIndex 1
add authentication samlPolicy pol_samlsp-adfs ns_true srv_samlsp-adfs
bind authentication vserver vs_samlsp-adfs -policy pol_samlsp-adfs -priority 100
Notice in the samlAction the samlRedirectUrl is set to “https://adfs.citrix.local/adfs/ls/wia“, this is a different URL than ADFSv2. Also make sure the signature algorithm is set to RSA-SHA256 and digest method to SHA256 (Note that this requires Netscaler version 10.5 build 56.15 or higher).
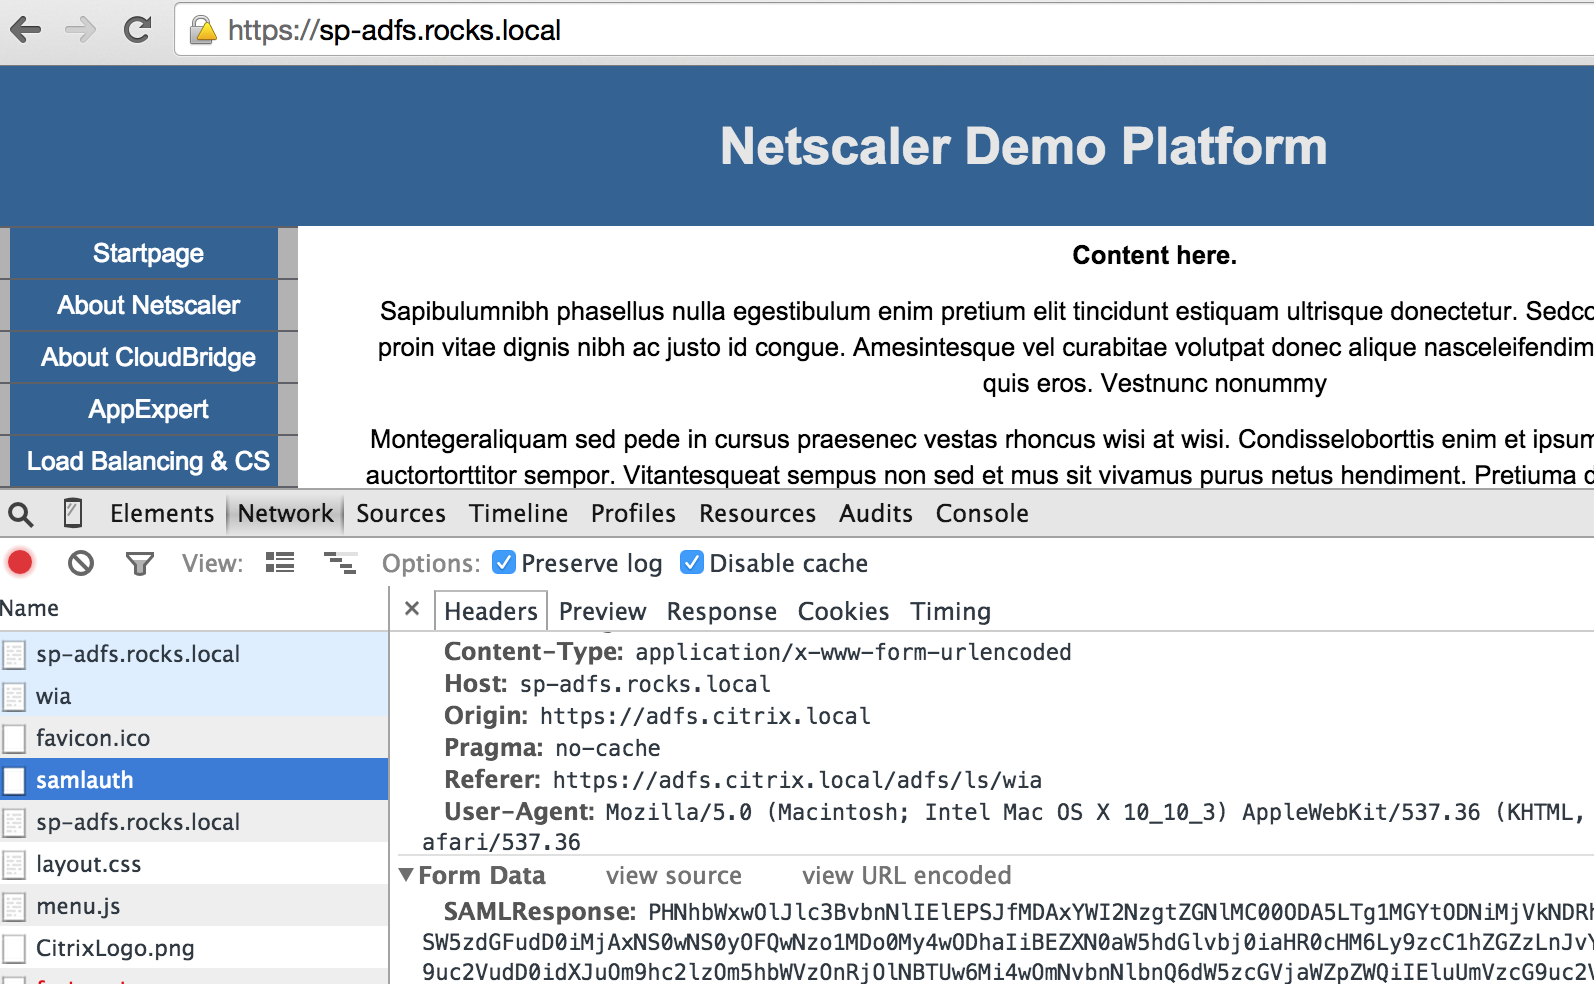
Again make sure your DNS entries are also correctly set and I can now access https://sp-adfs.rocks.local. My browser will be automatically redirected to https://adfs.citrix.local and prompt for authentication. After successful authentication the browser is redirected again to https://sp-adfs.rocks.local and it succesfully authenticates.
(Tip: For easy reviewing of saml assertions; and tracing in browser use Google Chrome and enable the “Preserve Log” option in Developer Mode).

NetScaler as ADFS Proxy (or WAP) replacement
This is documented in the Guide to Succesfully Deploying Netscaler as an Active Directory Federation Services Proxy, so there is no need for a pair of Microsoft WAP Servers in the DMZ.
Again as baseline article the deployment guide can be followed, but when configuring a NetScaler LB or CS virtual server with SSL certificate to front your internal Federation Server you will need to explicitly disable SNI-binding.
Configuration of NetScaler (as per deployment guide, but do notice the URL’s for ADFSv3 are slightly different):
- Add the AAA virtual server:
add authentication vserver vs_aaa_adfsproxy SSL 172.16.17.115 443 -AuthenticationDomain citrix.local
- Create service(s) pointing to the backend Federation Server (Make sure you follow the “SNI Binding” steps as well, otherwise the service will not come up):
add service svc_https_adfs 172.16.17.198 SSL 443
- Configure the authentication on the LB virtual server you’re clients will be connecting to (note: this is non-directly addressable):
add lb vserver vs_https_adfsproxy SSL 0.0.0.0 0 -authn401 ON -authnVsName vs_aaa_adfsproxy
bind lb vserver vs_https_adfsproxy svc_https_adfs
- Configure a different LB virtual server for the trust and federation metadata (which is available unauthenticated):
add lb vserver vs_https_adfsproxy_noauth SSL 0.0.0.0 0
bind lb vserver vs_https_adfsproxy_noauth svc_https_adfs
- Configure a CS virtual server:
add cs vserver vs_https_adfs SSL 172.16.17.114 443
- Create content switching actions, policies and bind to the CS virtual server:
add cs action act_lb_adfs_proxypassive -targetLBVserver vs_https_adfsproxy
add cs action act_lb_adfs_proxynoauth -targetLBVserver vs_https_adfsproxy_noauth
add cs policy pol_adfs_proxypassive -rule “http.REQ.URL.CONTAINS(\”/adfs/ls/wia\”)” -action act_lb_adfs_proxypassive
add cs policy pol_adfs_proxynoauth -rule “http.REQ.URL.CONTAINS(\”/adfs/services/trust\”) || http.REQ.URL.CONTAINS(\”/federationmetadata/2007-06/federationmetadata.xml\”)” -action act_lb_adfs_proxynoauth
bind cs vserver vs_https_adfs -policyName pol_adfs_proxynoauth -priority 90
bind cs vserver vs_https_adfs -policyName pol_adfs_proxypassive -priority 100
bind cs vserver vs_https_adfs -lbvserver vs_https_adfsproxy
- Create Rewrite Action and Policy for the services to proxymex, and bind accordingly:
add rewrite action act_rw_adfs_mexrequest replace http.REQ.URL “\”/adfs/services/trust/proxymex\””
add rewrite policy pol_rw_adfs_mexrequest “http.REQ.URL.CONTAINS(\”/adfs/services/trust/mex\”) act_rw_adfs_mexrequest
bind lb vserver vs_https_adfsproxy_noauth -policyName pol_rw_adfs_mexrequest -priority 100 -gotoPriorityExpression END -type REQUEST
- Bind the AAA virtual server with an authentication policy (and corresponding action)
add authentication radiusAction srv_radius -serverIP 172.16.17.101 -serverPort 1812 -radKey ca2a03547ec92572a3c9 -encrypted
add authentication radiusPolicy pol_radius ns_true srv_radius
bind authentication vserver vs_aaa_adfsproxy -policy pol_radius -priority 100
- Create a Traffic Profile for Single Sign On to ADFS url and bind it to the LB Vserver with authentication:
add tm trafficAction prf_sso_to_401-adfs -SSO ON -persistentCookie OFF -InitiateLogout OFF -kcdAccount NONE
add tm trafficPolicy pol_sso_to_401-adfs “http.REQ.URL.PATH.EQ(\”/adfs/ls/wia\”)” prf_sso_to_401-adfs
bind lb vserver vs_https_adfsproxy -policyName pol_sso_to_401-adfs -priority 100 -gotoPriorityExpression END -type REQUEST
Configuration of your Windows Server 2012R2 Federation Server concerning SNI-binding:
- Open PowerShell with Administrative Privileges
- Go into “netsh”:
PS C:\Windows\system32> netsh
- Get the current binding information:
netsh> http show sslcert
Hostname:port : adfs.citrix.local:443
Certificate Hash : 96cd248c99bbefee52572f69383043149a8f99ae
Application ID : {5d89a20c-beab-4389-9447-324788eb944a}
Certificate Store Name : MY
Verify Client Certificate Revocation : Enabled
Verify Revocation Using Cached Client Certificate Only : Disabled
Usage Check : Enabled
Revocation Freshness Time : 0
URL Retrieval Timeout : 0
Ctl Identifier : (null)
- Notice the Certificate Hash and Application ID and copy them.
- Add a new IP binding. 0.0.0.0:443 is to listen on all IP addresses, or select astatic IP address of this server if the server is connected with multiple network interfaces). Notice the reuse of the previously copied certhash and appid:
netsh> http add sslcert ipport=0.0.0.0:443 certhash=96cd248c99bbefee52572f69383043149a8f99ae appid={5d89a20c-beab-4389-9447-324788eb944a} certstorename=MY
Some background on SNI. SNI or Subject Name Indicator is a solution for a problem that has long been around; when using SSL a fully qualified domain name should only match a single public IP address. When the client is doing the SSL Handshake (See link here), the server will handover its configured certificate. Only after SSL connection establishment will the client start asking the correct website in HTTP format. If the certificate does not match the requested FQDN or website an error is thrown. This makes SSL websites very hungry for the scarce IPv4 addresses, hence SNI was introduced with RFC4366.
There needs to be a way to indicate to the server to which FQDN a client is connecting during the SSL Handshake, so that the server can look at it’s repository of SSL Certificates and return the correct certificate; this extension on SSL is called Subject Name Indicator. NetScaler fully supports SNI on the front-end and can use SNI to select correct certificates. Backend support is currently not available, but in this case of SNI for ADFS this is not a real problem and you can safely disable the SNI-binding to ADFSv3 on Windows 2012R2 server and revert back to IP-binding. Remember SNI is mainly for managing IPv4 scarcity on the internet, there is little need for SNI in the internal LAN.
Updates (last: 2017-12-7)
Many thanks to Morten Kallesoe (Citrix), Valerie Bonchev (Citrix), Simon Gottschlag (Xenit) and Greg Boch (Citrix) for their much appreciated additional tips, guidelines and feedback.
- SelfAuth policy necessary in version 11.1 or higher (Valerie)
As of version 11.1 you have to make sure there is a content-switch policy that directs /cgi/selfauth requests to the LB vserver performing the authentication (in this case vs_https_adfsproxy).add cs policy pol_adfs_proxyselfauth -rule “HTTP.REQ.URL.STARTS_WITH(\”/cgi/selfauth\”)” -action act_lb_adfs_proxypassive
- SNI to backend support in version 11.1
Since version 11.1 is released SNI hostname can be set to connect to the ADFS backend Federation Server. More documentation on this is available here - Beware when using Office365 with other browsers than IE.(Morten)
It will probably not work. when replacing the WAP Proxy feature with NetScaler. The MS HTTPAPI2.0 engine @ ADFS 3.0 server, looks at the User-Agent, and based on that value, it will either do a 200 OK or a 302 found and redirect you to /adfs/ls/wia. The latter is what you want.
To by pass this, simply rewrite the User-Agent to be compliant. Here is how i did it.add rewrite action RW_ACT_ADFS_REPL_USERAGENT replace “HTTP.REQ.HEADER(\”User-Agent\”)” “\”Mozilla/5.0 (Windows NT 6.1; WOW64; Trident/7.0; rv:11.0) like Gecko\””
add rewrite policy RW_POL_ADFS_USER-AGENT “HTTP.REQ.HEADER(\”User-Agent\”).EQ(\”Mozilla/5.0 (Windows NT 6.1; WOW64; Trident/7.0; rv:11.0) like Gecko\”).NOT” RW_ACT_ADFS_REPL_USERAGENT
bind lb vserver vs_adfs_443_auth -policyName RW_POL_ADFS_USER-AGENT -priority 100 -gotoPriorityExpression END -type REQUEST - Monitoring ADFS servers (Simon)
I’ve noticed ADFSv3 has a new way of monitoring (health check/probing) the servers, cfr. this Microsoft Technet Blogpostadd lb monitor MON-ADFS HTTP -httpRequest “HEAD /adfs/probe” -respCode 200 -LRTM ENABLED -secure NO -destPort 80 -netProfile <NETPROFILE>
- Transparent SSO using WIA with 401 authentication (Simon)
To have transparent SSO with Windows Integrated Authentication in 401 mode, there are a couple of additional items to configure.- Turn off ExtendedProtectionTokenCheck
- Add the X-MS-Proxy (rewrite) for external traffic (“proxy”)
- Configured CIP to X-MS-Forwarded-Client-IP on the service/serviceGroup
Relevant pieces of configuration:
add rewrite action RWA-REQ-ADFS_XMSPROXY insert_http_header X-MS-Proxy “\”NETSCALER\””
add rewrite action RWA-REQ-ADFS_PROXYMEX replace HTTP.REQ.URL.PATH_AND_QUERY “\”/adfs/services/trust/proxymex\” + HTTP.REQ.URL.SET_TEXT_MODE(IGNORECASE).PATH_AND_QUERY.STRIP_START_CHARS(\”/adfs/services/trust/mex\”).HTTP_URL_SAFE”
add rewrite policy RWP-REQ-ADFS_XMSPROXY “HTTP.REQ.URL.TO_LOWER.STARTSWITH(\”/adfs\”)” RWA-REQ-ADFS_XMSPROXY
add rewrite policy RWP-REQ-ADFS_PROXYMEX “HTTP.REQ.URL.TO_LOWER.STARTSWITH(\”/adfs/services/trust/mex\”)” RWA-REQ-ADFS_PROXYMEXadd lb monitor MON-ADFS HTTP -httpRequest “HEAD /adfs/probe” -respCode 200 -LRTM ENABLED -secure NO -destPort 80 -netProfile <NETPROFILE>
add serviceGroup SG-ADFS SSL -maxClient 0 -maxReq 0 -usip NO -useproxyport YES -cltTimeout 180 -svrTimeout 360 -CKA NO -TCPB NO -CMP NO -appflowLog DISABLED -CIP ENABLED X-MS-Forwarded-Client-IP -netProfile
bind serviceGroup SG-ADFS 443add lb vserver LB-INT_ADFS SSL 0.0.0.0 0 -persistenceType SOURCEIP -timeout 30 -cltTimeout 180
bind ssl vserver LB-INT_ADFS -certkeyName
set ssl vserver LB-INT_ADFS -SSL3 DISABLEDadd lb vserver LB-EXT_ADFS SSL 0.0.0.0 0 -persistenceType SOURCEIP -timeout 30 -cltTimeout 180
bind ssl vserver LB-EXT_ADFS -certkeyName
set ssl vserver LB-EXT_ADFS -SSL3 DISABLED
bind lb vserver LB-EXT_ADFS -policyName RWP-REQ-ADFS_XMSPROXY -priority 100 -gotoPriorityExpression NEXT -type REQUEST
bind lb vserver LB-EXT_ADFS -policyName RWP-REQ-ADFS_PROXYMEX -priority 110 -gotoPriorityExpression END -type REQUEST
bind lb vserver LB-INT_ADFS SG-ADFS
bind lb vserver LB-EXT_ADFS SG-ADFS
Disclaimer:
The sample code mentioned above is provided to you as is with no representations, warranties or conditions of any kind. You may use, modify and distribute it at your own risk. CITRIX DISCLAIMS ALL WARRANTIES WHATSOEVER, EXPRESS, IMPLIED, WRITTEN, ORAL OR STATUTORY, INCLUDING WITHOUT LIMITATION WARRANTIES OF MERCHANTABILITY, FITNESS FOR A PARTICULAR PURPOSE, TITLE AND NONINFRINGEMENT. Without limiting the generality of the foregoing, you acknowledge and agree that (a) the sample code may exhibit errors, design flaws or other problems, possibly resulting in loss of data or damage to property; (b) it may not be possible to make the sample code fully functional; and (c) Citrix may, without notice or liability to you, cease to make available the current version and/or any future versions of the sample code. In no event should the code be used to support of ultra-hazardous activities, including but not limited to life support or blasting activities. NEITHER CITRIX NOR ITS AFFILIATES OR AGENTS WILL BE LIABLE, UNDER BREACH OF CONTRACT OR ANY OTHER THEORY OF LIABILITY, FOR ANY DAMAGES WHATSOEVER ARISING FROM USE OF THE SAMPLE CODE, INCLUDING WITHOUT LIMITATION DIRECT, SPECIAL, INCIDENTAL, PUNITIVE, CONSEQUENTIAL OR OTHER DAMAGES, EVEN IF ADVISED OF THE POSSIBILITY OF SUCH DAMAGES. Although the copyright in the code belongs to Citrix, any distribution of the code should include only your own standard copyright attribution, and not that of Citrix. You agree to indemnify and defend Citrix against any and all claims arising from your use, modification or distribution of the code.