Introduction
It’s very common for a NetScaler to be used for providing access to Citrix XenApp and XenDesktop software environments, the one module on the appliance that provides this capability is the NetScaler Gateway, it’s one of many modules on the NetScaler. One of the many strengths of Citrix software environments is the option to access them from anywhere or anything and then run pretty much any application or desktop.
While providing a great level of flexibility it is important to also try and manage and control the user access in some cases, to protect the company systems from unsuitable end points. As by its nature, access from anywhere can also mean access from any PC type, trusted or otherwise.
OPSWAT was a mechanism that became popular with Citrix Access Gateways, this feature has recently been integrated with the core NetScaler firmware and policy engine from 10.5 onwards.
This document will show the steps required to make use of these scanning options to provide some additional levels of security over and above the use of just SSL. This policy enhancement provides end point scanning for Windows and Mac PC’s when accessing a Citrix software environment using the NetScaler Gateway on the Appliance.
Citrix provides some information on its support documentation site here:
http://support.citrix.com/proddocs/topic/netscaler-gateway-105/ng-adv-epa-wrapper-con-v2.html
This document aims to provide a more detailed view of the steps required to setup the scans and how they work.
Using Advanced End Point Analysis for Pre-authentication scans
The pre-authentication scan is an option that allows the administrator to choose the types of PC client that can connect to the NetScaler gateway. It also allows the administrator to specify which software application or module the client needs to have either installed or running in order to be granted access to the gateway. The level of checking includes things like the ability to verify OS patch level or is there a valid Anti-Virus application installed.
The policies set by the administrator are used as criteria for the connection and are checked before any username or password login box is presented. This has the benefit of screening out unsuitable systems even before the authentication dialogue option is available. So in this scenario, if the system the user is trying to use does not meet the set criteria defined by an administrator they will be unable to access Applications and Desktops until the condition(s) are corrected. Logging on the client cannot be used by the connection to determine what has failed, this is for security.
Using Advanced End Point Analysis for post authentication scans
The post-authentication scan is an option that allows the administrator to verify the status of the PC client that has already connected and authenticated to the NetScaler gateway but before any applications has been launched.
Having the option for post-authentication and pre-launch provides another option for end point scanning, although it is possibly more useful to verify the client before they actually connect and authenticate.
Creating a Pre-authentication scan for a domain check
Pre-requisites
In order to make use of the Advanced Pre-Authentication and Post-Authentication scanning facility there are a few elements that are needed first:
- A NetScaler with a platform and Universal licenses installed. The platform license sets the features and throughput. The Universal licenses are used to enable the end point scanning features and are assigned per user on a concurrent basis.
- A configured Virtual Gateway server on the NetScaler in Smart Access mode, so ICA only mode will be set as false on the virtual server properties.
- The current firmware build, as of today this is 10.5.51.10
- A back end authentication mechanism, such as Active Directory, to authenticate users. It is possible to use local accounts on the NetScaler but is better to have the configuration more closely matched to what would be used in a live environment.
- A test XenApp/XenDesktop environment as a target.
- An end point to test access, this would be either a Windows or Mac based PC system.
Note: End point scanning is a PC based technology, this does not apply to mobile devices such as tablets and SmartPhones.
It is assumed that:
- A valid certificate for the NetScaler Gateway virtual server, which is trusted on the client that will be used to connect.
Setting up the Pre-Authentication scan
Citrix provides a guide here to help with the initial setup of the NetScaler:
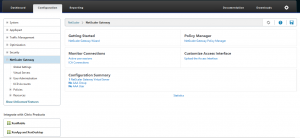
Once the NetScaler has been installed in an environment, there are a number of ‘wizards’ that can be used to get the gateway setup quickly. These apply to either XenApp, XenDesktop or the mobility suite called XenMobile. In this case as this is a PC based use case the NetScaler Gateway Wizard is a good starting point to get a new virtual gateway server setup. The wizards are available in the bottom left of the main appliance admin window, shown here:
The first step, once that gateway has been created, with or without using the wizard, is to create a Pre-Authentication policy with the options that are needed to check the end point. This initial example will use a domain check to test the client operating system is a member of the domain ‘Contoso.com’.
1. Login to the GUI and navigate to NetScaler Gateway-Pre Authentication – Profiles and choose ‘add’. Assign a name for the new profile and choose ‘create’. This profile will be used in conjunction with a scanning policy to assess the client prior to access.

2. Switch to the Policies tab and choose ‘add’ to add a new policy. This will be the policy to actually verify client compliance. So in this case, the policy will need to look for the domain membership on the client.

3. Enter the name of the Pre-authentication policy and then choose the ‘OPSWAT EPA editor’ on the right hand side. This editor has the scanning options that have been recently added to the appliance and features options for scanning for Anti-Virus and a range of other client software products. The Expression Editor has the core scanning options that have been available since the gateway was added to the appliance. These older polices are sometimes referred to as a ‘Classic’ type.
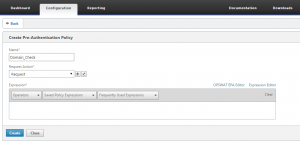
- The new pre-auth policy
4, A pop-up window will appear, use the expression editor to select ‘Windows’ to scan Windows based systems, then the ‘domain check’ which is towards the bottom of the check list.
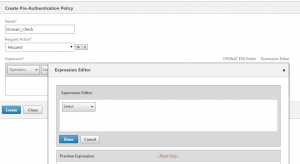
These choices reflect the type of scan, naturally for Mac based scans this would be the point to select that branch.
5. Choose the ‘+’ to the right of the Domain Check dialogue box. In this case the check will be to see if ‘contoso.com’ is the domain suffix. Enter the domain in the field and then click ok once this is done. The click ‘Done’ to add the check.

6. Now choosing ‘Create’ will create the policy the new policy.

- The expression editor with policy
7. To enable the policy it will now need to be bound to the Virtual server. This is done by editing the virtual server itself. Move to the NetScaler Gateway – Virtual servers section and select the virtual server and then choose the ‘edit’ option. Allow the HTML page to load and towards the bottom of the resulting web page there will be section called ‘Policies’. It will look like this:
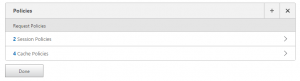
8. Choose the ‘+’ symbol in the top right of the Policies section.
- Choose policies
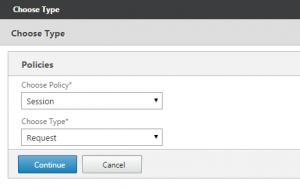
9. A selector box will appear, change the Policy type under ‘choose policy’ to ‘Pre-Authentication’ and choose ‘Continue’.

- Set the policy to be of type ‘Pre-authentication’
10. In the type section select the ‘Bind’ button and select the policy created in the earlier step ‘6’ with a check of the check box and choose the Insert option. This action binds the policy to the virtual server, so triggering the check when a client connects.
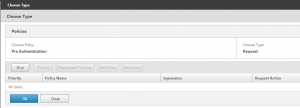
- Bind the policy from the earlier step.
11. Choose ‘OK’ and it should show the policies with the new pre-authentication policy also bound to the virtual server
- Virtual server policy list with the new pre-auth policy
Choose ‘Done’ to close the virtual server ‘edit’ session and return to the regular NetScaler admin screen.
12. Save the configuration, by choosing the disk symbol, highlighted in yellow.
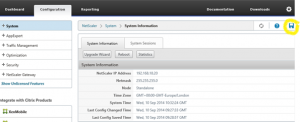
- Save the revised configuration
13. Once the scan has been enabled, test it with a suitable client that actually has domain membership matching the setting in the policy. Then repeat with a non-conforming client to verify the functionality of the new policy.
Other tests & combining policies
There are various categories of system scan that can be chosen as part of the scan for end user computers, so far the example has been just to test for a domain membership. The other categories that are available include:
| Operating System Type | Mac | Windows |
| Check Categories | Antiphishing softwareAntispyware softwareAntivirus softwareFirewallHard Disk encryption
Web Browser P2P Patch management MAC Address |
Antiphishing softwareAntispyware softwareAntivirus softwareBackup clientDevice Access Control
Data loss prevention Desktop Sharing Firewall Health Agent Hard Disk encryption Instant Messenger Web Browser P2P Patch management URL Filtering MAC Address Domain Check Numeric Registry Non-Numeric Registry |
Multi policy logic
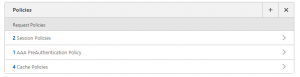
The pre-authentication policies work in a logical OR mode when policies are combined and bound to the same virtual server. So in this case, just one successful policy from the two will allow the user to reach the login box. So the virtual server policies section looks like this:

- Multiple policy view on the Virtual server
Within the bind section looking like this with two separate checks:

- Multiple bound policies
If it is required that two or more conditions need to be met to allow login (a logical AND), or some complex combination of policies is needed. A single policy can be created with a logic statement that matches the requirement. Such as the following example where a domain suffix test has a logical AND with the test for the generic AV scanner.

- Multiple Policy checking within a single policy object
As there is a logical OR at the Virtual server level, that would make a good place to create separate Windows and Mac policy sets.
Generic Tests
The various sections listed above, Antiphishing software, Antispyware software and Antivirus software and the others each include a generic scan at the top of the scan list. This allows for an administrator to scan for generic Anti-Virus products rather than looking for a particular vendor product.
The benefit of this is to allow a wide range of vendors without having to list every possible option and so this avoids creating many complex and difficult to manage policies.
Making operational changes to polices
In order to update or change a bound scanning policy, the policy needs to be edited within the virtual server ‘edit’ mode itself. This will allow changes or updates within the context of the virtual server.
Trying to revise a bound policy outside of the virtual server will result in the following message:
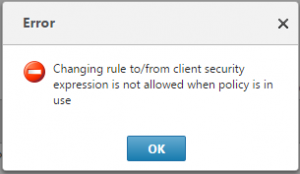
Alternatively, a new policy can be made as a copy of the current selection just by choosing the ‘add’ option while selecting the policy that needs to be revised. The next step will be to then update the policy name and then replace the current policy in use by revising the bindings on the virtual server. The benefit of this approach is that it provides a method of roll back should the new policy have some issues.
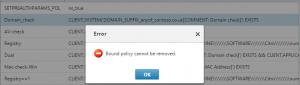
Deleting a bound policy
Once a policy is bound to a virtual server, before it can be deleted it needs to be unbound from the virtual server. If this is not done the follow message will be displayed.
- Bound Policy error message
Scanning in operation
The following set of screen shots show the behavior on the end point when connection for the first time, the installation of the EPA scanner is required only on the first connection to the NetScaler Gateway.
1. On initial connection the user will be prompted to download the scanning agent.
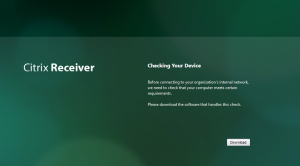
- The initial scan page, with download link
The user needs to run the executable that is downloaded to the client and install the program. No admin rights are required for this installation, both 64 bit and 32 bit clients are available.

2. Once installed the user can then navigate to the URL and the end point scanning agent will start and check the end point against the policy created earlier.

3. Assuming the policy matches the EPA windows will disappear and the user will be presented with a login page to allow them to enter some credentials for the appliance to verify prior to giving access to Applications and Desktops.
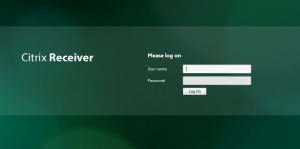
- The NetScaler Gateway login page
4. If the policy determines that the end point does not match the policy the following message is displayed.

- Access denied due to non compliance with policy
Troubleshooting AEPA Scans
The following article provide some pointers on the scanning process, however this is for the older scanning options. Google is handy but can provide some outdated links.
http://support.citrix.com/article/CTX135136
In terms of debugging, some information is available on the appliance and also a limited amount is placed on the client.
1) Detailed logging on the client is not available – this makes sense for a security perspective. As it is unnecessary for an unauthorized person to just be able to look at a log file and say “oh, I’m missing that regkey… let me add it get access”.
The client side nsepa.txt does include a CSEC code which can help identify which scan, possibly in a group of scans, that has failed. The admin would then need to verify what that scan actually was looking for. A zero code indicates a successful scan and a ‘3’ code indicates a scan failure.
2) Logging on the NS is performed and kept in /var/log/ns.log, however it currently has limited information about failed scans. Future options will be to enhance the logging available using a console.