
I loved magic tricks as a child and one Christmas I received a Paul Daniels magic set. The key to success for any magic trick is an acute focus on what the audience is actually seeing (or thinks that they are seeing) and I remember practicing in front of a mirror for hours trying to perfect the tricks which involved sleight of hand. This kind of focus on “user experience” is something I still find myself thinking about today when designing virtual desktop solutions.
User perception can make or break a deployment and one of the items that I see constantly getting overlooked during the design phase is the finer details of the end user experience.
In particular, controlling when and how resources are presented to users can have huge impact on the overall usability and security of an environment.
The good news is that XenDesktop 7.5 has a number of different tools which control when published apps and desktop are visible to users. Let’s take a look at the pros and cons of each filtering method to understand some appropriate use cases for each.
And finally, in the spirit of my handy Paul Daniels magic set I will give some worked examples for each method so you can practise the magic for yourselves at home.
METHOD #1 Delivery Group Access Policy
The simplest method of controlling application visibility can be done directly in the XenDesktop Studio console on a per delivery group basis. In this you can control whether applications appear based on a number of criteria:
- Filter for local connections
- Filter for Remote Connections (through a NetScaler Gateway)
- Filter for Remote Connections coming through a specific NetScaler Gateway and smart access policy combination
PROS:
- Any of the above filters can be combined to give a granular level of access.
- Powerful NetScaler Smart Access policies can be leveraged to only allow resources on approved endpoints using endpoint analysis.
CONS:
- Requires a NetScaler Gateway with smart access mode enabled.
- Applies to the delivery group level – all apps and desktops are either visible or hidden.
- Receiver Enterprise (Legacy PNAgent) does not understand Access Policy filters.
USEFUL FOR:
Access Policy filters are useful for removing an entire delivery group of secure published applications or desktops located in an isolated delivery group from external or un-trusted locations and devices. I have implemented this with public sector customers to only allow access to sensitive central government applications from approved remote locations using approved devices as identified via NetScaler EPA scans. For more information on Access Policy settings visit: http://support.citrix.com/proddocs/topic/xenapp-xendesktop-75/cds-set-access-policies-rho.html I also suggest you have a look at the following Citrix Consulting blog post which sums up perfectly how powerful SmartAccess is.
METHOD #2 Exclusion Filters
The access policies in method 1 actually have a number of extra filter settings under the hood that are configured with the XenDesktop SDK via PowerShell. They can be used to restrict visibility of delivery groups based on a variety of additional criteria including:
- Filter by Client IP address (white and blacklist)
- Filter by Client Name (white and blacklist)
- Filter by Smart Access Tag (white and blacklist)
- Filter By Users (white and blacklist)
PROS:
- Extra filters above and beyond the standard Access Policy GUI.
- Can be deployed without a NetScaler Gateway (only required for smart access based filters).
- Any of the above filters can be combined to give a granular level of access.
- Powerful NetScaler Smart Access policies can be leveraged to only allow resources on approved endpoints using endpoint analysis.
CONS:
- Applies to the delivery group level – all apps and desktops are either visible or hidden.
- Receiver Enterprise (Legacy PNAgent) does not understand exclusion filters.
USEFUL FOR:
This method is useful for deployments where a NetScaler Gateway is not being directly accessed by the client device.
I have implemented this method with a customer who wanted to prevent remote users from accessing a specific application from within a published desktop.
I started with a filter to hide the application from external users connecting from a NetScaler Gateway. This was then combined with a filter based on the client IP address of the XenApp worker servers hosting the remote user published desktop. This ensures that Receiver running within the published remote user desktop (which effectively becomes the client device connecting directly to StoreFront) does not see the application either. For more information on Exclusion filters visit: http://support.citrix.com/proddocs/topic/citrix-broker-admin-v2-xd7/set-brokeraccesspolicyrule-xd7.html
METHOD #3 StoreFront SDK Filters
New for StoreFront 2.5 the SF SDK now supports resource filtering on a per Store basis. Unlike the previous methods this also supports resource filtering on a per application basis rather than just the delivery group. Visibility can be restricted using the following:
- Filter by resource type (Published Apps or Published Desktops)
- Filter by Application Keyword
PROS:
- Does not require a NetScaler Gateway.
- Filter per individual application rather than per delivery group.
- Only method able to filter by resource type and keywords.
- Filters are per StoreFront store, multiple use cases can be addressed with multiple stores.
CONS:
- No Smart Access
USEFUL FOR:
SDK filtering brings the one feature I really missed from Web Interface and makes it better. Having the ability to hide specific applications and desktops from individual stores has huge potential for a variety of use cases. One such use case is hiding a published desktop from the receiver running within it while still retaining access to the published apps in the delivery group. For more information on SF SDK filters visit Feng Huang’s original blog post on the subject: /blogs/2014/03/27/hiding-applications-in-citrix-storefront/
DECISIONS DECISIONS….
So which filter is best? The answer in most cases will probably be a mixture of one or more filter types. You can combine multiple filters from multiple methods to give the user experience required for any given situation.
WORKED EXAMPLES:
As promised, here are some step by step example use cases to demonstrate how the above filters work.
PREPARATION:
Some of these methods use PowerShell to leverage SDK commands on the StoreFront and Desktop controller servers. There are a couple of steps you will need to do to enable the PowerShell commands.
- (StoreFront only) Load SF SDK Modules. From an Administrative PowerShell prompt on a SF server browse to the Scripts folder located in the install directory for StoreFront (default location is C:\Program files\Citrix\Receiver StoreFront\Scripts) and run type ./ImportModules.ps1
- (DDC Only) Load XenDesktop Modules. From an Administrative PowerShell prompt on a DDC server type Add-PSSnapin Citrix.*
- (Both StoreFront and DDC) Enable RemoteSigned applications. From an administrative PowerShell prompt type Set-ExecutionPolicy RemoteSigned
EXAMPLE #1 Delivery Group Access Policy Filters:
- Can be enabled by editing the properties of a delivery group. In the below example I have disabled resources from local connections by removing the tick from “All Connections not through NetScaler Gateway”. Furthermore I have restricted visibility to any connection coming via NetScaler gateway named “NSGW1”. In this example the entire delivery group will be invisible to users unless they are using the specific gateway NSGW1.
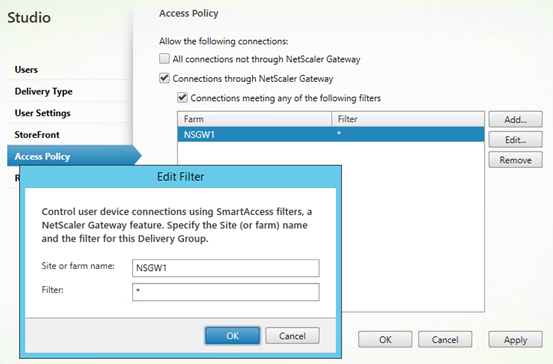
- Note that “Site or Farm name” should match the NetScaler gateway name exactly, while “Filter” should either be a wildcard as above, or match the particular NetScaler session policy you wish to target.
EXAMPLE #2 Exclusion Filters:
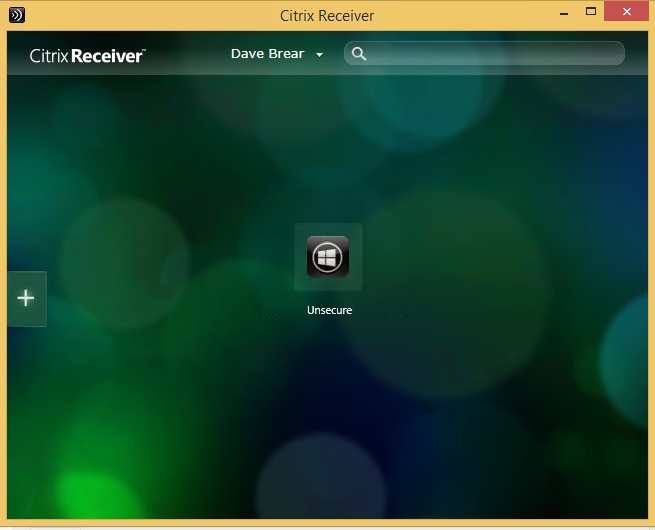
- In this example I have created two desktop groups called “Secure” and “Unsecure” I will use exclusion filters to hide the secure delivery group from a specific client IP address range. My test user account has access to both delivery groups as shown below:

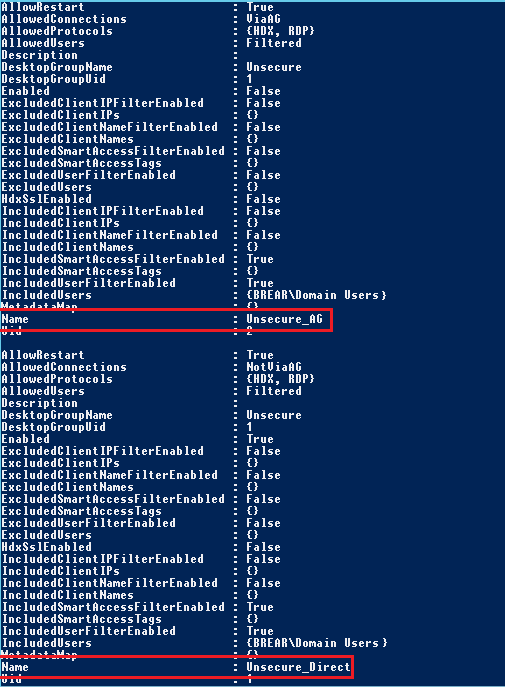
- I then checked the access policies on the Delivery Controller by running Get-BrokerAccessPolicyRule. As you can see, by default two policies are created for each delivery group called %DeliveryGroupName%_Direct and %DeliveryGroupName%_AG:
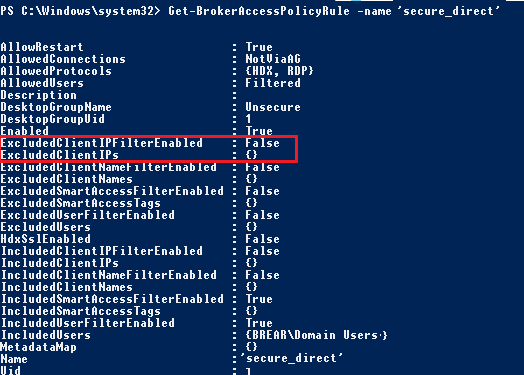
- Next I focussed on the “Secure_Direct” policy rule by typing Get-BrokerAccessPolicyRule –name ‘Secure_Direct’. This shows that ExcludedClientIPFilter is disabled by default.
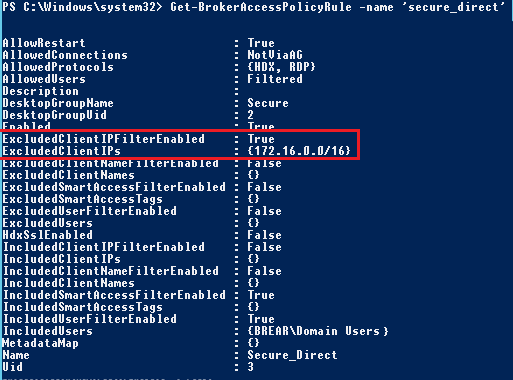
- I enabled them with the following command Set-BrokerAccessPolicyRule ‘Secure_Direct’ -ExcludedClientIPFilterEnabled $true –addexcludedClientIPs ‘172.16.10.0/16’. As you can see ExcludedClientIPFilterEnabled is now set to true, and the client IP range of my lab has been added to the policy
- I refreshed my Receiver on my client device and the Secure Desktop has vanished:
EXAMPLE #3 StoreFront SDK Filters:
In this example I will hide all published desktops and then proceed to hide individual applications from within a delivery group using specific keywords.
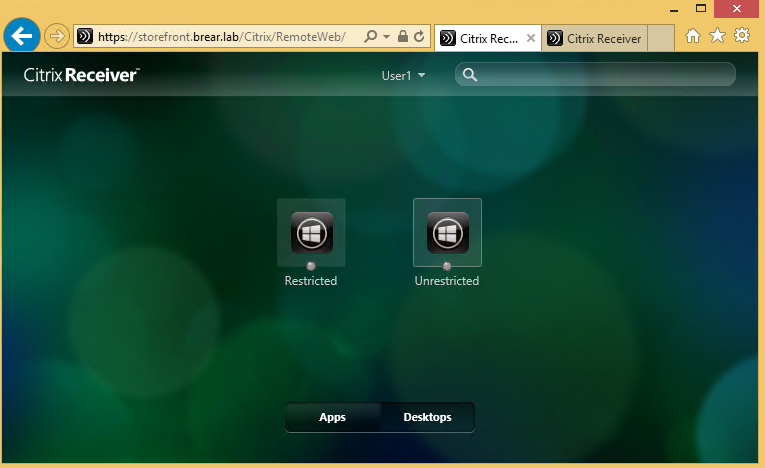
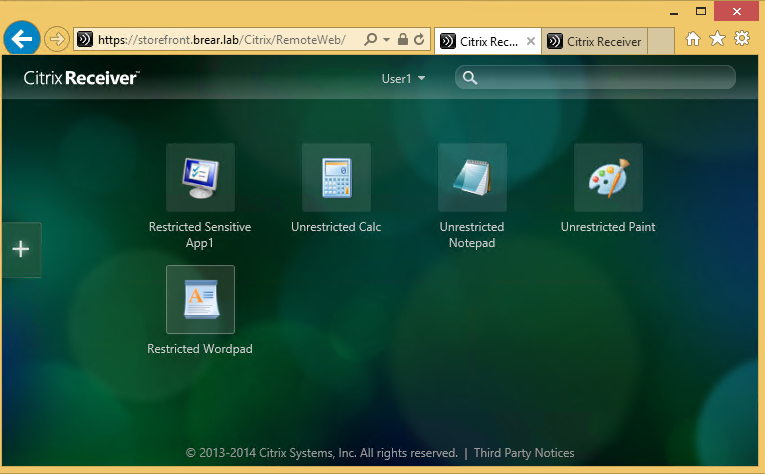
- I created two delivery groups called “Restricted” and “Unrestricted.” Each delivery group has a number of published apps which are all visible to my test user:
- I type the following command into an Administrative PowerShell window: Set-DSResourceFiltertype –SiteId 1 –VirtualPath “/Citrix/Remote” –includeTypes @(“Applications”) . SiteId can be found in the IIS manager console, but for most installs it will be set to 1. VirtualPath is the path of the StoreFront site after the FQDN – note that this should be to the native site not the web one:

- After refreshing Receiver you can see that the published desktops have vanished:
- Moving to the next goal of removing access to specified applications by keyword. I type the following PowerShell command: Set-DSResourceFilterKeyword –SiteID 1 – VirtualPath “/Citrix/Remote” –ExcludeKeywords @(“HiddenFromRemoteStore”)

- In the Studio console I edited the published applications I wanted to hide and included the following in the Description and keyword section: KEYWORDS:HiddenFromRemoteStore

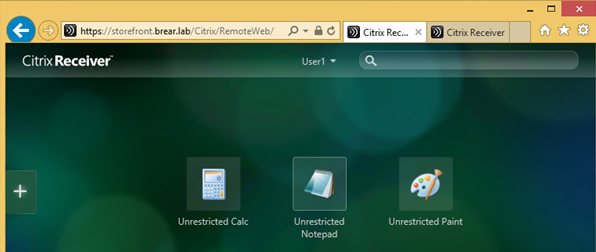
- Refreshing Receiver shows the two “Restricted” applications I identified by keyword are no longer visible:
Dave Brear – Citrix Consulting