StoreFront 3.0 has just been released. By now, hopefully you have learned that the headline feature for this release is to provide the unified user experience across all receivers and improve customizability.
If you would like to learn more about this, please refer to Richard’s blog articles here.
But back to the release! Today I would like to call out all the other new features available in StoreFront 3.0.
Please note that you have to import the StoreFront PowerShell modules before you can run any PowerShell commands described in this article. The following code snippet does this for you:
$dsInstallProp = Get-ItemProperty -Path HKLM:\SOFTWARE\Citrix\DeliveryServicesManagement -Name InstallDir
$dsInstallDir = $dsInstallProp.InstallDir
& $dsInstallDir\..\Scripts\ImportModules.ps1
Classic Receiver Experience
In order to help you smooth the transition to the new unified Receiver experience, StoreFront 3.0 continues to support the existing green bubble UI (referred to as the classic Receiver experience). This enables you to take advantage of all the new features immediately, and upgrade the user experience when your users are ready.
If you perform an in-place upgrade from StoreFront 2.x to 3.0, the UI for the existing Receiver for Web sites will remain as the classic green bubble UI. When you create new Receiver for Web sites after the upgrade or a fresh installation, users will see the new unified UI.
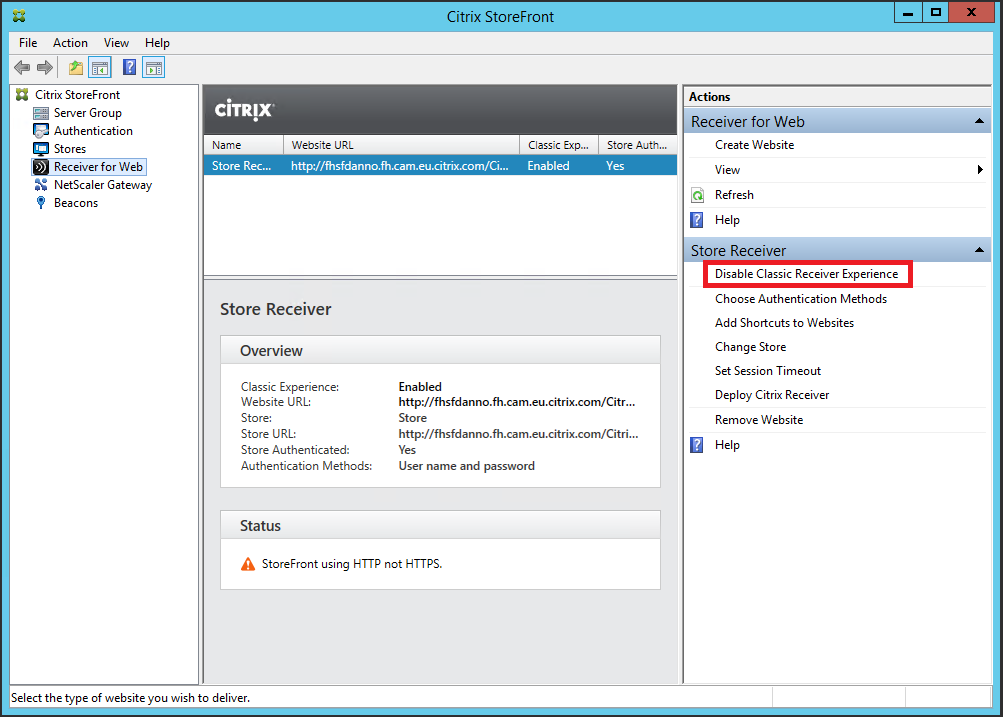
You can enable the new unified UI for an upgraded site using the StoreFront Administration Console by selecting the Disable Classic Receiver Experience action in the right pane for your selected Receiver for Web site.
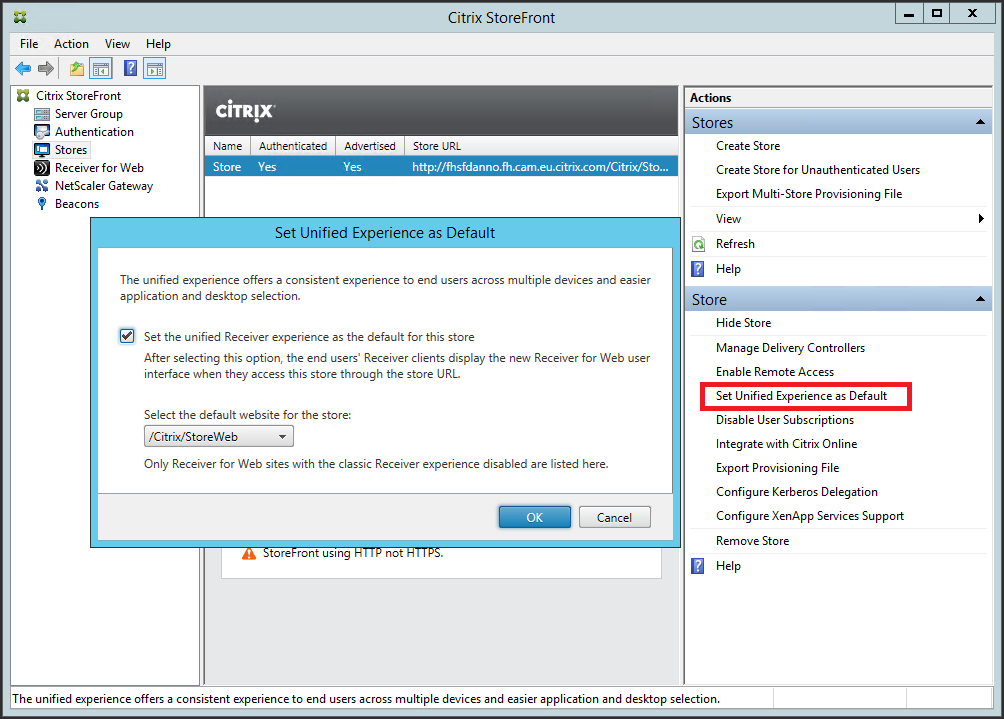
The above action alone will only enable the unified UI for your web users. In order to enable the unified experience for your users with latest native Receivers (such as Receiver for Windows 4.3 and Receiver for Mac 12.0), you also need to configure the Store.
- Select the Stores node from the left pane
- Select the Store you would like to configure in the middle pane
- Select the Set Unified Experience as Default action in the right pane
- Select Set the unified Receiver experience as the default for this store in the pop up dialog
- Select the Receiver for Web site to use for the native Receivers from the drop down list
- Select OK
Google Chrome Support without NPAPI
Google Chrome on Windows and Mac is fully supported without NPAPI out of the box in StoreFront 3.0. To take advantage of this, you have to upgrade both StoreFront and Receivers. Receiver for Windows 4.3 and Receiver for Mac 12.0 support this new technology. You can learn more details about the technology and user experience from my previous blog article here.
No More Editing of Hosts File
Previously, as stated here, Citrix recommends that you modify the hosts file on your StoreFront servers to ensure that Receiver for Web always talks to the local StoreFront server instead of the load balancer. In StoreFront 3.0, we leverage a new feature in the .NET Framework 4.5 to implement loopback communication between Receiver for Web and the rest of StoreFront Services. This is configurable using PowerShell cmdlet Set-DSLoopback, which syntax is
Set-DSLoopback [-SiteId] <Int64> [-VirtualPath] <String> `
[-Loopback] <String> [[-LoopbackPortUsingHttp] <Int32>]
The valid values for Loopback are:
- On – This is the default value for new Receiver for Web sites. Receiver for Web uses the schema (HTTPS or HTTP) and port number from the base URL but replace the host part with the loopback IP address to communicate with StoreFront Services. This works for a single server deployment and a deployments with a non SSL-terminating load balancer.
- OnUsingHttp – Receiver for Web uses HTTP and the loopback IP address to communicate with StoreFront Services. If you are using an SSL-terminating load balancer, you should select this value. You have to also specify the HTTP port if it is not the default port 80.
- Off – This turns off loopback and Receiver for Web uses the StoreFront base URL to communicate with StoreFront Services. If you perform an in-place upgrade this is the default value to avoid disruption to your existing deployment.
For example, if you are using an SSL-terminating load balancer, your IIS is configured to use port 81 for HTTP and the path of your Receiver for Web site is /Citrix/StoreWeb, you can run the following command to configure the Receiver for Web site:
Set-DSLoopback -SiteId 1 -VirtualPath /Citrix/StoreWeb `
-Loopback OnUsingHttp -LoopbackPortUsingHttp 81
Please note that you have to switch off loopback if you want to use any web proxy tool like Fiddler to capture the network traffics between Receiver for Web and StoreFront Services.
Delegating Authentication to the Backend Providers
StoreFront 2.x always communicates with the Active Directory to authenticate users. This requires that the domain hosting StoreFront servers has at least one-way external trust to the domain hosting the backend XenApp/XenDesktop farms/sites. This may not be possible in some deployments.
StoreFront 3.0 adds the capability to delegate authentication to the XenApp/XenDesktop farms/sites. This can be enabled by running the following PowerShell commands. Please replace the store and authentication virtual paths appropriately.
## set some variables relevant to your deployment
$SiteId = 1
$StoreVirtualPath = "/Citrix/Store"
$AuthenticationVirtualPath = "/Citrix/Authentication"

# change auth service to use XML Service auth instead of domain auth
Set-DSXmlServiceAuthentication -SiteId $SiteId -VirtualPath $AuthenticationVirtualPath
$fs = @(Get-DSFarmSets -IISSiteId $SiteId -VirtualPath $StoreVirtualPath) | where { $_.Name -eq "Default" }
Update-DSFarmSet -IISSiteId $SiteId -VirtualPath $AuthenticationVirtualPath -Farmset $fs
Treating All Desktops as Applications
Desktops are treated differently from applications in StoreFront/Receivers. They are placed in a separate Desktop tab and in the case of Receiver for Web, they are not reconnected with workspace control. In some use cases, it is desirable to treat desktops as applications so that they are placed together with applications and get reconnected as part of workspace control. With StoreFront 2.x, you have to add the TreatAsApp keyword to all published desktops to achieve this effect. This can be error-prone if you simply want all desktops to be treated as applications. It lacks flexibility too, if you want one store to treat desktops as applications and the other to preserve the desktop behaviour. StoreFront 3.0 enables you to configure treating all desktops as applications at the store level without the need of adding the TreatAsApp keyword to all the published desktops. This is configurable using the PowerShell cmdlet. The syntax is:
Set-EnhancedEnumerationOptions [[-siteId] <Object>] `
[[-storeVirtualPath] <Object>] [[-treatDesktopsAsApps] <Object>]
For example, if you would like to treat all desktops as applications for a store located at /Citrix/Store, the following command would configure it for you:
Set-EnhancedEnumerationOptions -siteId 1 `
-storeVirtualPath /Citrix/Store -treatDesktopsAsApps $true
Integrated Monitoring Service for NetScaler
Using NetScaler load balancer, you can set up a monitor to watch the health of StoreFront Services (see the screen shot of the NetScaler Admin UI below).
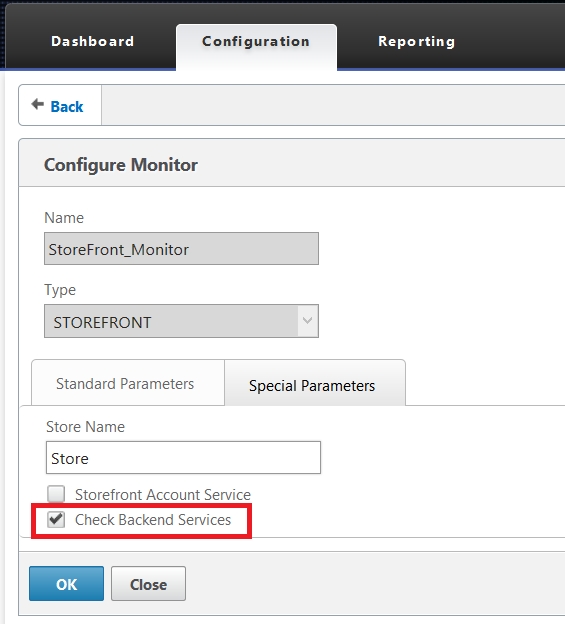
For StoreFront 2.6 or earlier, you have to install a separately add-on package on the StoreFront server to support NetScaler monitoring. This is now integrated in StoreFront 3.0. It is installed and enabled by default. You can use PowerShell commands to modify the settings of this service or disable this service.
To check the URL for this service, use the cmdlet Get-DSServiceMonitorFeature. By default, this service uses HTTP and listens on port 8000. You can change this to different schema and/or port by using the cmdlet Set-DSServiceMonitorFeature. For example, if you want to change the service to use HTTPS and listen on port 444, you can run the following command to configure it.
Set-DSServiceMonitorFeature -ServiceUrl `
https://localhost:444/StorefrontMonitor
If your deployment does not use NetScaler load balancer, you may want to remove this service by running the Remove-DSServiceMonitorFeature cmdlet.
Extended Store Customization SDK
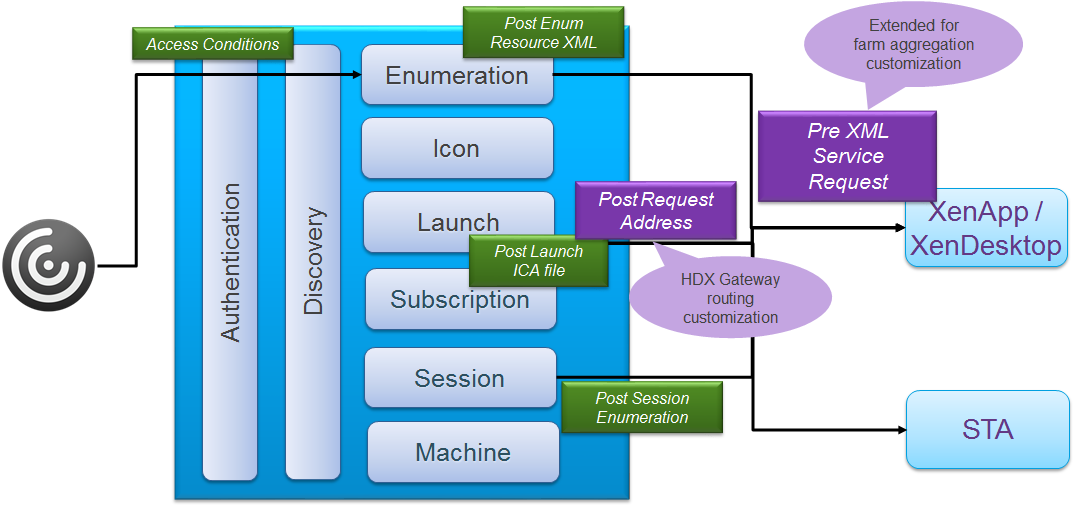
StoreFront provides a Store Customization SDK for advanced business logic customization. If you are not familiar with it, you are referred to here for further details. There are a number of extensions to this SDK in StoreFront 3.0.
- A new customization point is added during the launch process just after the broker allocates the VDA address but before NetScaler Gateway is selected. This enables you to change the Gateway to be used for the HDX connection based on the context data, such as the client IP address or VDA IP address etc.
- Various new properties, such as gateway information and HDX launch properties are added to the customization context data to provide more information to assist the customization choices.
- The pre-XML Service request customization point is extended to support advanced multi-site aggregation, such as modifying the equivalent farm sets, aggregation group and order of farms to be used for launch.
To provide further flexibility for customization, the StoreFront Web API is also extended to allow specified custom HTTP headers to be passed to the Store customization points. For example, you can extend Receiver UI to provide user session preferences and pass them to the Store customization points to modify the requests sent to the XML service or the ICA file. To allow custom HTTP headers to be passed to the Store customization points, you have to add the headers to the white list in the web.config file under the Receiver for Web site.
- Open web.config using your favourite text editor
- Locate
<communicates ...>...</communication> - Add a new section named forwardedHeaders with specified custom headers, e.g.
<communication …>
…
<forwardedHeaders>
<header name="Custom-Header-1"/>
<header name="Custom-Header-2"/>
</forwardedHeaders>
</communication>
Replace the values of the header names with your actual custom header names.