You may have read a post by my colleague Faisal Iqbal about how Citrix supports Smartcard Authentication from a CAC/PIV perspective. The gist of it is that we do support it in many different scenarios. While taking our word on it is all well and good, we often get asked to help support test environments that are not connected to production networks, and invariably these “closed network” tests have to support Smart Cards as well. The disconnect often happens that the folks setting up these test environments know exactly how to set up a domain controller, and often times a certificate authority, but are not well versed in how to set up a test CAC environment. So whether you’re a Govie, Contractor, or Integrator you just know that your environment supports Smart Cards without having to know the backend PKI that’s involved. Hopefully that’s where this post will demystify some of the confusion.
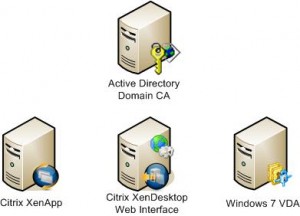
I’ll start by assuming that you know how to set up a simple XenDesktop POC. It’s really not difficult and there are plenty of resources to get you started on that path, whether our own Citrix E-Docs or blogs from knowledgeable Government partners like WWT’s Tech Lab’s vBlog. Your closed environment should have the following components in it. The only thing that’s not normally in a closed XD POC is a Active Directory Certification Authority, but we need it to support Smart Cards and simulate a real root of trust.
In my environment I used the JITC test CAC cards provided from DMDC. What’s not shown in the diagram above is a client. For simplicity’s sake in testing, I used a Windows 7 laptop with ActivClient CAC installed on it. I’ll get to CAC enabling thin clients in future posts.
Good testing procedure should be followed, so after you set up your POC ensure that you can do the following:
- Connect to a Win7 VDA using the standard browser connect to Web Interface.
- Connect to a XenApp Published Desktop using the standard browser connect to Web Interface.
If all that checks out, you know you’ve got a functioning XenDesktop environment, and can now add SmartCard authentication on top of it. I’ve broken this out into multi part steps; the first 2 steps set up the JITC test CAC infrastructure and the last 2 steps set up the Citrix Smart Card components.
STEP 1- Configure the certificates to validate the card
We need to figure out what certificate chains we need to validate these JITC test cards. The easiest way to determine this is to look at the certificates on the card with ActivClient CAC. We need to determine what the certificate chain looks like so we make sure that we have all the root and intermediate certificates. The first certificate is “DoD JITC ROOT CA 2”. Note that if you have your hands on JITC test cards, then you *SHOULD* know where to go to download the JITC root certificates. I won’t cover that here. The way it works is that the certificates on the card need to be validated against the issuing certificate. Starting with the client certificate, it was issued by an intermediate CA. The intermediate CA might have been issued by another intermediate CA, and so on until we get to the root issuing CA. With my JITC test card, JITC ROOT CA 2 is the root authority, and JITC EMAIL CA25 is my intermediate authority. I need my infrastructure to have the root and all intermediate CA’s known or else the chain of trust is broken.
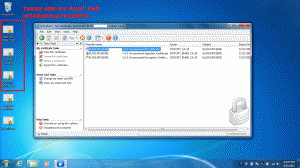
1.1) Collect all the certificates that you need in .cer format so that you can use a GPO to disperse them to the other computers in your domain. You should already have the ROOT CA 2 certificate, and you can get the intermediate certificates from your test card. Open up ActivClient CAC and export the certificates from your card. Once you have the certificates exported, you can open them up and look at the certification path. You’ll see the intermediate certificates that you need. View the intermediate certificates, go to Details, Copy to File and export them. Use the Base 64 (.cer) format, because there is a step ahead that doesn’t accept P7B files. Once here, transfer these certificates over to your AD for replication. Remember, we only care about the root and intermediate certificates, not the user’s actual certificates. I ended up with 3 certificates: 1 root CA, and 2 intermediate certificates. See the screenshot below, but note that I redacted my card’s EDIPI.
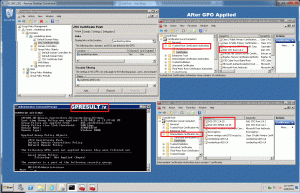
1.2 ) Create a GPO to push these certificates from your AD controller. Using GPMC, create a new GPO called JITC Cert Push, and then Edit the GPO. Expand down to Computer Configuration, Policies, Windows Settings, Security Settings, Public Key Policies. Highlight Trusted Root Certification Authorities and go to Action, Import and import the CA-2 ROOT certificate. Then highlight Intermediate Certification Authorities and import the intermediate certificates that are relevant to your card. Link the GPO to your domain. As an alternative you can manually install these certificates in these locations on all machines involved. Make sure all certificates are installed into the Local Computer store and not the user’s registry. If Local Computer is not an option for a physical store, after installing the certificates run mmc.exe as an administrator. This will allow you to add both the Local Computer and Registry store to the console and move the certificates after installation. You should ensure that your GPO is being applied to your domain. Do this by logging into your Windows 7 VDA and running a gpresult /v and looking at the Computer Settings section. If your GPO is working correctly, you will see it is getting applied. If your GPO is incorrect, you may see it being filtered out. You can also open the Cert Manager in the MMC SnapIn and see if the JITC certs are in the Root and Intermediate Certificates stores.
1.3) While still on your AD server, import the root and intermediate certs into your AD certificate CA containers for authorization. Open Server Manager, expand Active Directory Certificate Authority, and right click on Enterprise PKI, select Manage AD Containers. Under the NTAuthCertificates tab, add the CA2 and intermediate certificates.
1.4) Allow the .mil suffix in your AD controller. On the domain controller, open AD Domains and Trusts. Right click the top level node AD Domains and Trusts, not the domain name and select properties. Add “mil” as a valid UPN suffix.
1.5) Validate that the certificates appear in the registry correctly. Sometimes the certificates may not appear correctly in the NTAuth store. Symptoms that point to this are when you try and login using the smart card from a domain joined machine, but are unable to login with an error that it could not validate the certificate or one of the certificates in the chain. Validate this by looking in regedit at the key: HKEY_LOCAL_MACHINE\SOFTWARE\Microsoft\EnterpriseCertificates\NTAuth\Certificates. You should see one blob per certificate, so I see four blobs in my key (1 domain, 1 root ca, 2 intermediate). If you added 3 certificates to the NTAuth Store but only see one blob, you have run into this issue. If you don’t have a matching number of blobs to certificate, the resolution to this is to add the certificates on the command line using certutil -enterprise -addstore NTAuth CertFilename.cer. You should always check the registry location before and after you use this certutil command to make sure that it’s working.
Step 2 – Create mapped user accounts in AD
Now that the infrastructure is basically set up, we need to create a user account that maps back to the EDIPI of the card. We can usually find that in the Subject Alt Name/Principal Name of the Signature certificate on the card when looking at the card in ActivClient. On older cards, mostly the Oberthur models, the EDIPI is printed on the back of the card. This isn’t always the case on the new Gemalto cards.
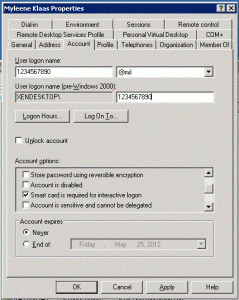
2.1) Create a user account with the EDIPI as the account name and @mil as the suffix. The pre-windows 2000 name does not need to match. Set whatever password you like and set it not to expire and not changeable by the user. After the account is created, go to it’s Properties, and on the Account tab, check the box to require smart card for interactive logon.
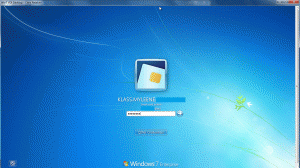
2.2 ) This is the testing step. This is easily done by joining your endpoint test system to the domain and use the smart card to log on to the local machine. Long logins will indicate that the current CRLs are not installed. If login fails and the CRLs are not installed, first attempt to browse to the JITC CRL site to confirm it is available. If it is not that, testing should not resume until it is accessible and you can download the CRLs. If you are truly “offline”, you can download the JITC CRL’s for your root and intermediate certificates from the DISA site and replicate them in your GPO that we set up earlier.
STEP 3 – Configure SSL for client to server communication
We need to ensure that the traffic to WI is encrypted, and the assumed scenario is LAN clients, so this does not cover using Secure Gateway/Access Gateway as an ICA proxy. This is simply to ensure authentication over SSL as we wouldn’t want to pass a cert/PIN over clear text.
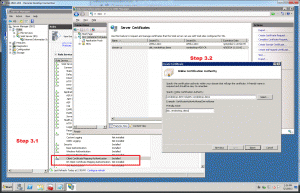
3.1) Log in to your Web Interface server. We need to add the required roles for the IIS server to ensure we can read client certificates. This is not installed by default when you install Web Interface, so we need to open Server Manager, highlight the Roles node and scroll down to the Web Server’s Role Services section. Click Add Role. Add Client Certificate Mapping Authentication and make sure IIS Client Certificate Mapping Authentication is not installed.
3.2) Get a certificate for the Web Interface site from the Domain CA. Open the IIS Manager on the Web Interface box, highlight the server name on the left, choose Server Certificates on the right. Select Create Domain Certificate, enter the information for the certificate request, and then choose your CA from the Browse box. After following the prompts, you should have a new SSL certificate for your IIS.
3.3) Add the SSL binding to the default site. Click the Default Web Site, choose Bindings on the right menu, click Add, Choose HTTPS, and select the SSL certificate that you just got from the domain CA.
3.4) Validate that your client computer can connect to the Web Interface. Open a browser on the client workstation and browse to https://<url of WI server>. If everything worked, you will get a certificate warning from your browser (if your client machine is not domain joined or does not have the root CA cert from your AD CA). You should still be able to log in and start connections. If so, you are cleared to proceed ahead.
Step 4 – Create a new WI site just for Smart Card authentication
We don’t recommend that you have multiple authentication methods available on a single site, such as Explicit and Smart Card. It’s much easier to manage when you have multiple sites.
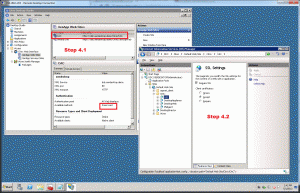
4.1) Open Web Interface Management Console or Desktop Studio if your DDC is your WI server. Select Web Interface Sites and click Create New. Give the site a unique name such as /Citrix/CAC and allow WI to create the site. When asked to configure the site, click yes and select Smart Card as the authentication method, and Authentication at Web Interface. You should provide your DDC and XenApp farm servers. You can test this step by disabling SmartCard and enabling Explicit credentials. Then from your test workstation, open the “https://<url_of_WI>/Citrix/CAC” and make sure that you can log in using known username and password. Make sure to change it back to Smart Card after you’ve validated that you can enumerate and launch sessions.
4.2) Enable Smart Card authentication for this new WI site by opening IIS Manager. Highlight the server name and double-click Authentication on the right. Enable Active Directory Client Certificate Authentication. Continue moving down tree on the left until you reach the sites you created in the Web Interface Management Console. Select the site you created in 4.1 and double-click SSL Settings on the right. Check the Require SSL box and select Accept under Client Certificates for sites requiring smart card authentication. Make sure to apply the settings.
4.3) On the Domain Controller open AD Users and Computers. Find the Web Interface server computer account, right-click it and select Properties. On the Delegation tab check the Trust this computer for delegation to any service box.
4.4) Now we need to set trust level on DDC. Open PowerShell on the DDC. Run “Add-PSSnapin Citrix.*” to add the Citrix modules. Run “Set-BrokerSite -TrustRequestsSentToTheXmlServicePort $true”.
4.5) You should install ActivClient CAC on any resource that a user will use such as the XenApp server and the XenDesktop VDAs. Make sure that you have the latest version as some recent issue cards need recent releases of ActivClient.
Step 5 – Final testing
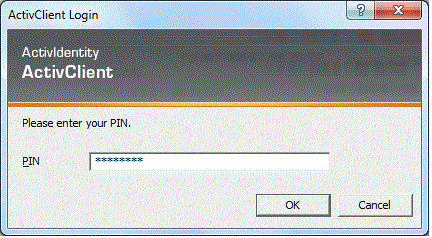
We’ve successfully set up the JTIC test CAC infrastructure in Steps 1 and 2. We’ve also set up all the very basic Citrix components in Steps 3 and 4. We should be ready to test. Insert your SmartCard into your client machine, open up a Web Browser and hit your new WI site, which should be something like “https://<url_of_WI>/Citrix/CAC”. You should get a prompt to select your certificate from the card. Choose your e-mail certificate because we know that your EDIPI is always in your e-mail certificate. You should then get a prompt from ActivClient for your PIN while the webpage loads. When you enter your PIN, you should be shown all the resources that are available to you. When you launch a Windows desktop, you will be prompted to enter your PIN again.
Away you go. Setting up the JITC test environment isn’t as hard or mystifying when you can approach it systematically and test as you go. Hopefully I’ve provided enough sanity checks throughout the configuration process to help you determine where things may go wrong. With live CAC cards, the production AD and PKI infrastructure should be set up so you only need to follow steps 3 and 4 on your XenDesktop infrastructure. This works the same with SIPR tokens, but instead of installing the ActivClient you use the 90 Meter middleware, as well as make sure that your EDIPI suffix matches the accepted UPNs, such as smil.mil.
Special thanks go out to Adam Oliver and Faisal Iqbal for both plagiarism and assistance in replicating this environment. If any of this has been helpful, please let me know.

