
One of the most common PVS questions Citrix Consulting Services (CCS) is asked about is what is the best way to replicate vDisks between PVS stores. Some colleagues and I thought it was time to develop a utility that would help customers simplify this process. To that end, I met with several very smart and talented colleagues: Dan Morgan and Miguel Contreras, both from CCS, and Martin Zugec from Technical Marketing. You may have worked with them in the past, and you have probably read many blog posts from each of them over the years. On this project, they all provided me with script examples and helped me work through the many possible ways to do this.
When we decided to start the project, the first thing I did was take Martin out to dinner so I could pick his brain on the best way to approach the scripting technically. Martin has written three of what I consider definitive Blogs on understanding PVS internals and he is incredible with PowerShell, to the point of making it art. If you want to bone up on the subject you should read all his PVS blogs:
PVS Internals #1 — Cache Manager
PVS Internals #2 — How to properly Size Your Memory
PVS Internals #3 — Designing vDisk Store
What Martin taught me was that PVS uses the Windows Cache Manager as the mechanism to cache vDisks. So, we need to understand how the Windows Cache Manager works with different copying methods. There are two types of copying we could use for the replication; buffered and unbuffered. Originally I was going to use unbuffered IO so that the replication did not displace vDisks currently being used from the cache. After discussing this with Martin I found out that the buffered copy moves the file into the cache at Priority2 while PVS vDisks use cache Priority5. Files with higher priority are preferred to remain in the cache. Therefore, it may be an advantage to use the buffered copy rather than unbuffered, because if there is free standby cache available, the new vDisks will be pre-cached and still not affect any running vDisks.
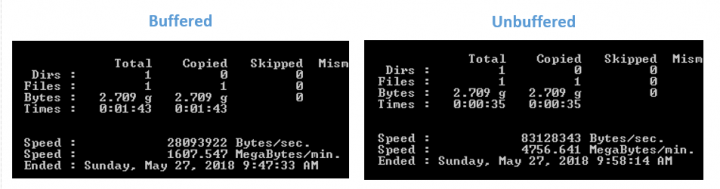
To see for myself how this works I downloaded Process Monitor from SysInternals and installed it on one of my PVS servers. I opened it and took a screenshot of the standby list as a baseline. I then used robocopy to copy a 2.7 GB ISO using buffered and unbuffered copies. The results are shown below.
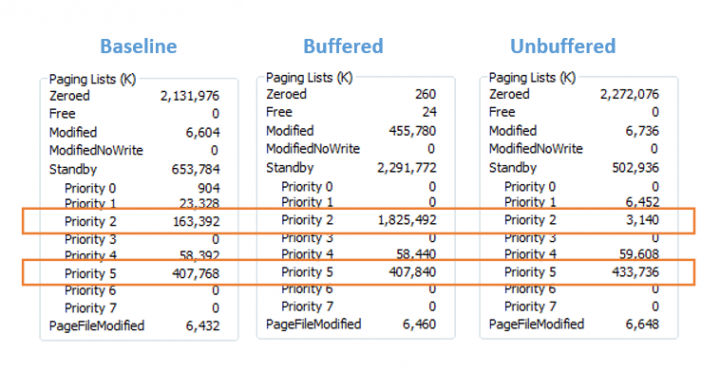
Note that with buffered copy only Priority2 is changed. Then with the unbuffered copy there is really no change to the standby cache. However, I did a little more testing because I noticed that the unbuffered copies are faster. I found in testing that it is about 3 times faster to use unbuffered copies as shown here.
Update 1-20-2019
Well I thought that was always true. But in working with customers and accounts that have much faster networks, we found that on 10 Gb/s networks and up, buffered copies are actually faster.

Based on these results, I decided to support both copy models with the scripting, allowing the administrator with the ability to choose their preferred method. That way if speed of replication is more important than pre-caching, then that choice is possible.
One of the key decisions I had to make for the scripting is what tool to use to copy the files. I decided that robocopy would be the best choice for a utility to copy the vDisks. I love robocopy and thought it was perfect for this use case for many reason:
- It’s part of Windows and therefore readily available.
- It handles all the heavy lifting. We can use the /MIR directive and it will keep our stores in sync.
- It performs well and can be tuned by setting the number of threads it will use.
- Most administrators already know how to use it.
- It has great logging and is easy to configure using text files.
- It is one of the few tools that supports unbuffered copy.
Now that you have the background, let’s talk about the utility I created. First, I am doing this to help Citrix customers be more efficient. However, realize this is really an example of what can be done with PVS and PowerShell. You are free to use the utility with no strings attached. You can modify the utility for your own use. But the utility is not supported by Citrix support. I will do my best to stay up on comments to this blog and will answer questions and address issues as I can, but do not call Citrix support if facing an issue related to this utility.
OK, I said one of the key design goals for the new utility was to support all use cases for vDisk replication. This means supporting all of the following:
- Replication within a PVS Site.
- Replication between PVS Sites.
- Replications between PVS Farms.
You can also support all three if you need to. For example, you may first want to copy to one server in a second farm, then to all the other servers in that farm from that server. Also, the utility needs to support copying the disks in any order. You should be able to copy disks one at a time or all at once. This gives you control over the amount of bandwidth used on the source servers against the time it takes to handle the entire replication.
Replication Within a PVS Site
First let’s Look at the most common scenario where we want to copy a vDisk from a Master Server, which is just a PVS server we decide to make all our changes on, to say three other PVS servers in the same site.

Using the utility, we can configure it to copy to all three servers at the same time (signified by the red circles) or one after the other (signified by the blue squares). The main difference is that the bandwidth usage required on the Master sever will be much lower if we copy serially, but it will take much longer for the entire process to complete. You could also copy two first then one or vice versa trading off time versus the amount bandwidth required. This could be important, depending on how many target devices boot during that time, how many total target devices there are, and how much activity is expected during the replication time.
Replication Between PVS Sites
The utility assumes by default that all servers in all sites in the same PVS farm can be copied without a bridgehead server (AKA Secondary Master), as shown below. Similar to the first scenario, whether the copies occur serially or in parallel is completely configurable to control the bandwidth used on the Master server.
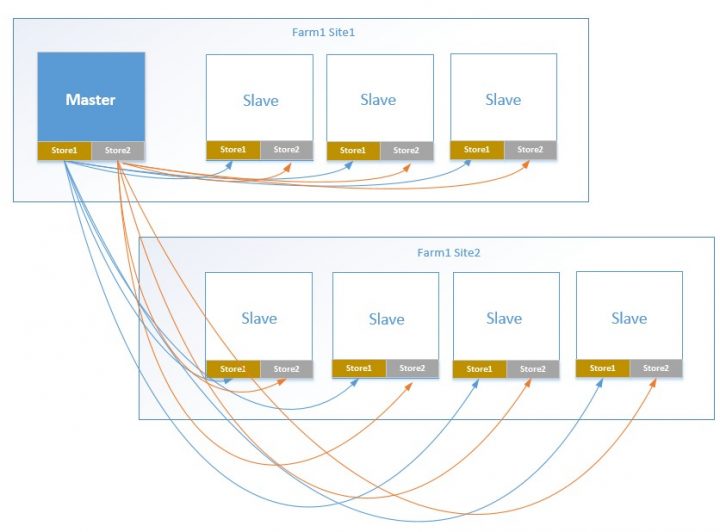
If the PVS sites you are replicating between are in different datacenters and your inter-datacenter link is bandwidth-constrained, you you can configure a server in the remote site to function as a bridgehead/secondary master server and the utility will add jobs to sync from the bridgehead and save considerable bandwidth on the inter-datacenter circuit.
Replication Between PVS Farms
Let’s look at another common need, which is to sync up two PVS farms in different datacenters. To make it more interesting I have included two stores per server.
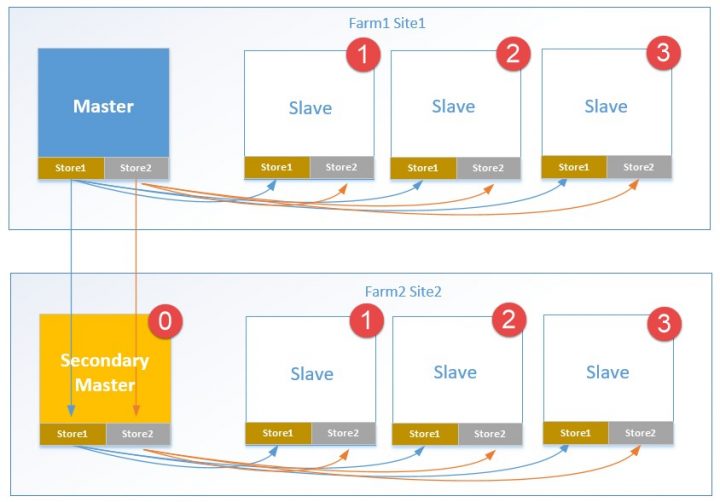
The vDisk is first copied to a Secondary Master in the second farm. Then, the Secondary Master is used as the source for all the vDisks in that site. Also, we have configured the utility to wait until the secondary site master copy is complete, then serially update the other servers in each site. Many possible combinations of these settings exist and can be configured for use with the tool.
In sum, I tried to make the utility work across the broadest set of use cases and environments that I could. I hope you find that it is very easy to use. This will be true if you designed your PVS infrastructure in ways we expect. However, if that is not the case, you may have to manually set up the configuration files that drive the scripts or make some tweaks to the code. If you find this the case, please come back to this blog and leave me a message with why the utility didn’t work for you so I can try to address it in a future version.
Installation
You may have noticed that I am calling this a utility and not a script. That is because I have created a UI that allows administrators to quickly build config files that tell the script what to do. The UI was created as a Microsoft HMTL Application (HTA). I like HTA’s because I find them powerful, easy to create, and they always work in Windows. The first thing you need to do to use the utility is to download the zip file, and unblock it, which will unblock all the scripts within it. To unblock it, open the properties of the zip file and click on the “unblock” check box. Then unpack the utility to a path. I always use a path with no spaces off the root on my workstation. I then disable inheritance on that folder to allow writes into the subfolders of the utility. If you are just testing you can run this from anywhere. If you are setting it up for production, I would install it on the machine you use as a scripting server in your Citrix environment. Then log on to that machine with a service account that you plan on running the utility as. The utility requires the following:
- Account with local Administrator permissions on the scripting server.
- Account with local Administrator permissions on PVS servers.
- Account in Citrix Administrators Group in PVS
- PVS Console Installed on the scripting server.
- PVS Version 7.7 or later
- PSEXEC copied into the PowerShell folder for the utility or Configuring PowerShell Remoting with CredSSP Authentication enabled
- Ports open required by PSEXEC
- Store names that match on all servers (this can be manually adjusted)
- .Net that at least matches your version of windows
Remoting Method (added 5-25-2021)
The utility will connect to each Provisioning Server to run robocopy scripts used to pull the vdisks to each target server. The utility allows for this remoting to be performed either by PSEXEC or PowerShell Remoting. PSEXEC is the default and requires very little configuration except downloading PSEXEC. If PowerShell Remoting is used there is more configuration required.
In order to properly configure PowerShell sessions to run remotely, PowerShell Remoting must be enabled on the console machine and any managed Provisioning servers. See about_Remote_Requirements for more details. Also, to allow the utility to use credentials on the remote computer so that the network can be accessed properly, the Credential Security Support Provider (CredSSP) must be configured on both the console machine and Provisioning Servers. CredSSP allows the console machine to delegate its credentials to each Provisioning Server and allows each Provisioning Server to accept them. The documentation can be confusing on this, but the console acts as the client and the Provisioning Servers act as the server for CredSSP. To make this easier, I added a script that you can run from the setup tab to connect to each server and run the Enable-WSManCredSSP command. On each server it will run:
Enable-WSManCredSSP -Role Server -Force
On the console machine it will run the following for each Provisioning Server:
Enable-WSManCredSSP -Role Client -DelegateComputer $ServerName -Force
Note: $ServerName will be the shortname of each server because the Provisioning Server PowerShell commands use the shortname.
Configuration/Setup
When you set up the script you must enter a credential that is used by PSEXEC when it launches the PowerShell script on each PVS server to run the robocopy commands. The credentials will be saved using a PowerShell function where the credential is hashed based on the user account and computer where the credential is saved. This is why it’s important to log into the scripting server using the service account the script will “Run As.” If you don’t do that, the script will not be able to unencrypt the account information and it will fail.
After you have the utility unpacked, and in its’ folder, run the reg file included with the script called “HTARunAs.reg.” It will configure a right-click menu item to allow you to run HTA’s “As Administrator.” Then right click on the HTA and run it “As Administrator.” The utility will open. Click on the setup tab and fill in the information. There are five sections to configure as seen below.

In the setup you will define the information required by the different scripts to work. This includes primarily the PVS servers that are the source for both obtaining the required PVS information as well as the servers where vDisks will be imported.
- Farm Master Servers — A master server is the source of the vDisk replication. The utility is designed so that the first entry made in the Farm Master Servers is the “Primary Master” meaning that it is where you will make changes to your vDisks and it will be the source for the replication to other servers, sites and farms. If you have one or more secondary farms then you will add additional “Secondary Master” servers here as well. These will be configured as bridgehead servers for the secondary farm. Also, when the vDisks are imported for a site they will be imported using the Secondary Master.
- Secondary Site Import Servers — After the replication is complete the vDisks are automatically imported into PVS for any sites other than the one the Master Servers are in. The servers added here will be used for the import process. The drop down should already list the servers to choose from if you have more than one site.
- Save Credentials — Use this section to enter the credentials used to run the robocopy PowerShell script on PVS servers.
- Time Limit — The master script will run in a loop executing jobs on remote PVS servers. The script waits for the jobs to complete, then creates new jobs as dictated by the ordering of the replication jobs. If there are issues and the remote jobs never complete, this time limit will be reached and the master script will be closed out cleanly.
- Copy Method — The utility can use either buffered or unbuffered file copies. The default is unbuffered, which will provide faster replication times. Switching to buffered file copies will pre-cache the vDisks, if there is standby cache available.
- Disk to Use for Remote Server Storage – This field is used to define the path used on each Provisioning server to copy and run remote scripts. By default it will be set to c:\vdiskreplicator.
- Remove Deleted vDisks form the PVS console – If enabled deleted vDisks will be removed from secondary Provisioning Server consoles.
- Cleanup unused lok, pvp and xml files – If enabled the script will remove lok, pvp, and xml files if a vdisk file no longer exists.
- Storage Space Warnings – Define percentages used for warning and critical settings in the storage space usage report.
- Remoting Method – Choose PSEXEC or PowerShell Remoting. Optionally download PSEXEC or run teh CredSSP script to configure CredSSP on all fo the Provisioning Servers.
After saving all the setup parameters use the email tab to configure the utility to send status emails after running the scripts. The status email will include information on each robocopy job and whether any replicated vDisks were successfully imported. The email will also include all the robocopy logs, the remote script logs and the master script log.
Now you are ready to set up the replication. Use the Stores tab to define all the stores in your environment. First click on the “Get Stores” button. A script will be run to pull in all the stores from the defined Master Servers. This will generate Master/Slave pairs where the stores names match. If you need to add pairs where the store names are different, then use the manual add feature. To use this feature first click “Populate”. A PowerShell script will query all the PVS servers defined in the setup tab and add the servers/stores to the Source and Destination drop down boxes. After the script is complete, choose the desired Source and Dest pairs and add the selections to the Stores table. Then you can add them to the process table as described in the next section.

The list includes the Type (Automated or Manual), Farm, Site, Server and Source/Destination for the Master and Slave Stores. Check the Action checkbox for all the store pairs you want to include in your default replication script and click “Add to Process”. This will add any of the selected lines to the process tab.
Bandwidth Limiting
In Version 3.2 I added the ability to limit bandwidth on slower network circuits. Robocopy includes a feature that allows limiting the bandwidth used while copying files. It does not limit bandwidth directly, instead it inserts a gap between packets that has the effect of limiting bandwidth, because the packets are sent out with a delay. This gap is called an “inner packet gap” or IPG. The utility can configure an IPG for each desired store copy. I added a calculator that will help determine the proper IPG. Use the calculator to determine the IPG for your connection, then enter that value in the Bandwidth Limit (IPG) field on the Process tab. Only rows with a value greater than zero will be limited. Note this feature is not as configurable for higher bandwidth connections (those over say 1 Gb/s) because the IPG will go quickly to a single value. About the lowest you can configure bandwidth on a 1 Gb/s link is 500 Mb/s.

The IPG Calculator allows you to determine the desired IPG settings for your store copies. Once you determine the setting this can be added on the Process tab. An IPG setting of Zero or blank means do not limit the copy. I would recommend this setting for LAN copies.

The last tab in the interface is the Process tab. The Process tab allows you to manually run the script. You can use the process tab to run one or all of the replication jobs manually. If you make changes in the process tab you must save it before running the script because the script uses the saved configuration files, not what is shown on the UI. Just remember the saved settings become the default. The Process tab also has Backup and Restore buttons. You can backup the configuration before changing it if for example you just want to replicate a single store. Then when your done, just click restore to get back the standard configuration.
Use the order field to configure the order of the replication. Using 0 means the robocopy job will be run when the script starts. Any lines with a 0 are all started at the same time. To configure one copy job after another, enter the predecessor line # from the first column into the order field for the line you want to follow it. In the example above the job 5 will follow the job 3 and job 8 will follow job 7. Any order should be possible using this interface. When you have configured all the lines you want to include in the default replication click the save button and this configuration will be saved to be used by the script.
The UI provides the ability to run the replication or to test it.
If you use test a “/L” is added to the robocopy rcj file and robocopy only logs what it would do, rather than performing any copies. Also, the vDisk imports are skipped. But everything else is run, including creating folders and copying the script files to all the PVS servers, running robocopy using the supplied credentials, creating the log file and status email. I would always recommend running once in test mode before using the utility in standard mode.
The PowerShell Script
The last thing to discuss is how the PowerShell script works. This won’t be a techie description of the actual scripting but just how the process works. The script first opens all the configuration files and reads the job table into a table in memory. The script then looks at all imported vDisks and versions to see if any are in Private Mode. If any are found, they are added to the file exclusion list used for the robocopy configuration. This way only Standard Mode vDisks are replicated. When PVS disk versioning is being used, the script will exclude any version that is not in Production Mode.
The script then loops through the jobs and first starts the jobs with an order of 0. The jobs are run remotely using PSEXEC on each slave server. The loop executes every minute and it checks the jobs that were started to see if any have completed. If a job status changes to completed the script looks for any other job with the completed job number in its order field. If there are any, then those jobs are started and the looping continues. Jobs that are completed are then ignored. This loop will run until all jobs are completed or the time limit is reached.
I had to add some logic to handle the fact that robocopy will over-write an active vDisk that is different from the Master Server version. This is because PVS server does not create a file system lock on the vDisks it uses its own locking mechanism. To deal with this issue the script will now check each vDisk fiel to see if it has any active connections. If it does, the vDisk will be added to the robocopy file exclusion list and it will not be replicated until it is no longer in use. This change was created in version 3.8.
When the loop is exited the script moves on to import the vDisks into the Master Servers and Secondary Site Import Servers. Lastly the script gathers all the logs, creates the status email and sends the email to the defined recipients.
Using A Scheduled Task
To run the utility on a regular basis set up a scheduled task on your scripting server. Remember the following points when creating the scheduled task:
- Run the task as the user you used when configuring the utility.
- Run with highest privilege.
- Configure for the latest version of Windows.
- Run when user is logged on or not.
- Start a program pointing to the vDiskReplicator.ps1 file.
- Start in the PowerShell folder under your utility folder.
I know this blog was long but really there is a lot to go over if you want to really understand the process at a deep level. Please let me know if you try the utility and provide any thoughts you have on how it works or what can make it better.
Lastly, and possibly most importantly, this is version1 of this utility. I have tested it in my lab but it has not been tested by customers at the time this blog was released. Please start by using this in your lab. Treat it like any script you would develop yourself and test it well before adding it to your production environment. Remember this is to be used at your own discretion and is not supported by Citrix.
This software application is provided to you “as is” with no representations, warranties or conditions of any kind. You may use and distribute it at your own risk. CITRIX DISCLAIMS ALL WARRANTIES WHATSOEVER, EXPRESS, IMPLIED, WRITTEN, ORAL OR STATUTORY, INCLUDING WITHOUT LIMITATION WARRANTIES OF MERCHANTABILITY, FITNESS FOR A PARTICULAR PURPOSE, TITLE AND NONINFRINGEMENT. Without limiting the generality of the foregoing, you acknowledge and agree that (a) the software application may exhibit errors, design flaws or other problems, possibly resulting in loss of data or damage to property; (b) it may not be possible to make the software application fully functional; and (c) Citrix may, without notice or liability to you, cease to make available the current version and/or any future versions of the software application. In no event should the code be used to support of ultra-hazardous activities, including but not limited to life support or blasting activities. NEITHER CITRIX NOR ITS AFFILIATES OR AGENTS WILL BE LIABLE, UNDER BREACH OF CONTRACT OR ANY OTHER THEORY OF LIABILITY, FOR ANY DAMAGES WHATSOEVER ARISING FROM USE OF THE SOFTWARE APPLICATION, INCLUDING WITHOUT LIMITATION DIRECT, SPECIAL, INCIDENTAL, PUNITIVE, CONSEQUENTIAL OR OTHER DAMAGES, EVEN IF ADVISED OF THE POSSIBILITY OF SUCH DAMAGES. You agree to indemnify and defend Citrix against any and all claims arising from your use, modification or distribution of the code.
Updated 6/21/2018 Version 1.1 to fix bugs with multisite replication status and assigning buffered or unbuffered copies.
Updated 6/30/2018 version 2.0 Added the ability to choose which vDisk files to replicate. See the help for details. One important thing to note when using this feature is that once you select just certain files for replication, whenever the script is run, it will only include those files until you clear the selection. I also made several small fixes within the UI and explained a few things better in the UI and help.
Updated 7-5-2018 Version 2.0.2 Fixed issue with the HTA saving the email config and running the email test on Server 2016. This was due to a pathing issue where 2016 treats “cmd /c” differently than other OSes. Also fixed the issues with Access Denied for the robocopy jobs. I added a -h in the PSEXEC cmdline so the job would be elevated. I also tested using an account with just local admin and not domain admin.
Updated 7-11-2018 Version 2.1 Added the ability to manually add any source and destination stores. Fixed an issue where network based stores could not be replicated between sites. Fixed an issue where files could not be selected when using network stores. Removed Order from the stores tab as it was not needed there. Updated the Get Stores script to work better.
Updated 7-18-2018 Version 2.2 – Fixed two big issues both with versioning. If a version already existed in a second Site or Farm, then a new version could not be imported. Also, if using selected files with versioning, the version files were not replicated properly. If you change an override setting in versioning that will not currently be replicated though the override will be replicated initially. I plan to address that in a future version. Likewise if you delete versions you must delete on both sides before replicating. I also plan on addressing deletes in future versions. The current version will remove the files but it wont handle the settings.
Updated 7-26-2018 Version 2.3 – There was a bug in the script used to populate the manual drop downs for choosing from and to stores. This updated modified the GetManStores.ps1 script to convert local paths to network paths for the stores. You only need to upgrade to this version is you are using the manual population functions to configure your stores.
Updated 11-12-2018 Version 2.4 – Fixed issues with the two scripts that create the stores mappings on Server 2016. I also fixed an issue with versioning that would throw an error by trying to add versions that were already added.
Updated 11-25-2018 Version 2.5 – Fixed an issue where a vDisk would not be imported into Secondary Masters if the vDisk was being replicated with the base and versions and the base had not already been added to the Secondary Master. I also added a section at the end of the vDiskReplicator log file that lists all errors encountered within the master script.
Updated 12-30-2018 Version 3.0 – All, I had a chance during the time off at the Holidays to make some significant additions to the utility. I will be writing a new blog on the main feature added here. I wanted to thank Niek Harmsen for the idea. Niek asked me a while back for a replication status report for all vDisks. I thought that was a great idea and I have added that in this version. I would really appreciate if you could post here if the feature is working correctly for you or not. I have only been able to test it in my lab. I also added the ability to create a user agnostic hash for the PSExec password that will allow different users to use the utility on the same machine. I fixed an issue where when removing a store it would remove two lines instead of one. I also fixed an issue of determining the screen resolution to set the size of the utility when used via RDP. This fix does cause the utility to open slower because it now uses a PowerShell command to get the screen resolution rather than WMI. Lastly, I added error coding to several places when files are written or opened. I am hoping this will help for the folks that cannot use the utility on Sever 2016 mainly because the utility wont save to the processrows.txt file. It should tell you know if there is an error and what the error is.
Updated 1-16-2019 Version 3.1 – I added some new UI features that were requested including custom process row backups and the ability to select all and unselect all rows. There were several important bug fixes. One to address the issue some users were having importing vDisks into secondary Farms and Sites. I also fixed a bad bug where if you selected a file to replicate from a store that was not in the stores being replicated, all files would be replicated from your defined stores. The script now makes sure that stores are skipped if there are not files to copy for the store. Also, I added several new logging lines to make troubleshooting easier. Lastly, the script uses a local path to copy log files on remote PVS servers rather than network paths because some AV vendors disallowed network copies.
Updated 1-20-2019 Version 3.2 – I think I finally fixed all the issue with importing vDisks into Secondary Farms and Sites. In the import command there is a flag I missed that must be set when importing a VHDX file rather than a VHD file. I also had some wrong logic in determining which files to import.
Along with the bug fixes I added a new features asked for by a customer quite a while ago. The utility now allows bandwidth limiting for slower network circuits. Robocopy includes a feature that allows limiting the bandwidth used while copying files. It does not limit bandwidth directly, instead it inserts a gap between packets that has the effect of limiting bandwidth, because the packets are sent out with a delay. This gap is called an “inner packet gap” or IPG. The utility can configure an IPG for each desired store copy. I added a calculator that will help determine the proper IPG. Use the calculator to determine the IPG for your connection, then enter that value in the Bandwidth Limit (IPG) field on the Process tab. Only rows with a value greater than zero will be limited. Note this feature is not as configurable for higher bandwidth connections (those over say 1 Gb/s) because the IPG will go quickly to a single value. About the lowest you can configure bandwidth on a 1 Gb/s link is 500 Mb/s.
Also I had a great conversation this week with a customer that realized buffered copies were working much faster in his environment than unbuffered copies. In my original testing in my lab (which is only 1 Gb/s) this was not the case. I am working at a customer that also is using the utility, so I tested as well and found the same thing. So I think that on very fast networks (10Gb/s and above) buffered copies will provide significantly better transfer times. If you want the best performance switch the setting in the setup tab.
Updated 1-21-2019 Version 3.2.1 – Fixed issue where if the IPG value was blank from not saving a new ProcessRows.txt file the PowerShell would break and no copies were performed. Also fixed an error when saving a custom backup that it always said the file already existed. Fixed a few spelling mistakes.
Updated 1-23-2019 Version 3.2.2 – Fixed issues with adding Process Rows using manual stores when GetStores was never run. Now the utility allows the use of stores where the from and to are named differently. You must use manual store assignment for this. Also, fixed an issue importing versions if the base version was not selected in files to include but it also was not replicated and imported yet. Now you will get an error. Anyone that had issues adding stores to Process Rows should try this version.
Updated 3-3-2019 Version 3.3 – Added support to define the directory used by the utility on remote servers. The default is still c:\vdiskreplicator but if you need to use a d: drive or a path like d:\scripts\vdiskreplicator that is now supported. I also worked more on the issues of mixing auto stores and manual stores. I think it works in all cases now, but let me know if you have any problems getting your store definitions into the process tab. If you switch to this version from an older version you should recreate all your store definitions from scratch or you may have issues with moving new stores from the stores tab to the process tab because I removed all headers from the text files that drive the UI.
Updated 6-3-2019 Version 3.5 – Note I created a Version 3.4 but never published it. I think this new release is big enough that I am using 3.5. This includes some fixes, test works better than before, I added a fix created by Craig Ohler that allows you to clone a vDisk with a PVP and replicate it by file. But the big changes here are as follows:
- Ability to delete vDisks two ways. If you’re using store mirroring you can remove the vDisk on the Master Server and it will be removed on all defined Secondary Site and Farm servers. You can also delete the vDisk using the utility. To use that don’t delete in the PVS console, make sure the vDisk is not assigned to any targets, then use the utility to delete the vDisk. It will first delete the vDisk on the Master Server, then the normal replication process will remove it on all other servers. The delete feature must be enabled in setup.
- Storage Space Utilization Report. The utility now has the ability to report on how much storage is available in each store. You can set a warning percent and a critical percent and it will color code the report. If you call the GetStoreSpace.ps1 scritp by itself in a schedule task and you have enabled email it will email you the results. It is also called by the replications script and it will include the report in the attachments of the email.
- Lastly this version will allow you to replicate between stores on the same PVS server. This allows you to have a DEV store on the Master Server and replicate from that to the Prod on the Master, then all other stores as necessary.
- As always use caution and read all the warnings listed at the top of this section.
Updated 6-5-2019 Version 3.5.1 Added the ability to download PSExec.exe from the setup screen. This must now be done prior to running the utility after you set it up.
Updated 6-25-2019 Version 3.5.2 Fixed an issue where if the script was run with no parameters it assumed it was in delete selected files only mode and it just exited because no files were actually selected. Now the default mode is for the normal operation of replicating using mirroring as designed. Fixed the way the call for getting storage space was written so that it does not try to send two emails when its called from the vdiskreplicator.ps1 script. Added logic to define default settings for the storage space warning and critical limits if these are not saved from the UI.
Updated 6-27-2019 Version 3.5.3 – Fixed an issue with saving the Process Rows.
Updated 7-10-2019 Version 3.5.4 – Fixed an issue with the UI that caused the “add to process” to not work on non-English configured Operating Systems. Thank you Martin for helping me figure this out.
Updated 7-25-2019 Version 3.5.4.1 – I apologize there was a bad bug in the GetStorageSpace.ps1 script that stopped that script from working as long as the config file for it was present. I have fixed this and reposted the utility. To fix this issue download the zip but you only need to replace the GetStorageSpce.ps1 file.
Updated 12-1-2019 Version 3.6 – I was contacted by a partner Craig Ohler from IntraSystems who figured out that Merged Bases were not being added to Secondary Sites. Craig had already figured out how to fix the script for the problem. I tested Craig’s fix and included Craig’s code in the download. This also include a fix to the delete logic to handle a case where we would try to delete a layer that was still in use. This is not as bad as t sounds because you cant delete a vDisk that is in use. I want to thank Craig for his help here and all the help he has provided in the past by testing the utility and providing feedback.
Updated 2-15-2020 Version 3.6.1 – This update has two main changes. First, the status email now lists the source and destination paths for each robocopy status table. I also added the ability to clean up lok, pvp and xml files from the Primary Master Stores and all included slave stores. This process must be enabled in the setup tab and it runs as the last item in the script. It works by looking at every lok, pvp and xml file and it will delete them if there is no corresponding VHD, AVHD, VHDX, or AVHDX file. As always please test before using in production.
Updated 5-21-2020 Version 3.7.0 – I made three small changes, two are very important if you use vhdx files and versioning. Please update if you do. I fixed bug where if avhdx files were used, the lok, pvp, and xml cleanup would think every avhdx file was missing and get deleted if not in use. Also, the cleanup of unused lok, pvp and xml files would happen even in test mode. This was changed to just log what files would be removed. Lastly, there was a spurious “pvp “entry created in the excluded files for every robocopy rcj file. This has no impact but it was fixed.
Updated 8-27-2020 Version 3.8 – I fixed an issue where jobs could be skipped if two jobs finished in the same minute and both had jobs that ran after them. To fix the issue, I changed from using a variable to keep track of the job to run next time to using the status field in the job table. When one job is complete any jobs that are waiting for that job to finish have their status changed to “RunNextTime”. Then the script knows the next loop to run them. I would like to thank David Ray for reporting this issue.
I also fixed an issue where robocopy would write over an active vDisk if the Slave Server disk was different (usually newer) than the Master Server version. The script now checks to see if any of the Slave Server vDisks have active connections. If they do, they are added to the robocopy exclusion list. I would like to thank James Sabia for reporting this issue.
Lastly I changed the Space Status Report to show an Error if the server is unreachable. Previously it would show the settings for the last reachable store.
Note: I would consider these changes major. Please use appropriate caution when rolling out this new version and let me know if you have any issues.
Updated 12-5-2020 Version 3.8.2 – I noticed this past week that the changes I made in version 3.8 were not working as I intended. When getting active connections for a vDisk against a server the SDK returns any active connection in the farm. Therefore, if the vDisk was mounted on any server in the farm the utility would not copy it. I guess this was not a big problem for most because they must create the vdisk version then replicate it before using it. But I wanted the utility to only check against each target/slave server to see if that server had it mounted. I had to change the script to get all the active targets on the slave server then exclude any vDisks that the targets had mounted. For versions, the mounted version and all earlier versions are excluded.
Updated 5-25-2021 Version 4.0.0 – Added support for PowerShell Remoting. Also added the ability to delete versions. As always please test well before using the script in production and see usage and support warnings above.
Updated 1-21-2022 Version 4.1.0 – Found a very bad bug in the 4.0 version that stopped the utility from being able to copy the powershell script used to start the robobopy job on remote servers. If a version before 4.0 was used first, the utility would work because that script was already copied. If you are updating a former 4.0 version you can just copy the vdiskreplicator.ps1 file after downloading and unblocking the script.
Citrix TechBytes – Created by Citrix Experts, made for Citrix Technologists! Learn from passionate Citrix Experts and gain technical insights into the latest Citrix Technologies.
Click here for more TechBytes and subscribe.
Want specific TechBytes? Let us know! tech-content-feedback@citrix.com