At Citrix Synergy 2018, Citrix announced Azure Quick Deployment capability from the Citrix Cloud environment (more on Quick Deployment from Christiaan Brinkhoff, one of Citrix’s CTPs). If you use quick deployment, Citrix Cloud will automatically make the resource groups and virtual networks in Azure. And by using Citrix Cloud itself, you automatically get a Citrix site, Delivery Controller, Workspace (Storefront), and more.
What’s left to automate? The Master Image/ VDA, of course.
During a Synergy session, I heard a presenter say: “The last part is easy. Just create a master image and you’re done.” But creating a good master image can take a lot of time, especially if there is a need for a lot of local applications. It is a best practice to automate the creation of your master image. That’s why I created the Ultimate Golden Image Automation guide. But this guide uses an on-prem VMware and Citrix Provisioning environment. For the cloud, we need a new process, one that uses Microsoft Azure and Citrix Machine Creation Services. A great thing about this is that they both can be managed with Microsoft PowerShell. If we combine the right PowerShell commands we can make a new automatic master image deployment scenario.
The new master image deployment scenario goes as follows:
- Create a new Azure Virtual Machine
- Deploy VDA and software on the Virtual Machine
- Update Machine Catalog from the new Virtual Machine
- Delete the Virtual Machine and its resources
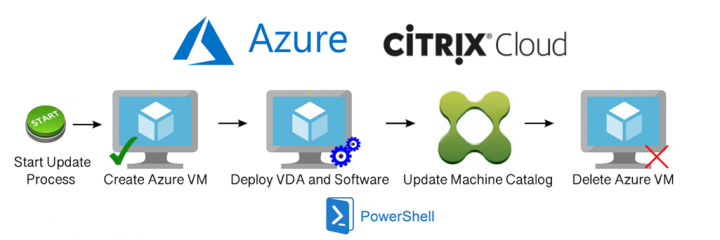
Deleting the VM is not entirely necessary but helps reducing cost. Consistency is key during the automation process so starting with a new Azure VM will help.
Install Azure PowerShell Modules
The first thing we need to do is to install the Azure remote management PowerShell modules. This requires PowerShell 5, so if you have a Windows 2012R2 or Windows 8.1 machine you need to update to PowerShell 5, which you can download here. After that you can run the following script to install the modules.
-
#### Install Azure PowerShell Module
-
Install–Module PowerShellGet -Force
-
Install–Module -Name AzureRM
Import Azure PowerShell Modules
After the installation is completed you need to import the module with the following script.
-
#### Import Azure PowerShell Module
-
Import–Module -Name AzureRM
Connect to your Azure tenant
Now, we need to connect to the Azure tenant so that we can deploy a virtual machine. The script below will ask for your credentials. You could change the script to make an object from your credentials, so it connects automatically (also refer to the last paragraph in this post: Security in the Cloud).
-
#### Connect to Azure Tenant
-
$Azurecred = get–credentials
-
Connect–AzureRmAccount -Credential $Azurecred
Create new Azure Virtual Machine
Now that we’re connected, we need to create the new Virtual Machine that is to become the new master image. We do this with the following script.
-
#### Create Azure VM
-
$ResourceGroup = “myRG” ### Resource group name
-
$VMName = “myVM” ### VM Name, example VDI-Master
-
$Location = ‘myLocation’ ### Azure RG location, example westeurope
-
$VirtualNetwork = “myNetwork” ### Azure Virtual Network name
-
$Subnet = “mySubnet” ### Azure Subnet name
-
$VMimage = “myImage” ### Imagename, example VDI = MicrosoftWindowsDesktop:Windows-10:RS3-Pro:latest, XenApp = MicrosoftWindowsServer:WindowsServer:2016-Datacenter:latest
-
$VMSize = “mySize” ### VM Size, example Standard_DS2_v2
-
$VMUserName = “myUser” ### VM Admin user, example AzureUser
-
$VMPassword = “myPass” ### VM Admin password, example Welkom12345!
-
$VMPass = ConvertTo-SecureString -String $VMPassword -AsPlainText -Force
-
$VMCred = New-Object -TypeName System.Management.Automation.PSCredential -ArgumentList ($VMUserName, $VMPass)
-
New–AzureRmVm –ResourceGroupName $ResourceGroup -Name $VMName –Location $Location –VirtualNetworkName $VirtualNetwork –SubnetName $Subnet –ImageName $vmimage -Credential $VMcred –Size $VMSize
Get Azure Virtual Machine Private IP
Because we’re going to use this new Azure virtual machine in a software deployment scenario, we need to know the private IP address of the virtual machine. This IP address is assigned randomly (DHCP). We can get the private IP address with the following script.
-
#### Get Azure VM Private IP
-
$ResourceGroup = “myRG” ### Resource group name
-
$VMName = “myVM” ### VM Name, example VDI-Master
-
$nic = Get–AzureRmNetworkInterface -name $VMname –ResourceGroupName $ResourceGroup
-
$AzureIP = $nic.IpConfigurations.privateIpAddress
-
Write-host “The VM $VMname has IP Address $AzureIP”
Disable Firewall on the Azure Virtual Machine
We need to push an automation agent to the Azure Virtual machine so that we can deploy our software. That’s why we temporarily need to disable the Windows Firewall on the Azure virtual machine. It is not possible to run a script directly on an Azure virtual machine, but you can use a Custom Script extension. The script below will create a small PowerShell script in c:\temp. Then upload it to your Azure storage account and then create a Custom Script extension to be run on the Azure Virtual Machine which uses the script from your storage account. After this the Virtual Machine will be rebooted. And now you can push your Automation agent (Ivanti, SCCM, etc..). Don’t forget to enable the firewall once you’re done.
-
#### Disable Firewall on the machine
-
$StorageAccountName = “mySA” ### Azure Storage Account name
-
$StorageSAKey = ‘mySAKey’ ### Azure Storage Account key, you can find this under keys at your storage account
-
$ResourceGroup = “myRG” ### Resource group name
-
$VMName = “myVM” ### VM Name, example VDI-Master
-
$Location = ‘myLocation’ ### Azure RG location, example westeurope
-
$ContainerName = “script”
-
$temp = “C:\Temp”
-
$testtemp = Test-Path $temp
-
if (!$Testtemp)
-
{
-
New-Item -ItemType Directory -Path $temp | out-null
-
}
-
New-Item -ItemType File -Path “$temp\disablefw.ps1” | out-null
-
$Filecontent = ‘Set-ItemProperty -Path “HKLM:\SYSTEM\CurrentControlSet\services\SharedAccess\Parameters\FirewallPolicy\DomainProfile” -name “EnableFirewall” -Value 0
-
Set-ItemProperty -Path “HKLM:\SYSTEM\CurrentControlSet\services\SharedAccess\Parameters\FirewallPolicy\PublicProfile” -name “EnableFirewall” -Value 0
-
Set-ItemProperty -Path “HKLM:\SYSTEM\CurrentControlSet\services\SharedAccess\Parameters\FirewallPolicy\Standardprofile” -name “EnableFirewall” -Value 0′
-
add-content “$temp\disablefw.ps1” $filecontent
-
$Localpath = “$temp\disablefw.ps1”
-
$context = New–AzureStorageContext –StorageAccountName $StorageAccountname –StorageAccountKey $StorageSAKey
-
Set–AzureRmCurrentStorageAccount –Context $Context
-
New–AzureStorageContainer -name $ContainerName
-
Set–AzureStorageBlobContent -File $LocalPath -container $ContainerName -Force
-
Set–AzureRmVMCustomScriptExtension -Name ‘myScript’ –ContainerName $ContainerName –FileName “disablefw.ps1” –StorageAccountName $StorageAccountName –ResourceGroupName $ResourceGroup –VMName $VMname –Run “disablefw.ps1” –Location $Location
-
Restart–AzureRmVM –ResourceGroupName $ResourceGroup -Name $VMName
Delete Azure Virtual Machine Public IP
The Azure virtual machine is created with a public IP address by default but we’re not going to use this. The following script will delete the public IP.
-
#### Delete Public IP Address
-
$ResourceGroup = “myRG” ### Resource group name
-
$VMName = “myVM” ### VM Name, example VDI-Master
-
$nic = Get–AzureRmNetworkInterface -name $VMname –ResourceGroupName $ResourceGroup
-
$nic.IpConfigurations.publicipaddress.id = $null
-
Set–AzureRmNetworkInterface –NetworkInterface $nic
-
Remove–AzureRmPublicIpAddress –ResourceGroupName $ResourceGroup -Name $VMName -Force
Installation of Software and VDA
Now that we have a new Azure virtual machine, the private IP address, credentials, and the firewall is temporarily turned off. We can start deploying software and, of course, the Citrix VDA Software. You can do this with PowerShell or your own favorite automation product. You can also use my Ultimate Golden Image Automation Guide for software deployment tips and silent parameters. To install the VDA, you can check out this great article by Dennis Span or see the Citrix install command web page. And of course, don’t forget to optimize your image with the Citrix Optimizer and to seal your master image the right way with BIS-F (Base Image Sealing Framework).
Stop Azure Virtual Machine
After deploying all the software and installing the VDA, it’s important to stop the Azure virtual machine before you update your machine catalog. You can do this with the following script.
-
#### Stop Azure VM
-
$ResourceGroup = “myRG” ### Resource group name
-
$VMName = “myVM” ### VM Name, example VDI-Master
-
Stop–AzureRmVM –ResourceGroupName $ResourceGroup -name $VMName -Force
Update the Citrix Machine Catalog
Now that we have created a new master image, we need to update the Machine Catalog. If you run your own delivery controller in Azure or even on-premises, you can use the script below on any machine with Citrix Studio installed. If you use Citrix Cloud services you need to install the Citrix Cloud Remote PowerShell SDK. After installing the SDK, you can connect to your Citrix Cloud environment with the Get-XdAuthentication and then run the script.
-
#### Update MCS Machine Catalog
-
Add-PSSnapin Citrix*
-
$ResourceGroup = “myRG” ### Resource group name
-
$VMName = “myVM” ### VM Name, example VDI-Master
-
$DDC = “myddc.company.com” ### Delivery controller FQDN or the Citrix Cloud Connector FQDN if you use Citrix Cloud
-
$MCName = “myMC” ### Machine Catalog name
-
$AzureNetworkName = “myNetwork” ### Network name under Azure Hosting Connection in Citrix Studio
-
$DDC = $DDC+“:80”
-
$VM = Get–AzureRmVM –ResourceGroupName $ResourceGroup -Name $VMName
-
$Diskname = $VM.StorageProfile.OsDisk.Name
-
$MasterImage = “XDHyp:\HostingUnits\$AzureNetworkName\image.folder\$ResourceGroup.resourcegroup\$Diskname.manageddisk”
-
Set–ProvSchemeMetadata –AdminAddress $DDC -Name “ImageManagementPrep_DoImagePreparation” –ProvisioningSchemeName $MCname -Value“True”
-
$ProvScheme = Get–ProvScheme –AdminAddress $DDC –ProvisioningSchemeName $MCName
-
$ProvSchemeGUID = $ProvScheme.ProvisioningSchemeUid
-
Publish–ProvMasterVMImage –AdminAddress $DDC –MasterImageVM $MasterImage –ProvisioningSchemeName $MCName
-
Get–ProvSchemeMasterVMImageHistory –AdminAddress $DDC –ProvisioningSchemeUid $ProvSchemeGUID –SortBy “Date”
-
Start–BrokerNaturalRebootCycle –AdminAddress $DDC -InputObject @(“$MCName”)
Delete the VM
Now that the catalog is updated, there is no need to keep the Azure Virtual Machine and its resources; we can delete it with the following script:
-
#### Delete Azure VM and Resources
-
$ResourceGroup = “myRG” ### Resource group name
-
$VMName = “myVM” ### VM Name, example VDI-Master
-
$Diskname = $VM.StorageProfile.OsDisk.Name
-
Remove–AzureRmVM –ResourceGroupName $ResourceGroup -Name $VMName -force
-
Remove–AzureRmDisk –ResourceGroupName $ResourceGroup -Name $Diskname -force
-
Remove–AzureRmNetworkInterface –ResourceGroupName $ResourceGroup -Name $VMname -Force
-
Remove–AzureRmNetworkSecurityGroup –ResourceGroupName $ResourceGroup -Name $VMname -Force
Security in the cloud
When you use the cloud and automation we need to enter credentials a few times. Make sure to never save your credentials as plain text in your scripts. Recently, there has been an increase in Azure account hijackings for mining cryptocurrency. Try to use a password vault or, at the very least, encrypted passwords. I have my script repository in my Ivanti automation library and I use password variables that are stored, encrypted, in the automation database. Another important thing is the Azure virtual machine credentials we created in the new virtual machine step. Once created, these admin credentials are on every machine you produce from the master image. So, don’t forget to disable the credentials with Disable-LocalUser or to remove them with Remove-LocalUser and add a new secure account.
I hope this was informative. For questions or comments you can always give a reaction in the comment section or find me on LinkedIn or Twitter.
Citrix TechBytes – Created by Citrix Experts, made for Citrix Technologists! Learn from passionate Citrix Experts and gain technical insights into the latest Citrix Technologies.
Click here for more TechBytes and subscribe.
Want specific TechBytes? Let us know! tech-content-feedback@citrix.com