Just a quick blog to highlight the recent availability of a new CTX article (CTX200370), which I think is super useful and a must read for anyone using HDX or HDX 3D Pro!
A few months ago, my colleagues Fedi Saidane and Gabriel Nguyen, wrote what is probably the best blog on HDX Graphics ever written, in which they covered how to understand HDX graphics modes and codecs (read it here).
If you really want to understand how to debug and optimise your use of HDX with XenDesktop or XenApp it really is a must read. Fedi and Gabriel went on to write a CTX article, CTX200370, containing practical further information. I thought this article was so useful that I’m reprinting it below. As always if you are reading this blog at a later date you should check the CTX article itself for enhancements or corrections that may have occurred.
Objective
This procedure explains how to determine which display mode is running in a XenDesktop 7.x session.
Requirements
Log on with access to a command prompt _OR_ CTX135817 – HDX Monitor installed in VDA.
Background
XenDesktop 7.x offers a few display mode options:
- DCR (Desktop Composition Redirection)
- H.264 / H.264 Compatibility Mode
- Legacy Graphics Mode
Instructions
Procedure 1 – Using Windows Management Instrumentation Command (WMIC)
1. Connect to VDA.
2. Launch a command prompt.
3. Depending on the display mode you would like to test, enter related query in the following matrix and check the output value:
|
Display Mode |
Query |
Value to Check |
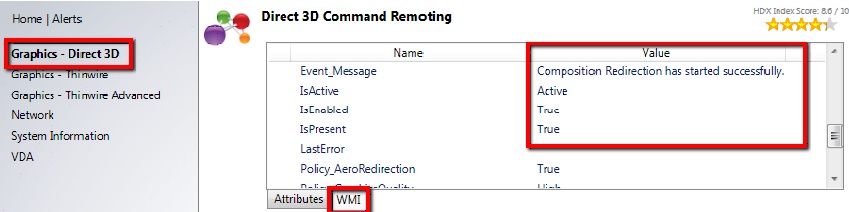
| DCR | wmic /namespace:\\root\citrix\hdx path citrix_virtualchannel_d3d get /value | IsActive=Active Policy_AeroRedirection=TRUE |
| H.264 | wmic /namespace:\\root\citrix\hdx path citrix_virtualchannel_thinwire get /value | Component_Encoder=DeepCompressionV2Encoder IsActive=Active |
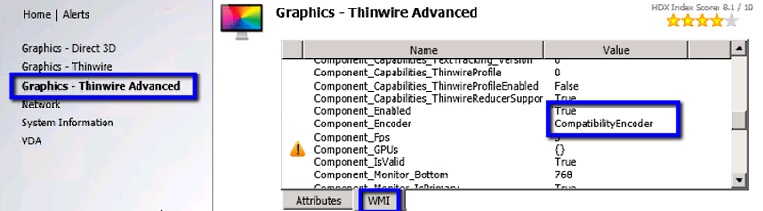
| H.264 Compatibility Mode | wmic /namespace:\\root\citrix\hdx path citrix_virtualchannel_thinwire get /value | Component_Encoder=CompatibilityEncoder IsActive=Active |
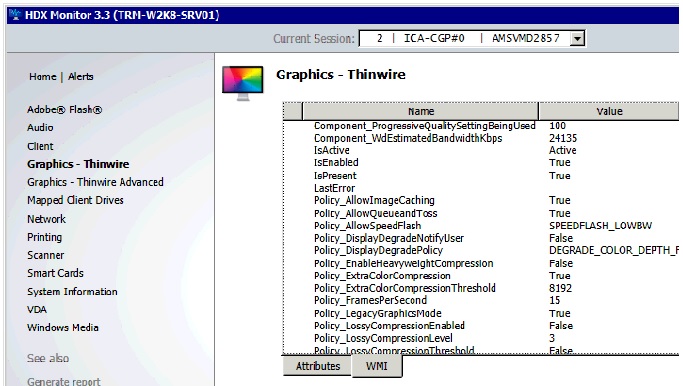
| Legacy Graphics | wmic /namespace:\\root\citrix\hdx path citrix_virtualchannel_graphics get /value | IsActive=Active Policy_LegacyGraphicsMode=TRUE |
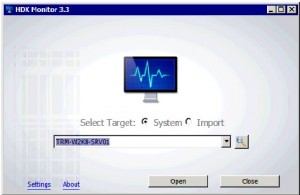
Procedure 2 – Using HDX Monitor
1. Launch HDX Monitor, select a target and click Open.
2. Click on any icon to access detailed view.
3. Depending on the display mode you would like to test, check the WMI output of the following sections:
- Graphics – D3D : DCR
- Graphics – ThinWire Advanced : H264 / H264 Compatibility Mode
- Graphics – ThinWire : Legacy Graphics Mode
Additional Resources
CTX139331 – Citrix Virtual Desktop Handbook 7.x
Citrix Blogs – What’s new with HDX display in XenDesktop & XenApp 7.x?
Citrix Blogs – Go SuperSonic with XenDesktop 7.x Bandwidth SuperCodecs
Citrix Blogs – JPEG Compression – Recognising The Artefacts to Help Tune HDX for XenDesktop and XenApp
Applicable Products
Hidden Nugget of Gold!
It’s a well-kept secret that HDX Monitor has an import and export feature. This allows you to export a snapshot of all the policies and HDX metrics it has captured in XML format. You can then read it back in with the import function to use HDX Monitor as a viewer. This is really useful if you want to check the configuration of a system or are providing helpdesk support.