Cloud Guidepost: Citrix Virtual Apps and Desktops Service on Azure (Part 3) – Environment Implementation
Something you will notice if you ever travel to Costa Rica is the big cloud you have to go through right before your plane lands in the central valley; it’s there every single time! In Citrix Cloud Success, things have been pretty “cloudy,” as well (pun intended), and in our third (and final) blog post in this series, I will walk you through the actual implementation of the Citrix Virtual Apps and Desktops Service in combination with the Microsoft Azure Cloud.
Before you continue, I strongly encourage you to read part 1 and part 2 of this blog series if you have not already done so.
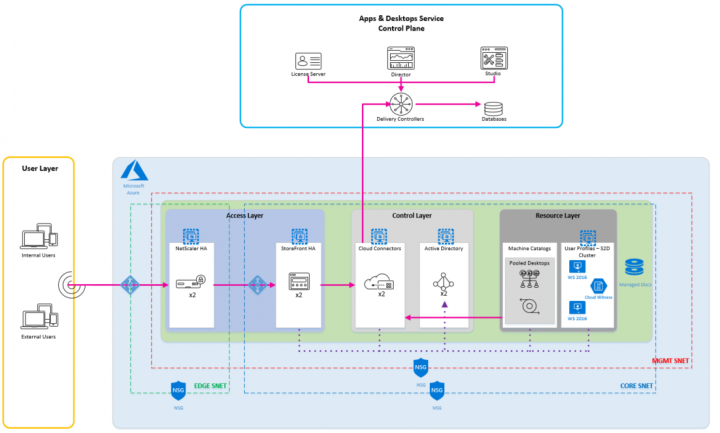
1. My Architecture Diagram
Creating a diagram that models your environment is extremely important, especially for larger deployments. It allows you to think through the major components that you will need to deploy. Please keep in mind that you can get really creative when planning your components and the Azure features you can leverage to make them highly available, so the following example is by no means the only way you can do it, but just one of many ways.
2. My Azure Disk Configuration
With regard to your Azure VM Disks, I would definitely encourage you to use managed disks on all of your servers. In my case, I used managed disks for all them. Doing this removes all the storage account management complexities away from me since Microsoft will take care of that. If you want to learn more about Managed Disks support for Citrix environments, check out this nice blog post.
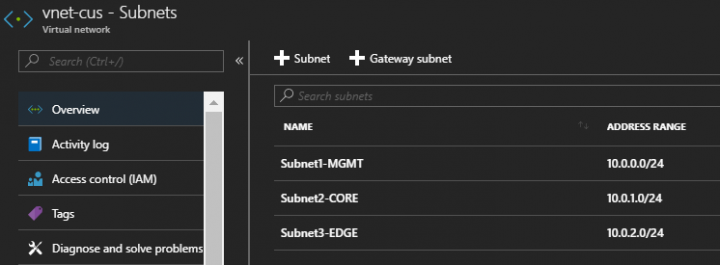
3. My Azure VNets and Subnets
In this specific environment, I have created 1 VNet with 3 subnets; an EDGE subnet that points to the outside world, a CORE subnet, which is my internal server network, and an MGMT network that is used for management traffic only. Security groups should be configured on each subnet to allow only the necessary traffic to be allowed. Remember that you can also apply security groups on a per vNic basis if you need to.
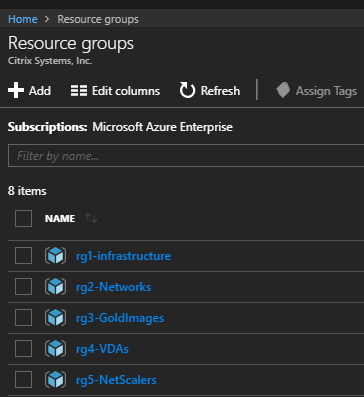
4. My Resource Groups
Resource group planning can be very different from one company to another, so you can choose your own criteria when deciding how to segregate your resource groups. Just keep in mind that there are limits to consider when planning them. The usual practice is to accommodate resources that share a similar lifecycle in the same resource group. In my case, I created 5 resource groups: 1 for Infrastructure servers, 1 for networks, 1 for master images, 1 for my VDAs, and 1 for my NetScaler resources.
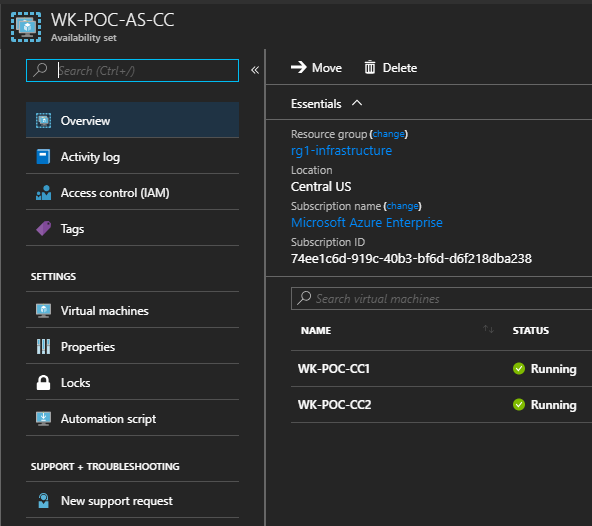
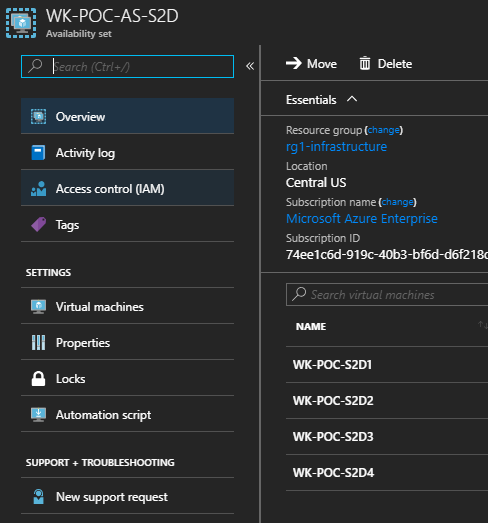
5. My Availability Sets
High availability is a major topic when planning your workloads in Azure. In my case, I created Availability Sets to ensure Azure places my VMs in different fault and updates domains. What this means is that the VMs inside this availability set will not share the same power source and network switch in the same datacenter. On the other hand, you have Availability Zones (still supported on a limited set of regions). In this case, you let Azure know which zone (datacenter) within a region should they place your VM as you are creating it, usually with a minimum of 3 zones per region. In my case, I created separate Availability Sets for my NetScalers, Domain Controllers, Cloud Connectors, File Servers, and StoreFront Servers:

Remember: Availability Sets and Availability Zones cannot be combined and must be defined at the moment you create your VMs.
6. My Access Layer Configuration
NetScaler was deployed as a high availability pair. You can do that manually by creating all of the components, or you can use this ARM template that will create the HA pair and its required components for you, plus auto-configure the HA. If you decide to go the manual way, keep the following in mind:
- vNic configuration is crucial; you must make sure that each IP you will use on EACH of your NetScalers is defined at the vNic level. Remember, internal IP configuration in the NetScaler UI does not mean anything unless you have defined the IPs at the Azure vNic level.
- By design, IP addresses cannot “float” between 2 Azure VMs. HA Independent Network Configuration (INC) must be utilized so that your NetScalers do not share the same IP addresses.
- You will end up creating 2 NetScaler Gateway vServers for the SAME URL but with a different IP address (the VIP for each of your NetScalers to use, since again, VIPs cannot float in Azure).
- Your VIPs will be internal IPs, not public.
- The VIP of your secondary node will not be responsive unless there is a failover event.
- Use CAPS when creating the second vServer so that NetScaler lets you create it.
- Put an Azure External Load Balancer in front of your NetScalers. It will hold the public IP address for your external users to access.
- The SSL certificate will need to be attached to both NetScaler Gateway vServers, not the Azure Load Balancer.
- Your public DNS A-record will need to point to the public IP address of the Load Balancer
Bear in mind that the above is not the only way you can do this; make sure to check out this article to learn more about deploying a NetScaler HA Pair in Azure.
In the case of StoreFront, I deployed a pair of servers behind an Azure Internal Load Balancer and leveraged a dedicated Availability Set. I did not attach an SSL certificate to my StoreFront servers. I did not find any caveats around this configuration, and it was pretty straightforward.
7. My Control Layer Configuration
Cloud connectors were deployed as a pair in an availability set, but there is no need to set up any type of load balancing for them. As you know, Citrix will keep your Cloud Connectors evergreen, so a minimum of 2 should be deployed to ensure your services will be available even when we update the connectors for you (and yes, we will never update both Cloud Connectors at the same time).
Remember: Cloud Connectors will connect to Citrix Cloud via outbound port 443. Keep this in mind when planning and implementing your Network Security Group configuration.
8. My Resource Layer Configuration
In my case, I only used a single dedicated VDA, but you can certainly create your master image and use it to deploy your VDIs off of it via Machine Creation Services. Remember, it is crucial to plan the access level that you want to provide to Citrix Cloud in your Azure subscription. Part 2 of this blog series has a whole section on this.
As far as my Citrix Profile Management and Folder Redirection storage is concerned, I used Storage Spaces Direct (S2D). You can use this ARM template, which will deploy everything for you from creating the servers and joining them to the domain, to setting up your cluster. In my case, I decided to go with the manual process and here are my findings:
- Make sure Network Discovery and File and Printer Sharing are enabled before you start any installation.
- Your DNS servers must be local to your cluster so it has permissions to create the necessary DNS records required for the cluster to function properly.
- When you create your Cluster, this will create a CNO (Cluster Named Object) in Active Directory (AD) on the same OU where your cluster node computer accounts are stored, which is the Core identifier for your Windows Cluster inside AD. The CNO should NEVER be deleted from AD unless you wish to completely destroy your cluster.
- If you place your computers in an OU different than “Computers” in AD (which will most likely be the case), you will need to grant your CNO with “Create Computer Objects” permissions in the OU that holds your computer accounts; this will be required to create the VCO when you create your cluster role.
- A Virtual Computer Object (VCO) will be created in the OU where your CNO resides. The VCO is created when you create the SOFS role in your cluster.
- Make sure to create a Cloud Witness to be used for Cluster Quorum.
- If you add new disks to your servers, S2D will pool the servers automatically (provided you have the usual 1 pool only). After this, all you need to do is extend your volume.
- Plan your storage requirements properly before you scale to the bigger production environments, adding extra nodes might require you to recreate your volumes.
After configuring the S2D cluster, I configured Citrix Profile Management and Folder Redirection via GPOs, there is no additional configuration required in order to leverage your S2D shares.
So here it is, our 3-part journey comes to an end and I hope it will be helpful for you when implementing the Citrix Apps and Desktop Service in combination with Microsoft Azure. Stay tuned for upcoming blogs in the Cloud Guidepost series!
JP Alfaro
Cloud Success Engineer