Hi, I’m Andy Cooper from the Citrix Security Team. Joe Nord already introduced a new feature in XenDesktop 7.6that provides SSL security for HDX connections. Now that SSL has been integrated into the core of the VDA, enabling it is simpler than it has ever been before, and the solution scales out to large deployments while delivering the level of performance Citrix customers have come to expect. In this follow-on blog I will walk you through the essential steps for configuring SSL in a common use-case scenario, and outline some potential pitfalls. I will then show how to configure SSL for pooled, non-persistent VDI desktops.
Enabling SSL Step-by-Step
To start, let’s overview the process to add SSL to a XenApp or XenDesktop deployment for dedicated user VDI desktops and persistent RDS Servers – it might be easier than you expected.
- Obtain and install certificates for each VDA.
- Run the Enable-VdaSsl.ps1 powershell script on the VDA.
- Enable SSL on the delivery controller.
The biggest hurdle to overcome is establishing trust and managing and provisioning certificates. The Citrix Receiver clients must trust the certificate authority (CA) that issued the VDA certificates for the HDX connection to succeed. You can use a wide range of public (usually commercial) certificate authorities supplying certificates which will already be trusted by the Citrix Receiver without any further configuration – it uses he same list of trusted CA’s which are built into Windows.
Generally speaking this would be done by creating a request.inf file containing the following on the VDA. The exact parameters here may vary, this is just an example – speak to your Certificate Authority for further details. The important part here is the Subject, where you should replace the CN (Common Name) with the fully-qualified domain name of your VDA:
<strong>[NewRequest]
Providertype = 12
RequesterName = "Administrator"
RequestType = "PKCS10"
Subject = "CN=vda1.mycompany.test"
ProviderName = "Microsoft RSA SChannel Cryptographic Provider"
KeyLength = 2048
KeyAlgorithm = RSA
HashAlgorithm = sha256
MachineKeySet = true</strong>
Now run the following command on the VDA to generate a certificate signing request file which you can give to a public Certificate Authority to use to generate a certificate:
<strong>certreq -new request.inf csr.txt</strong>
The certificate authority will now give you a certificate file which you can install on the VDA with the following command:
<strong>certreq –accept testvda1.cer</strong>
Once certificates are provisioned to the VDA, the rest of the process is straightforward. The Enable-VdaSsl.ps1 powershell script can be found in the Support folder of the XenApp or XenDesktop 7.6 product media. In most cases running it as simple as this:
<strong>Enable-VdaSsl.ps1 –enable</strong>
This will enable SSL on the VDA by discovering and using the certificate that is present (if more than one certificate is present, this won’t work). The script also takes care of configuring the Windows firewall to allow SSL connections. Be careful, as once this script has been run non-SSL connections will be blocked by the Windows firewall. More configuration options are available with this command and you can check eDocsfor the full set of arguments.
To enable SSL on the delivery controller, first enable SSL for the delivery group. SSL can only be enabled for an entire delivery group. It is not possible to enable SSL for specific applications like it was for XenApp 6.5. As a final step, the delivery controller needs to be configured to use fully qualified domain names for the VDA address rather than IP addresses (which are used by default). This is important because otherwise the endpoint address will be an IP address, which will likely not match the name on the VDA certificate. Here is is how to do this in a powershell window on the Delivery controller running as a XenDesktop administrator:
- Asnp citrix.*
- Get-BrokerAccessPolicyRule –DesktopGroupName ‘GROUPNAME’ | Set-BrokerAccessPolicyRule –HdxSslEnabled $true
- Set-BrokerSite –DnsResolutionEnabled $true
Enabling SSL for Pooled VDAs
The steps given in the previous section won’t work for Pooled VDAs with a non-persistent disk. You could follow them, but each time the VDA reboots for use by another user it would revert to the base image, undoing all your hard work.
One option would be to use the same wildcard certificate for each VDA, where the common name in the certificate contains a value like *.mycompany.test, meaning all VDAs such as vda1.mycompany.test and vda2.mycompany.test would be trusted based on the same certificate. This is not a secure option. If any one of the VDAs becomes compromised, this all powerful certificate would mean HDX connections belonging to all VDAs would be at risk.
Instead a secure alternative is to leverage Microsoft Active Directory Certificate Services. This already provides a mechanism for provisioning certificates automatically using group policy. We will add a startup script on the VDA that dynamically provisions a fresh certificate and enables SSL to the VDA.
Note that this approach will only work for Desktop VDAs. For Server VDAs, the ICA listener is brought up too early during the boot process, before certificates can be automatically provisioned.
Since Active Directory Certificate Services uses an internal Enterprise Certificate Authority, it won’t be automatically trusted by all Windows installations. If the clients are managed by the corporation and part of a domain forest, the trusted CA certificates can be distributed automatically using group policy. For BYOD and other non-domain joined devices you will need to distribute the trusted CA certificates to your users by some other mechanism (such as offering a download link).
The rest of this blog will walk through the steps involved in configuring Active Directory Certificate Services auto-enrollment to provision the VDA certificates, and then how to enable SSL for a pooled Windows 7 VDA or Windows 8.x VDA.
Enable Certificate Auto-Enrollment
First ensure you have Active Directory Certificate Services role installed on a server in your VDA domain forest providing an Enterprise CA, otherwise auto-enrollment will not be possible.
Note that this may put considerable higher load than usual on your Enterprise CA, since VDAs will be submitting a certificate request on every boot. Make sure to allocate sufficient CPU and memory on the CA server to cope with the load, and as ever test the scalability of the deployment in a lab environment before moving into production.
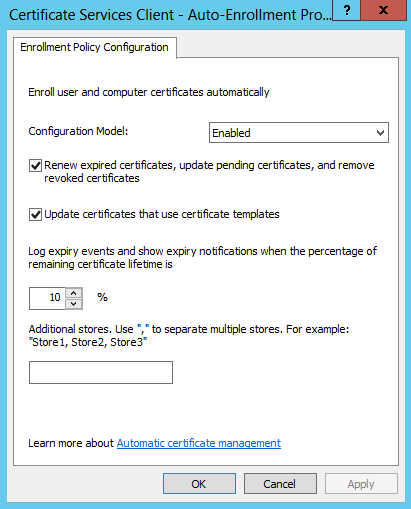
In the Group Policy Management Editor, create a new policy which applies to the Organisational Unit that will contain your pooled VDAs with SSL enabled as follows:
- Expand Computer Configuration -> Policies -> Windows Settings -> Security Settings -> Public Key Policies
- Edit the ‘Certificate Services Client – Auto Enrollment Policy’ object properties
- Configure as shown in the screenshot below.
- Right-click the Automatic Certificate Request container and select New -> Automatic Certificate Request…
- In the Automatic Certificate Request Setup Wizard, click Next
- Ensure the Computer certificate template is selected, click Next
- Click Finish
Preparing the Windows 7 Master Image
Copy the Enable-VdaSsl.ps1 script (provided on the product installation media in the Support >Tools > SslSupport folder) to the VDA master image, to a location within the System path environment (for example %systemroot%\system32). Note the master image should not contain any certificates to be used for HDX SSL connections. The certificates will be provisioned when the MCS or PVS machine catalog is created. Now create a new scheduled task as follows (do not run the scheduled task now):
- Enter a suitable Name and Description for the scheduled task
- Click Change User or Group… and in the Select User or Group dialog box enter SYSTEM and click OK
- Click Run whether user is logged on or not
- Select the Triggers tab
- Click New…
- In the New Trigger dialog, select Begin the task: On an event
- Select Log: Application
- Select Source: Microsoft-Windows-CertificateServicesClient-CertEnroll
- Select Event ID: 19
- Click the Actions tab
- Click OK
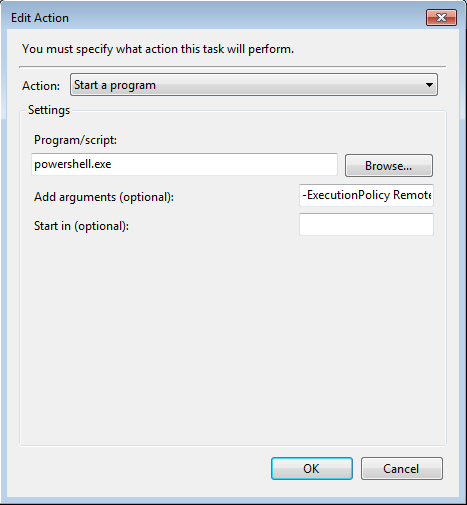
- Select the Actions tab
- Click New…
- In the New Action dialog, select Action: Start a program
- In the Program/script field, enter ‘powershell.exe’
- In the Add arguments field, enter ‘-ExecutionPolicy RemoteSigned Enable-VdaSsl.ps1 -Enable -Confirm:$False’
Here are some screenshots showing what the resulting scheduled task should look like: 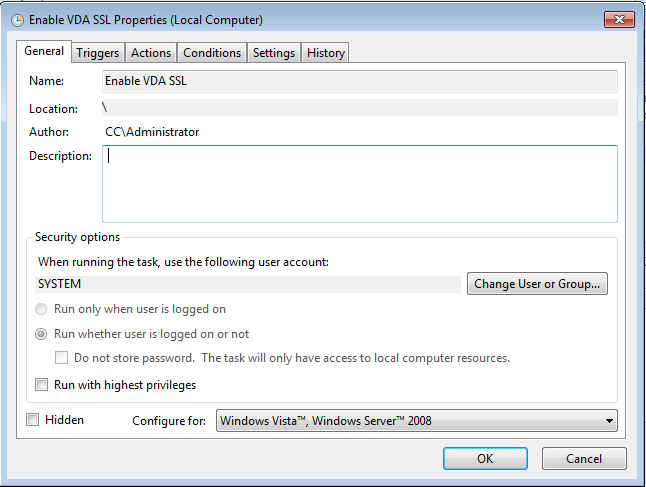

 Note that you should create this scheduled task locally on the master image, not delivered via Active Directory Group Policy. Now update the machine catalog and SSL should be enabled to the Windows 7 pooled VDAs.
Preparing the Windows 8.x Master Image
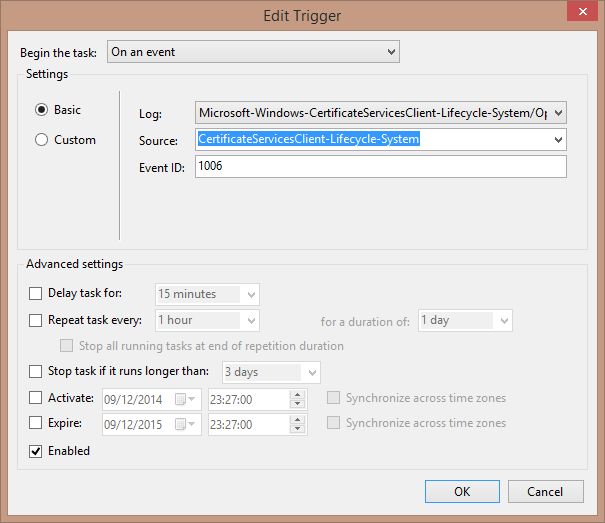
The steps for a Windows 8.x master image are the same as for Windows 7, with the exception of setting the event Trigger in the scheduled task as follows:
- Select Log: Microsoft-Windows-CertificateServicesClient-Lifecycle-System/Operational
- Select Source: Microsoft-Windows-CertificateServicesClient-Lifecycle-System
- Select Event ID: 1006
 I hope you found this blog useful. Please use the comment box if you have any questions. And let me know if there any other security related topics you would like to see covered in future.