To Optimize TCP Traffic
If you’re wondering, there is no little knob to turn. But, providence is on your side, as the NetScaler has an excellent tool-kit that you can leverage to optimize TCP flows through the appliance.
In fact, now is the perfect time to ensure that your NetScaler appliance is correctly optimized with a baseline TCP profile. With the right information, you can very easily tweak on your NetScaler appliance to optimize TCP traffic.
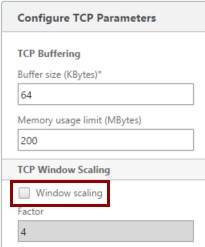
The very best place to start tuning up your NetScaler is at the Global Settings level. Simply log into the appliance via the GUI, navigate to the System node, then Settings and select Change TCP parameters on the right side of the screen as reflected below:
Stage (1) Tune
You’ll want to ensure that Window scaling is enabled.
What is Window scaling?
Window scaling allows end-points to increase/decrease the TCP receive window, effectively increasing or decreasing the effective bandwidth that is allowed in TCP streams.
Other detailed explanations:
TCP Window Scaling RFC 1323 – https://www.ietf.org/rfc/rfc1323.txt
Wikipedia- http://en.wikipedia.org/wiki/TCP_window_scale_option.
Stage (2) Tune
You’ll want to also ensure that SACK (selective acknowledgement) is enabled.
What is this SACK?
SACK improves TCP throughput by only retransmitting a portion of the TCP window, depending on what segments may have be lost during transmission of course. Avoiding the need to retransmit the entire TCP window will positively increase the overall throughput capability, and thus improve the user experience.
For a detailed explanation on SACK, reference the RFC :
SACK (Selective Acknowledgement) – http://tools.ietf.org/html/rfc2018
Improved TCP performance – http://packetlife.net/blog/2010/jun/17/tcp-selective-acknowledgments-sack/.
Stage (3) Tune
You ‘may’ want to enable Nagle’s.
The main reason that you may want to enable Nagle’s is if you’re dealing with lots of small packets being transmitted through the NetScaler. Take a look at the following URL for a description of Nagle’s – http://en.wikipedia.org/wiki/Nagle’s_algorithm. In short, enabling Nagle’s allows the NetScaler to group or combine a number of small outgoing messages/packets into a transaction, once 2*MSS worth of data is outstanding on the wire, and send them all at once. Proceed with caution on enabling Nagle’s at the Global level, as enabling this feature may cause issues with traffic that isn’t small in nature.
Give It a ‘Custom Tune’
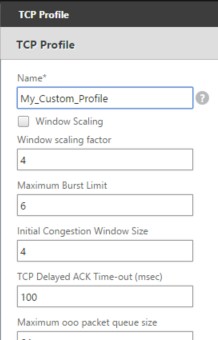
As a note, for Window scaling, the default value is (4). If you’re dealing with long, fat pipes and are frequently transmitting very large files, such as virtual machine images or perhaps an ISO, increasing the Window scaling to a value of (6) should provide better performance than the default (4) value.
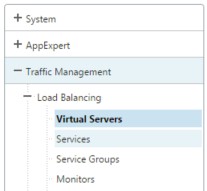
To create a custom TCP profile, navigate to the Traffic Management node, then Load Balancing and Virtual Servers and select a vServer that you would like to add a TCP profile to. Click on Profiles on the right of the screen:
Click on the (+) option to begin creating a custom TCP profile that will only be applied to the selected Virtual Server.
Simply fill out the profile with the values desired, click Create and you’ll have a customer TPC ‘tune’ profile on that selected vServer.
Reference: http://support.citrix.com/article/CTX121149
Do you have any custom TCP profiles created? Why not leave a comment with examples of how you’ve given your NetScaler appliance a ‘tune-up’.


