Introduction
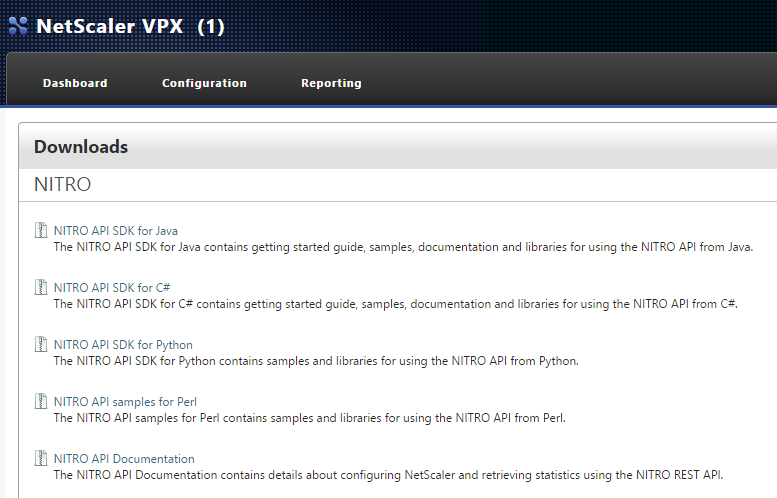
Lately, I have been able to work with NetScaler programmatically via the NetScaler NITRO API and I have been wanting to raise some awareness and pass off some general knowledge of this vital feature of NetScaler. The purpose of this article isn’t necessarily here to show you the full intricacies of NITRO, but I do want to share some possibilities, and perhaps get you started along the path of NetScaler automation! The NetScaler NITRO API is a RESTful service living within the NetScaler that allows you to interact with it by changing configurations or getting statistics off of the appliance. NITRO is available in a vast array of languages and SDKs. Whether your favorite language is Python, Java, C#, Perl, or even plain HTTP calls using the REST interface we have a way to interact with the NetScaler. Each NITRO SDK is available at your respective NetScaler via the Download tab on the far right corner.

Use Case
For the first blog within this series I wanted to showcase a Citrix Support article that you might be familar with. The CTX article we will be handling via NITRO is the Recommended Settings and Best Practices for a Generic Implementation of a NetScaler Appliance. A fellow colleague here within Citrix Consulting and I were talking about this implementing this support article many times over multiple NetScalers and we were thinking of ways to make it quick and easier to do so. We both quickly landed on NITRO.
The tool
Before we begin interacting with NetScaler NITRO we need to have a method to do so. As stated above, you could use Java or Python or other languages, but I want to show the barebones of how NITRO communicates with NetScaler. We are going to be using HTTP GETs, PUTs, POSTs, and other methods to talk to the NetScaler. This type of communication can be done via HTTP clients like cURL, wget, or becoming more common is browser extensions. I have been working with and have grown to like the Google Chrome extension POSTMAN. POSTMAN is an extension that you add to chrome that allows you to create and even intercept REST requests to APIs. Here you can see my POSTMAN setup.
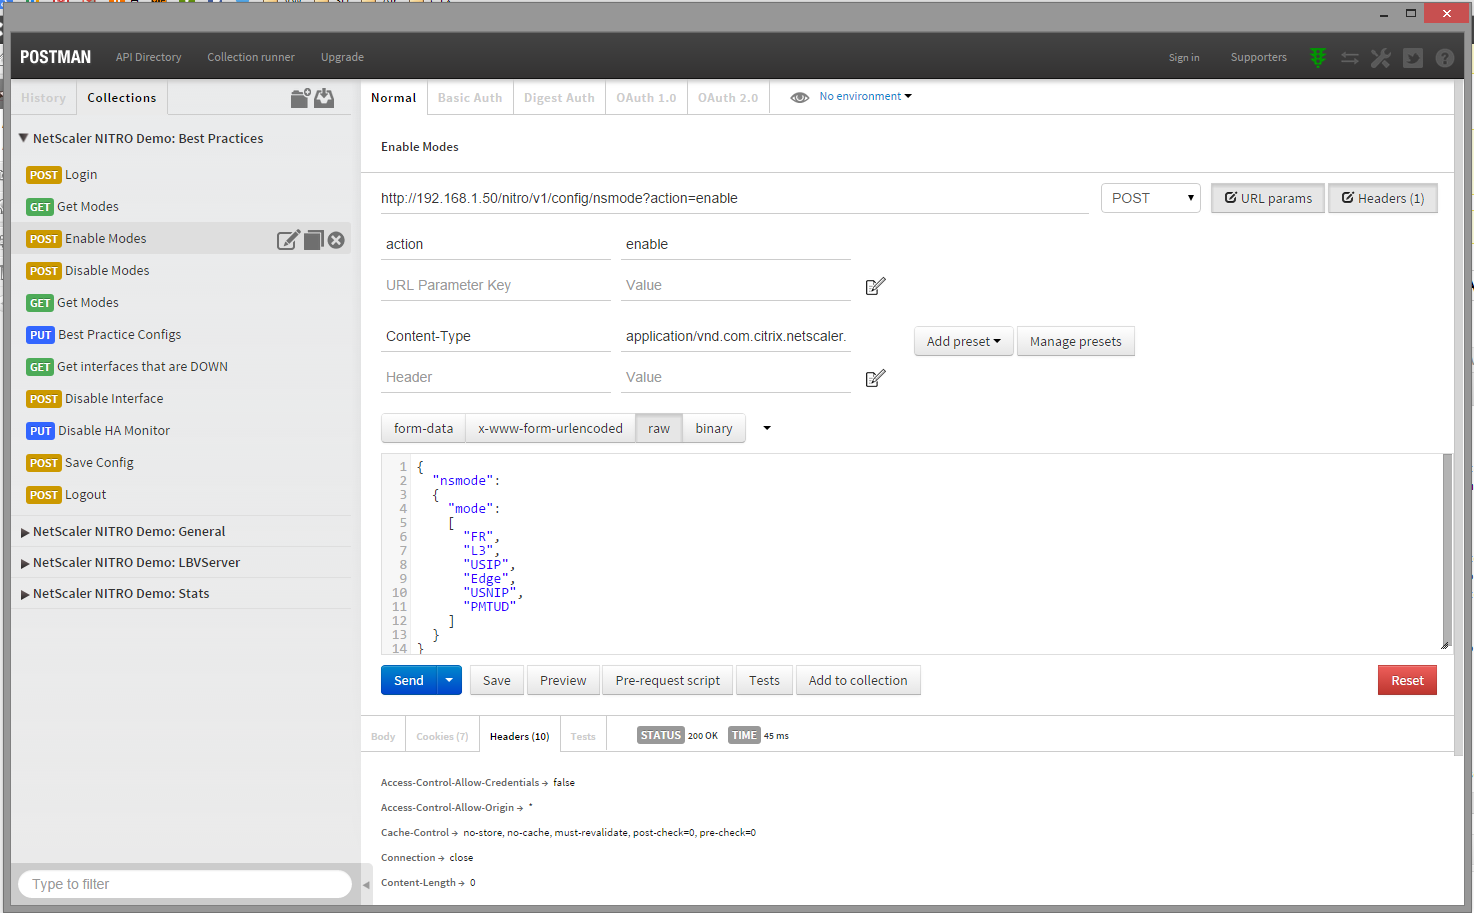
- In this screenshot you can see my collections on the left column which are a series of requests that I gathered together.
- On the main pane you are able to see the HTTP POST request that I am building with the URL parameters, headers, and payload specified.
- You also can see the response’s body, headers, and other data from the NetScaler after I clicked the Send button.
To get POSTMAN up and running all you will need to do is install two Google Chrome Extensions.
Best Practices via REST
- The first step in interacting with NetScaler via REST is to login. To do so we need to create a login request.
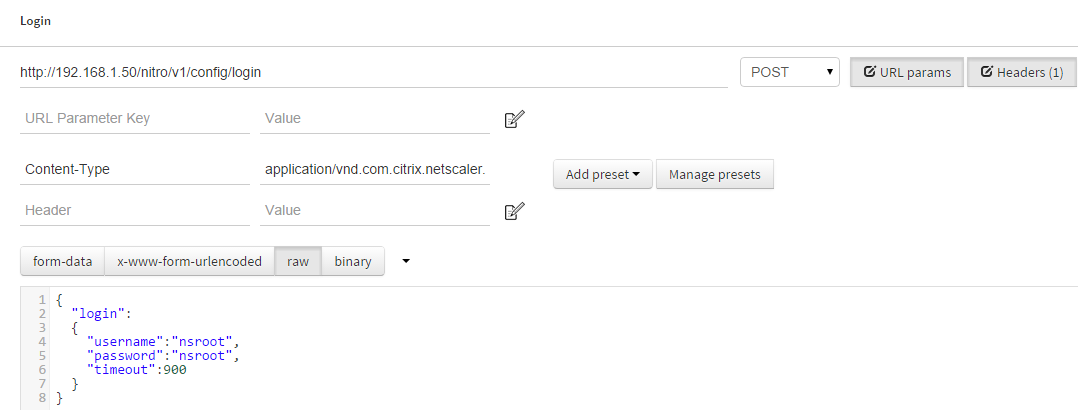 NITRO Login
- URL: http://192.168.1.50/nitro/v1/config/login
- Type: POST
- Headers:
- Content-Type: application/vnd.com.citrix.netscaler.login+json
- Data – RAW:
{
    "login":
    {
        "username":"nsroot",
        "password":"nsroot",
        "timeout":900
    }
}
Here you see how the connection to NITRO is made. We specify a url to the NITRO resource /nitro/v1/config/login. Specify the Headers while being sure to include the login method and that we would like to communicate via json. Finally the data specifies a login block with the username, password, and the timeout of the connection set. If all is well, the NetScaler will reply with a Status of 201 Created indicating that all is good and a NITRO_AUTO_TOKEN will be created for you. You can see this token in the Cookies of the response in POSTMAN.
It’s important to be aware of this cookie as all future communication with NITRO will have to include it. Fortunately, POSTMAN handles that for us automatically and we don’t need to worry about it. NITRO Login Auth Token
 - The second step is to get the current modes enabled. This isn’t necessarily part of the CTX article, but it is a good to understand how you do something like this via NITRO. You can take this knowledge of getting features and functions and apply it to other things like LBVServers via NITRO.
 NITRO: Get Modes
- URL: http://192.168.1.50/nitro/v1/config/nsmode
- Type: GET
- Headers:
- Content-Type: application/vnd.com.citrix.netscaler.nsmode+json
Acknowledge the URL and the Type. Since this is a GET we do not need to specify any payload or data. Check out the headers and verify that they match the method we are calling, nsmode. This is important. Compare the headers here to the headers in step one. These headers will ALWAYS match your method you are utilizing when interacting with NITRO. In the screenshot above you can see the response of the NetScaler showing that FR, L3, USIP, Edge, ect.. modes are enabled.
- This begins the first step in the CTX article. Enabling modes.
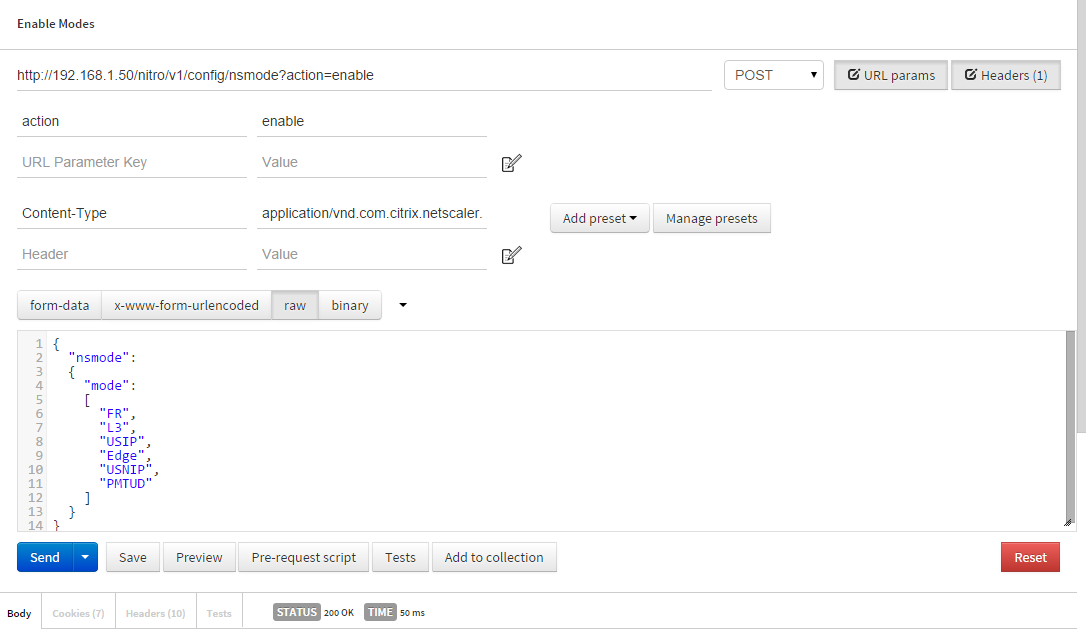
- URL: http://192.168.1.50/nitro/v1/config/nsmode?action=enable
- Type: POST
- URL Params:
- action: enable
- Headers:
- Content-Type: application/vnd.com.citrix.netscaler.nsmode+json
- Data – RAW:
{
    "nsmode":
    {
        "mode":
        [
            "FR",
            "L3",
            "USIP",
            "Edge",
            "USNIP",
            "PMTUD"
        ]
    }
}
Be sure to acknowledge the URL Params set in this HTTP POST. The Content-Type also matches the method we are performing, like in step two. If all is well, our response status should be 200 OK.
- We also need to disable some modes. We will do so almost exactly like before, except we flip the action to disable.
- URL: http://192.168.1.50/nitro/v1/config/nsmode?action=disable
- Type: POST
- URL Params:
- action: disable
- Headers:
- Content-Type: application/vnd.com.citrix.netscaler.nsmode+json
- Data – RAW:
{
    "nsmode":
    {
        "mode":
        [
            "L2",
            "RISE_APBR",
            "RISE_RHI",
            "BridgeBPDUs",
            "SRADV",
            "DRADV",
            "IRADV",
            "SRADV6",
            "DRADV6",
            "CKA",
            "TCPB",
            "MBF"
        ]
    }
}
Like before, if all is well our response status will be a 200 OK.
- In my screenshots above I like to run the Get Modes function again to verify that our changes went through. Refer to step two if you need help in running this again.
- The next step in the CTX article is to configure a few different features. In this example I am taking advantage of NITRO bulk methods, meaning I am doing a few things at once. You can see this via multiple methods being handled at once in the Data section of the request. Be sure to match up each method and configuration from the CTX article to the NITRO call below.

- URL: http://192.168.1.50/nitro/v1/config/
- Type: PUT
- Headers:
- Content-Type: application/vnd.com.citrix.netscaler+json
- Data – RAW:
{
    "nstcpparam":
    {
        "ws":"ENABLED",
        "sack":"ENABLED",
        "nagle":"ENABLED"
    },

    "rnatparam":
    {
        "tcpproxy":"ENABLED"
    },

    "nsparam":
    {
        "cookieversion":"1"
    },

    "nshttpparam":
    {
        "dropinvalreqs":"ENABLED"
    },

    "snmpalarm":
    {
        "trapname":"CPU-USAGE",
        "thresholdvalue":95,
        "normalvalue":35,
        "severity":"Informational",
        "state":"ENABLED",
        "logging":"ENABLED"
    },

    "snmpalarm":
    {
        "trapname":"MEMORY",
        "thresholdvalue":95,
        "normalvalue":35,
        "severity":"Critical",
        "state":"ENABLED",
        "logging":"ENABLED"
    }
}
You might have noticed that the Content-Type header still matches our method in the URL, in this case nothing. We are also using those bulk methods to set things like snmpalarm, nsparam, and nstcpparam all at once. If you wanted to, you could make this request using multiple calls to the same URL splitting up the data into single segments. IE) only handling the nstcpparam, running that, and then moving to the next. Since we are doing a bulk method here NITRO replies with a status of 200 OK and the response body contains details for each method we are utilizing. In the screenshot you can see one method’s details in the body.
- The next step in the CTX article is to disable the interfaces that are down. To do so we need to first figure out what interfaces are down. We can use a NITRO GET request for that!
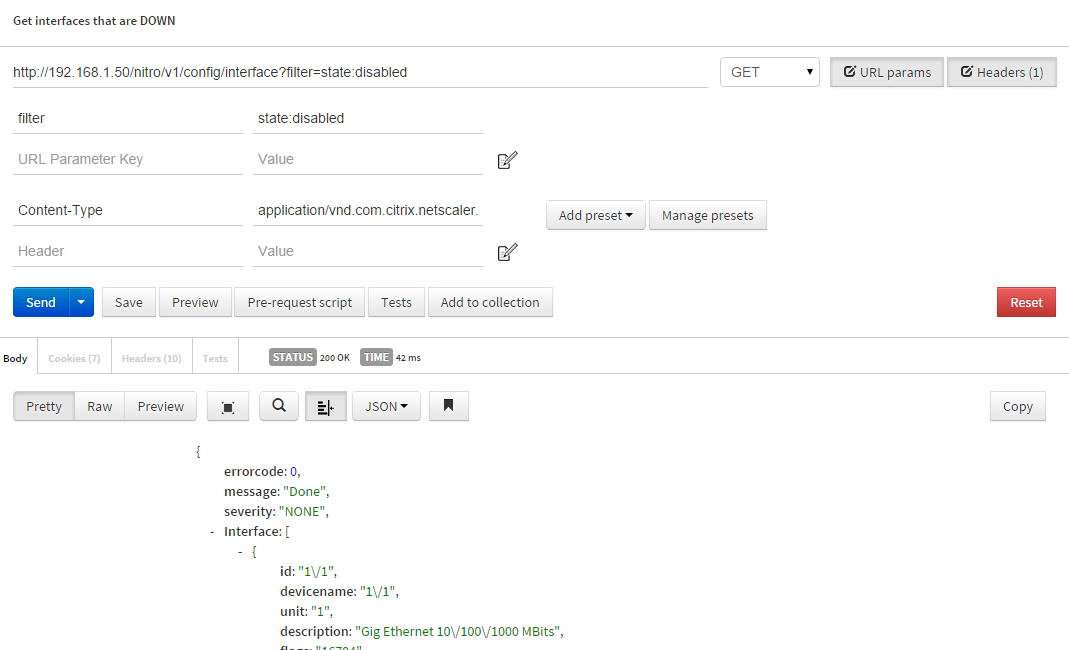
- URL: http://192.168.1.50/nitro/v1/config/interface?filter=state:disabled
- Type: GET
- Headers:
- Content-Type: application/vnd.com.citrix.netscaler.interface+json
- URL Params:
- filter: state:disabled
First thing, remember that Content-Type header — it needs to match the URL request — in our case interface. Next we are introducing a way to filter our response. We only want to get interfaces that are disabled, so we include the filter param with state:disabled. Finally, check out the response body in my screenshot. Here you can see the device id, device name, and other info about that particular interface. The device ID is important because we will utilize it in the next step.
- Now we need to disable the interfaces that are down. Remember that device ID? You will use it here.
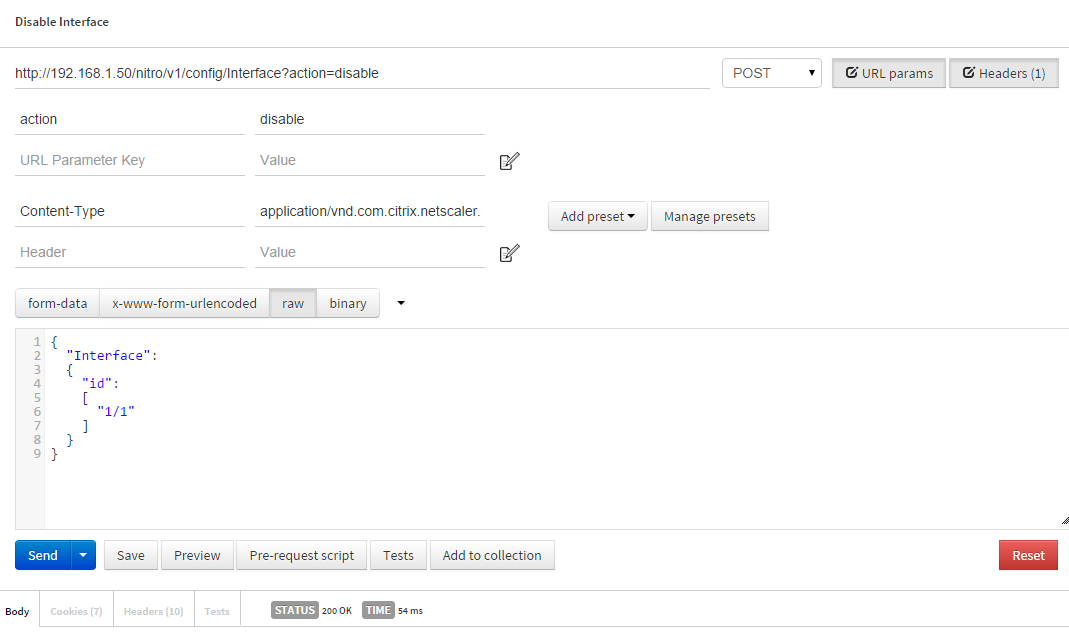
- URL: http://192.168.1.50/nitro/v1/config/Interface?action=disable
- Type: POST
- URL Params:
- action: disable
- Headers:
- Content-Type: application/vnd.com.citrix.netscaler.Interface+json
- Data – RAW:
{
    "Interface":
    {
        "id":
        [
            "1/1"
        ]
    }
}
Remember that Content-Type. Also be aware of the action in the URL Params, we are disabling the interface so we set it to disable. Finally check out the data. Here we specify that device ID. If we had multiple we could list them all here. As usual, if there are no issues NITRO will reply with 200 OK.
- The last step in the CTX article would be disabling HA monitoring for the particular interface.
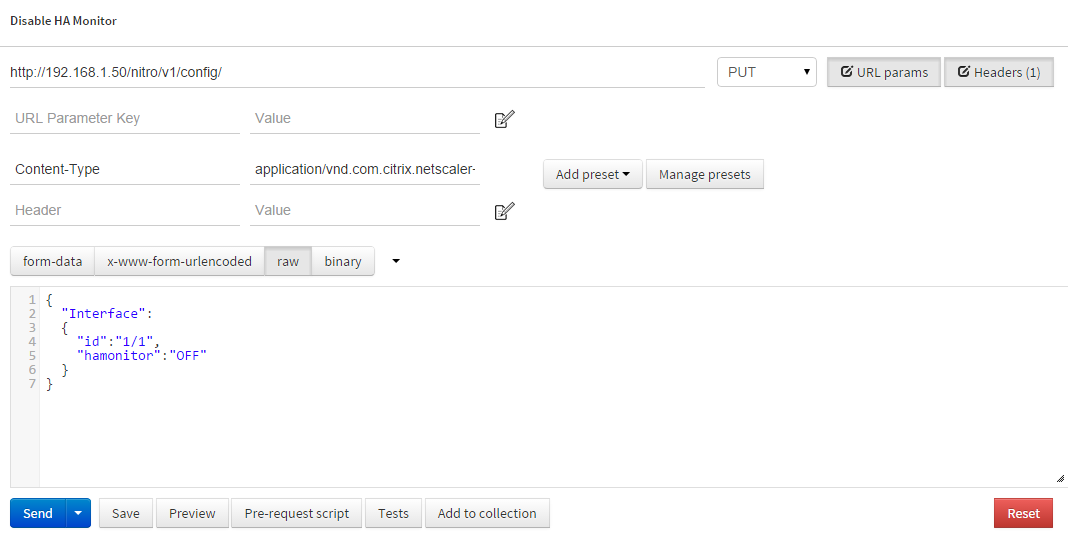
- URL: http://192.168.1.50/nitro/v1/config/
- Type: PUT
- Headers:
- Content-Type: application/vnd.com.citrix.netscaler+json
- Data – RAW:
{
    "Interface":
    {
        "id":"1/1",
        "hamonitor":"OFF"
    }
}
Be aware of the Content-Type matching the url method and the data passed through.
- We are now done with the Best Practices guide, and we should save our config. Lets get to it!

- URL: http://192.168.1.50/nitro/v1/config/nsconfig?action=save
- Type: POST
- Headers:
- Content-Type: application/vnd.com.citrix.netscaler.nsconfig+json
- URL Params:
- action: save
- Data – RAW:
{
    "nsconfig":
    {
    }
}
As always, be aware of the Content-Type, check the params – we are saving this time, and the data. The NetScaler replies with a 200 OK if all is well.
- Finally, the last step of any NITRO interaction should be logging out.
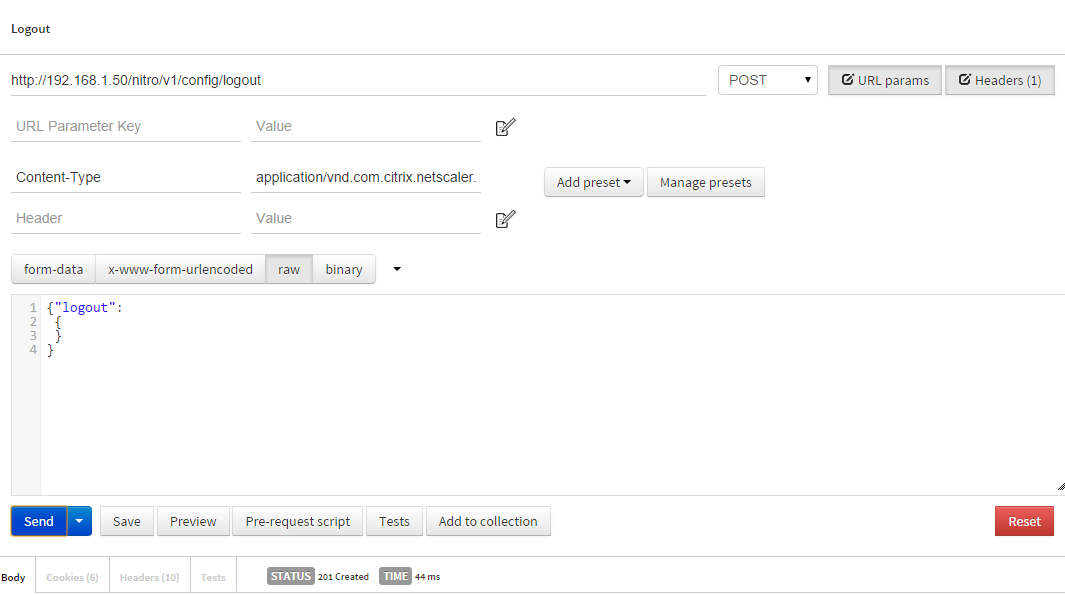
- URL: http://192.168.1.50/nitro/v1/config/logout
- Type: POST
- Headers:
- Content-Type: application/vnd.com.citrix.netscaler.logout+json
- Data – RAW:
{
    "logout":
    {
    }
}
Remember those headers! The NetScaler replies with a 201 Created when you initiate a logout.
Conclusion
I hope this helps move you along the way to an automated NetScaler. If you have any feedback or questions feel free to post them in the comments. Also, I will be continuing on the path of adding some additional NetScaler NITRO blog posts to this series in the future. If you have any great use cases or anything that you would like to see happen via NITRO please post below! By the way! My entire POSTMAN configuration for this specific article is located below in the resources. To get up and running all you will need to do is install two Google Chrome Extensions (one and two), import my collection into POSTMAN, and change the IP addresses to your NSIP.
Resources
My POSTMAN Collection
https://www.getpostman.com/collections/94ff021b2ccc854922ba
Using cURL with the NetScaler Nitro REST API
/blogs/2014/02/04/using-curl-with-the-netscaler-nitro-rest-api/