Hi, and thank you for taking the time to read this blog!
I wanted to provide a quick and simple guide to installing Remote PC Access, in comparison to its first release last June. In fact, deployment and installation management for the technology has been vastly improved with the incorporation of the technology into XenDesktop Studio and the Virtual Desktop Agent UI. For more details on what else is new, see my blog here: /blogs/2013/05/22/remote-desktop-mobility-with-remote-pc-access-in-xendesktop-7/
Now, on with the install!
Server:
- Download XenDesktop 7 from here: http://www.citrix.com/downloads/xendesktop/product-software.html
- Prep a Windows 2008 R2 or 2012 Server: http://support.citrix.com/proddocs/topic/xendesktop-7/cds-sys-requirements.html
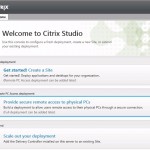
- After install, launch the Studio and select “Remote PC Access Deployment” See Figure 1
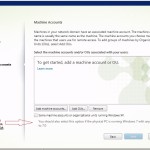
- During this initial creation it will prompt for creating the Catalog and Assignment for your desktops to users, by using a combination of Machine Accounts/OUs, and User Accounts/Groups – if you are familiar with the Remote PC Service, this is its replacement, only much more flexible! See Figure 2 *Please note, do not use the VDA from 5.6 when checking this box, use the 5.6 FP1 VDA, or 5.6.200, or 5.6.300 hotfixes.
- Setup StoreFront for web and BYO Receiver access http://support.citrix.com/proddocs/topic/dws-storefront-20/dws-manage.html
PC/Laptop:
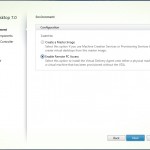
- Install the Virtual Desktop Agent on the PC or Laptop (for laptops follow these guidelines: http://support.citrix.com/proddocs/topic/xendesktop-7/cds-remotepc-plan.html) by using the metainstaller UI or silent installation with an ESD solution: http://support.citrix.com/proddocs/topic/xendesktop-7/cds-install-config-intro.html – See Figure 3. You may also note the 3D Pro decision prompt. There could be a group of users in your organization that require GPU apps and for more details on 3D Pro appropriate desktop installations, see here: http://www.citrix.com/products/xendesktop/features/high-def-experience/hdx-3d-pro.html
- Reboot the target PC or Laptop, then login as the user account locally. The XenDesktop broker will autoassign the user account to the desktop!
Client/BYOD:
- Navigate to the XenDesktop broker’s URL with a web browser from a different desktop with Receiver installed http://www.citrix.com/products/receiver/overview.html and login as the user. The desktop icon should be accessible by the user and able to launch with Receiver.
- To enable BYOD connections, download the Receiver from the device’s commercial App Store and configure Storefront http://support.citrix.com/proddocs/topic/dws-storefront-20/dws-create-store.html
Lastly, to enable SSL encrypted secure connections without a burdensome VPN tunnel, download and install Netscaler Gateway: http://www.citrix.com/products/netscaler-gateway/try.html – if you already have NS Gateway (Access Gateway), then add the new Storefront site and appropriate firewall rules for TCP port 1495/2598 from it, to the PCs/Laptops.
Note: You can create additional catalogs and assignments later to mix and match OU’s with User Groups and then apply different HDX policies to control things like clipboard, printing, and device drive mapping, more commonly known as virtual channels. You can also customize the user experience and behavior as well. Management of this experience in Citrix terminology is called “SmartAccess”. For more details: http://hdx.citrix.com/hdx-smartaccess
In closing, Remote PC Access is intended to be a simple a solution, alleviating administration and user frustration with remote desktop access, yet still provide the security and performance you are accustomed to with Citrix technologies built on HDX.
Let us know how your experience is in the comments section!