Notes:
- The following configuration was employed on XenServer 6 and 6.0.2. I’ve also used previous versions of usb-redirector on instances of XenServer 5.x, but will not cover their installation.
- The solution has not been rigorously tested and is not supported by Citrix.
- This article does not go into detail on how to use the Linux command line. Please refer to Linux documentation for further information if necessary.
Since early versions of XenServer 5 I’ve wanted to run my print server as a virtual machine. The problem is that XenServer doesn’t natively support USB passthrough of anything but mass storage devices. This caused me to look at other solutions. One solution that’s popular is the hardware approach used by companies like Digi. This approach works, but is cost prohibitive for a very small home office deployment, which caused me to search for a cost effective software solution. Early on I tried a few different implementations, but there were relatively few solutions that allowed the use of Linux as a USB over network server.
One that I found to work, and have been using for about 3 years now is USB Redirector from Incentives Pro. The Linux-based server is actually free, but you need to pay for the client side when using Windows (as in my case). That said, I found this solution to be the most cost effective at the time, and although I haven’t done extensive research lately, I expect it still to be very, if not the most cost effective.
Before someone suggests that the Open Source USB/IP Project would be more cost effective, I attempted its use after XenServer 6 was released. If memory serves, I believe I did have a bit of success with it, but using it with the specific printers I had didn’t work properly. It does offer hope for a future implementation, but at the time I tried it the project and XenServer stars didn’t align.
So, before we get into the nitty gritty, here’s what I needed to accomplish. I have XenServer 6.0.2 running on a machine, and I wanted to plug a Sony UP-D75 photo printer into the XenServer via USB and forward that device into a Windows 2003 Server VM running on the same resource pool. The printer is rather old, and as a result they don’t make a driver for newer operating systems, so I’m stuck with 2003.
Now, without further ado… the process.
Compiling the kernel module
- Download the DDK for the version of XenServer you’re running from http://www.citrix.com/English/ss/downloads/
- Inside the DDK ISO is the DDK virtual appliance. Do one of the following:
- extract the DDK appliance from the ISO
- mount the ISO
- burn the ISO to CD, insert the CD into the maching running XenCenter
then import via XenCenter
- Power on the DDK VM and answer the firstboot questions
- Log into the DDK, either at the console, or through an SSH session
- Download USB Redirector for Linux from http://www.incentivespro.com/usb-redirector-linux-i386.tar.gz:
wget http://www.incentivespro.com/usb-redirector-linux-i386.tar.gz
- Extract the tarball:
tar xzvf usb-redirector-linux-i386.tar.gz
- Change into the resulting directory:
cd usb-redirector-linux-i386
- Run the installer to compile the kernel module and install into the DDK:
./installer.sh install-server
- Change to the parent directory:
cd ..
- Create a tarball of the install directory with the kernel module compiled for your specific version of XenServer:
tar czvf usb-redirector-linux-i386-XS6.0.2-53456p.tgz usb-redirector-linux-i386
- Copy the tarball to the XenServer of the correct version that you want to install onto:
scp usb-redirector-linux-i386-XS6.0.2-53456p.tgz root@10.10.1.10:/root
If desired, uninstall the usb-redirector from the DDK
/usr/local/usb-redirector/uninstall.sh uninstall
That’s all we’ll need of the DDK, so you can do with it as you like.
Now, it’s time to install onto your XenServer:
Installing USB Redirector on XenServer
- Log into your XenServer, either at the console or via an SSH session
- Extract the tarball you copied from the DDK:
tar xzvf usb-redirector-linux-i386-XS6.0.2-53456p.tgz
- Change into the resulting directory:
cd usb-redirector-linux-i386
- Next we need to modify the installer so that it doesn’t attempt to compile the kernel module, which we’ve already done. There are two ways of doing this. The first is to make the modifications manually using vi. If you aren’t comfortable editing text files on Linux, you can use the second method which is to apply a patch. Complete one of the following two patch methods:
Manual Patch
vi installer.sh
In the usbsrv_install() function comment out the following 3 lines with hash marks (#):
  if [ ! -d $KERNELDIR ]; then
    exit_with_error "Kernel sources or kernel headers directory not found. Please install the corresponding package first."
  fi
In the usbsrv_make_kernel_module() function comment out the following 2 lines with hash marks (#):
  make KERNELDIR=$KERNELDIR clean >/dev/null 2>&1
  make $make_flags $driver_config KERNELDIR=$KERNELDIR >$script_dir/buildlog.txt 2>&1
Save and close the file.Automated Patch
Download the patchfile and patch installer.sh:
wget <a href='/blogs/wp-content/uploads/2012/02/installer.patch_.zip'>/blogs/wp-content/uploads/2012/02/installer.patch_.zip</a>
unzip installer.patch_.zip
patch -i installer.sh.patch
- Run the installer:
./installer.sh install-server
- Now you need to modify the firewall settings so clients can connect to your USB server:
vi /etc/sysconfig/iptables
add
-A RH-Firewall-1-INPUT -m state --state NEW -m tcp -p tcp --dport 32032 -j ACCEPT
before the REJECT statement, by default the 3rd to last line, making it look like the following:
...
-A RH-Firewall-1-INPUT -m state --state NEW -m tcp -p tcp --dport 80 -j ACCEPT
-A RH-Firewall-1-INPUT -m state --state NEW -m tcp -p tcp --dport 443 -j ACCEPT
-A RH-Firewall-1-INPUT -m state --state NEW -m tcp -p tcp --dport 32032 -j ACCEPT
-A RH-Firewall-1-INPUT -j REJECT --reject-with icmp-host-prohibited
COMMIT
- Restart the firewall service:
service iptables restart
Kernel Module/Driver Nuances
Depending on the device you’re wanting to share, there may be a driver installed on XenServer that will become active when you plug in the device and cause conflicts. In my case, I am sharing a Sony USB printer. When I plug in the printer, by default, the usblp driver grabs hold of the device, which is not what I want so I need to disable it. To determine if a driver is activated for a given device, BEFORE PLUGGING IN THE DEVICE, issue the following command:
tail -fn 0 /var/log/messages
This will keep a connection open to the messages file and if anything writes to it the messages will also be posted to your session. In my case, the following messages were displayed when I plugged in the device:
Feb 29 13:48:35 schizo kernel: usb 2-4: new high speed USB device using ehci_hcd and address 5
Feb 29 13:48:35 schizo kernel: usb 2-4: configuration #1 chosen from 1 choice
Feb 29 13:48:36 schizo kernel: usblp0: USB Bidirectional printer dev 5 if 0 alt 0 proto 2 vid 0x054C pid 0x0202
Feb 29 13:48:36 schizo kernel: usbcore: registered new interface driver usblp
After unplugging the device, the usblp driver remains loaded. This is determined by issuing the following command:
lsmod | head
which in my case produced the following output:
[root@schizo ~]# lsmod | head
Module                  Size  Used by
usblp                   9577  0
iptable_filter          1277  1
ip_tables               8497  1 iptable_filter
tusbd                  32182  1
cifs                  210827  4
nfs                   257444  1
nfs_acl                 2153  1 nfs
auth_rpcgss            32640  1 nfs
lockd                  61583  1 nfs
To unload the module, use the rmmod command:
rmmod usblp
To disable the module:
echo blacklist usblp > /etc/modprobe.d/blacklist-usblp
Generically, this would be:
echo blacklist <module name> > /etc/modprobe.d/blacklist-<module name>
Sharing a USB Device from XenServer
Now it’s time to share a USB device with your newly installed USB server. Plug a USB device you want to share into the XenServer, then share it with USB Redirector:
To find the options available to you:
usbsrv
To see the devices attached to the system and their status:
usbsrv -list
Here’s what I get on my server:
[root@schizo usb-redirector-linux-i386]# usbsrv -list

================= USB SERVER OPERATION SUCCESSFUL ===============
List of USB devices:

   1: Virtual Keyboard and Mouse American Megatrends Inc. Composite USB Device
      Vid: 046b   Pid: ff10   Port: 1-3.1
      Status: plugged

   2: UP-D75 Sony USB Printer
      Vid: 054c   Pid: 0202   Port: 2-3
      Status: plugged

===================== ======================= ===================
To share a USB device:
usbsrv -s 2
or
usbsrv -share -vid 054c -pid 0202 -usbport 2-3
Now notice the “shared” status for the Sony printer:
[root@schizo usb-redirector-linux-i386]# usbsrv -list

================= USB SERVER OPERATION SUCCESSFUL ===============
List of USB devices:

   1: Virtual Keyboard and Mouse American Megatrends Inc. Composite USB Device
      Vid: 046b   Pid: ff10   Port: 1-3.1
      Status: plugged

   2: UP-D75 Sony USB Printer
      Vid: 054c   Pid: 0202   Port: 2-3
      Status: plugged, shared

===================== ======================= ===================
Connecting to a Shared Device from a Client
To use the shared device, on a client machine download the client and connect to the shared USB resource. I used Windows and downloaded the USB Redirector Client v5.1. After installing the client, run it.

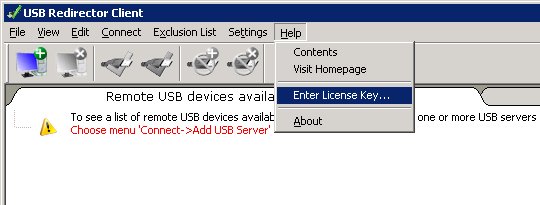
You’ll need to add the license using “Enter License Key…” from the Help menu.

After that you “Add USB Server…” from the Connect menu, using the IP address of the XenServer.

Assuming the server adds properly, you can then click on the USB device and “Connect USB Device” from the Connect menu.
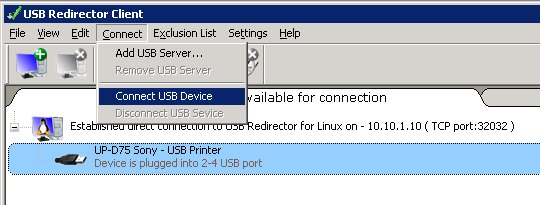
Then your device will be connected and you can install the driver for the device and start using it.

And that’s all there is to it! Good luck!