One of the core tasks when setting up XenDesktop is to integrate it with the existing customer infrastructure, such as the virtualization platform. Following you can find a screenshot of the respective wizard:
When integrating XenDesktop with vSphere or vCenter respectively, you might encounter the following error message:
„Cannot connect to the vCenter server due to a certificate error. Make sure that the appropriate certificates are installed on the vCenter server, and install the appropriate certificates on the same machine that contains all instances of the host service.“
As the error message indicates, XenDesktop is not able to connect to vCenter because it does not trust the server certificate in use. That commonly happens in POC environments where the customer has not replaced the self-signed server certificate, which is added to the vCenter server during installation, with a certificate signed by a trusted internal/external CA.
According to the XenDesktop Admin Guide in Citrix eDocs (http://support.citrix.com/proddocs/topic/xendesktop-7/cds-vmware-rho.html) a simple solution to this challenge is to connect to vCenter using IE, accept the security warning, click on the certificate warning and install the server certificate on the XenDesktop Broker. Unfortunately this does not work in all cases. But luckily there is another option to make it work:
Update for vCenter / vSphere 6: With vCenter 6 the file structure on the vCenter server has been changed and the approach outlined in the blog does not work any longer. Please use the steps outlined within eDocs – Prepare the virtualization environment: VMware to import and trust the default certificate. In my lab environment importing the vCenter certificate directly from within Internet Explorer worked flawlessly. Make sure to import it for the Local Machine and into the Trusted People store.
vCenter / vSphere 5.5
1. Connect to your vCenter server and browse to „C:\ProgramData\VMware\VMware VirtualCenter\SSL“
2. Copy the cacert.pem file to your XenDesktop Broker (to the C:\Temp directory for example)
3. Open a Microsoft Management Console (by running the mmc.exe command) as an Administrator
4. Add the Certificates Snap-In and select to manage certificates for the local computer account.
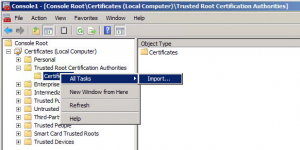
5. Browse to „Trusted Root Certification Authorities“ and select Import
6. Import the cacert.pem file. (You need to select „All Files“ from the dropdown menu in the lower right hand corner, to be able to see it)
7. Now you should be able to see the vCenter certificate in the list of trusted certificates and XenDesktop should connect to vCenter without any error message.
Obviously there are good reasons for not using self-signed certificates in production environments, so you should use the aforementioned technique for POC environments only. For all other cases go and get a proper server certificate.
-Thomas
Follow me on Twitter @tberger80


